Product Management
Product Management is the foundation of your Bizaldo system. A well-organized catalog enables fast order entry, accurate inventory tracking, and clear reporting.
Where to find it: In the left sidebar, click Inventory then click Products.
Product View
The Product tab provides a quick glance at the health of your product catalog through Key Performance Indicators (KPIs).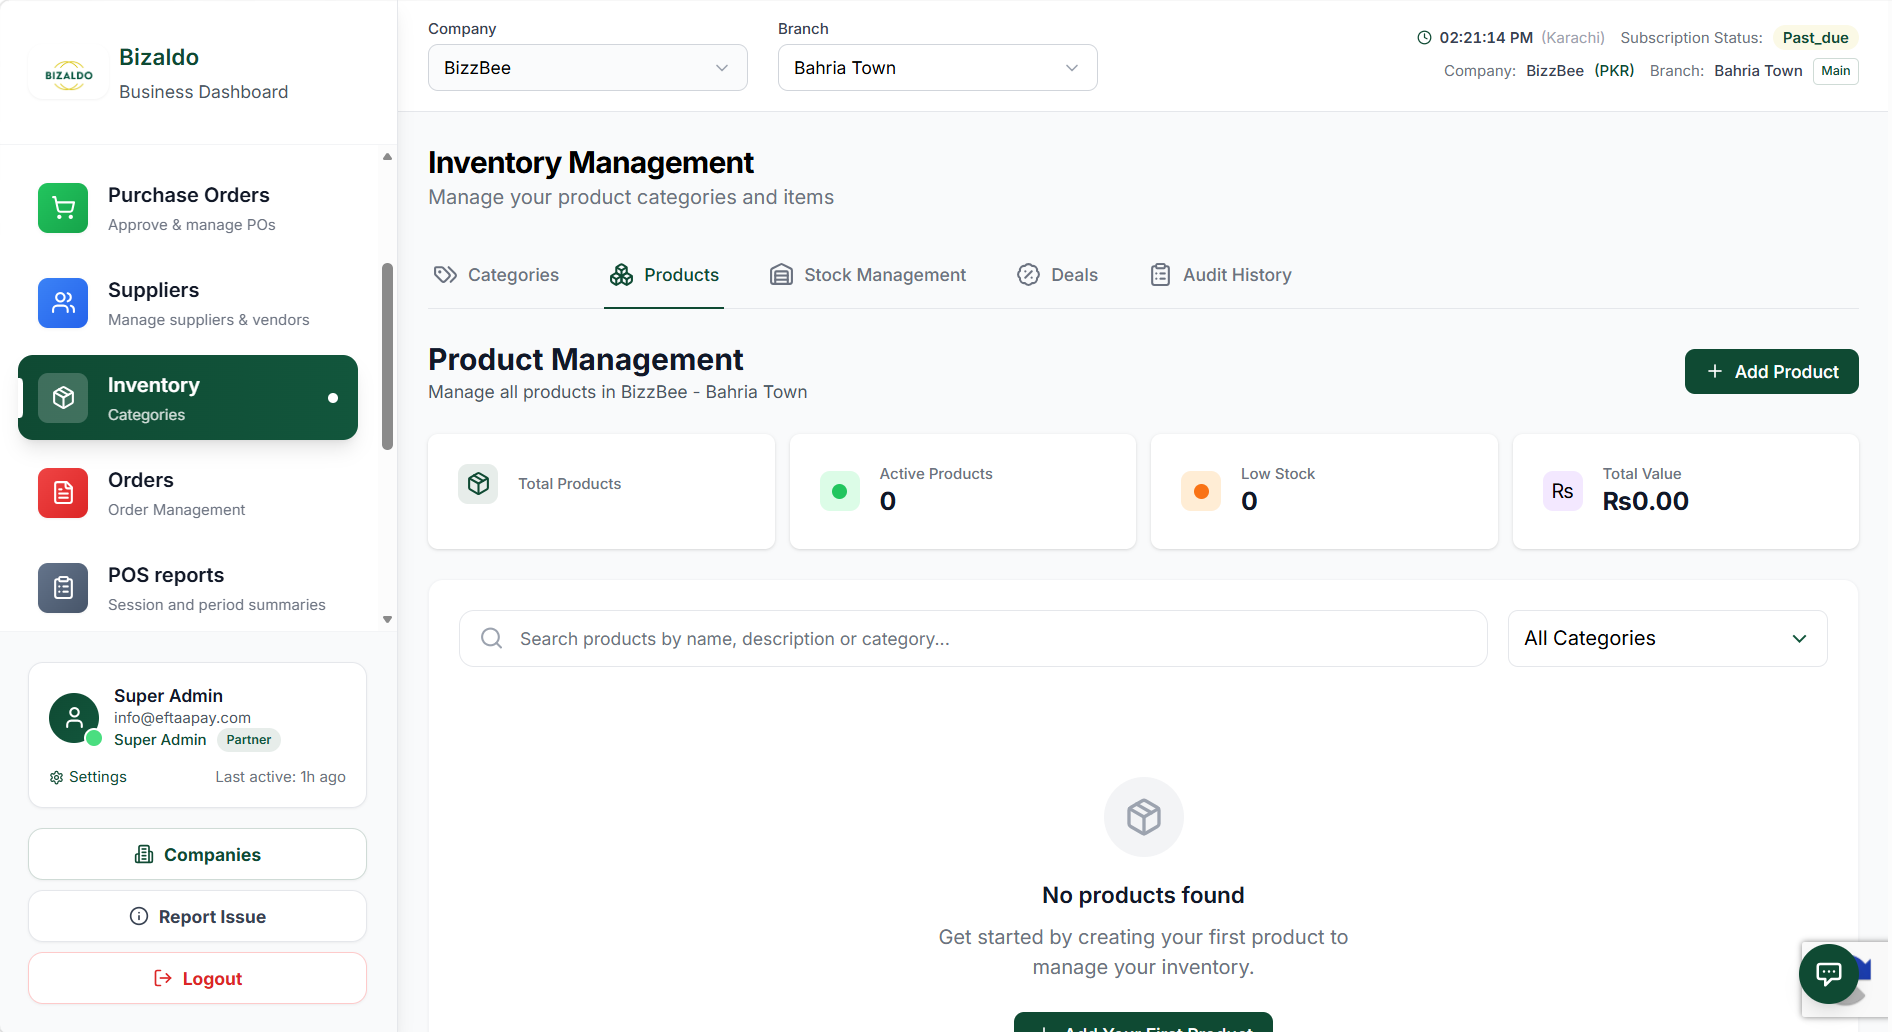 1234
1234Product KPIs displayed on the Inventory Management dashboard.
Screen Elements
The total number of products in your catalog.
The number of products currently active and available for sale.
The number of products that have fallen below their minimum stock threshold.
The total monetary value of your current product inventory.
Product Structure
Key Attributes
Every product in Bizaldo has:| Attribute | Purpose | Example |
|---|---|---|
| Name | Display name | "Margherita Pizza" |
| SKU | Unique identifier | "PIZ-001" |
| Category | Organization group | "Main Courses" |
| Price | Unit selling price | $12.99 |
| Cost | Unit cost (optional) | $4.50 |
| VAT % | Tax rate applied | 8% |
| Unit | Measurement unit | "pcs", "kg", "liter" |
| Barcode | Scanning code (optional) | "123456789012" |
| Description | Detailed info | "Classic tomato and mozzarella" |
| Image | Visual reference | pizza.jpg |
| Available | Active/inactive | Yes/No |
| Add-on | Can be used as add-on ingredient | Yes/No |
Categories
Categories organize your catalog for POS navigation and reporting.Where to find it: In the left sidebar, click Inventory then click Categories.
Category Structure
Menu
├── Beverages
│   ├── Hot Drinks
│   ├── Cold Drinks
│   └── Alcoholic
├── Food
│   ├── Starters
│   ├── Main Courses
│   │   ├── Pizza
│   │   ├── Pasta
│   │   └── Grill
│   └── Desserts
└── Retail
    ├── Merchandise
    └── Ingredients
Creating Categories
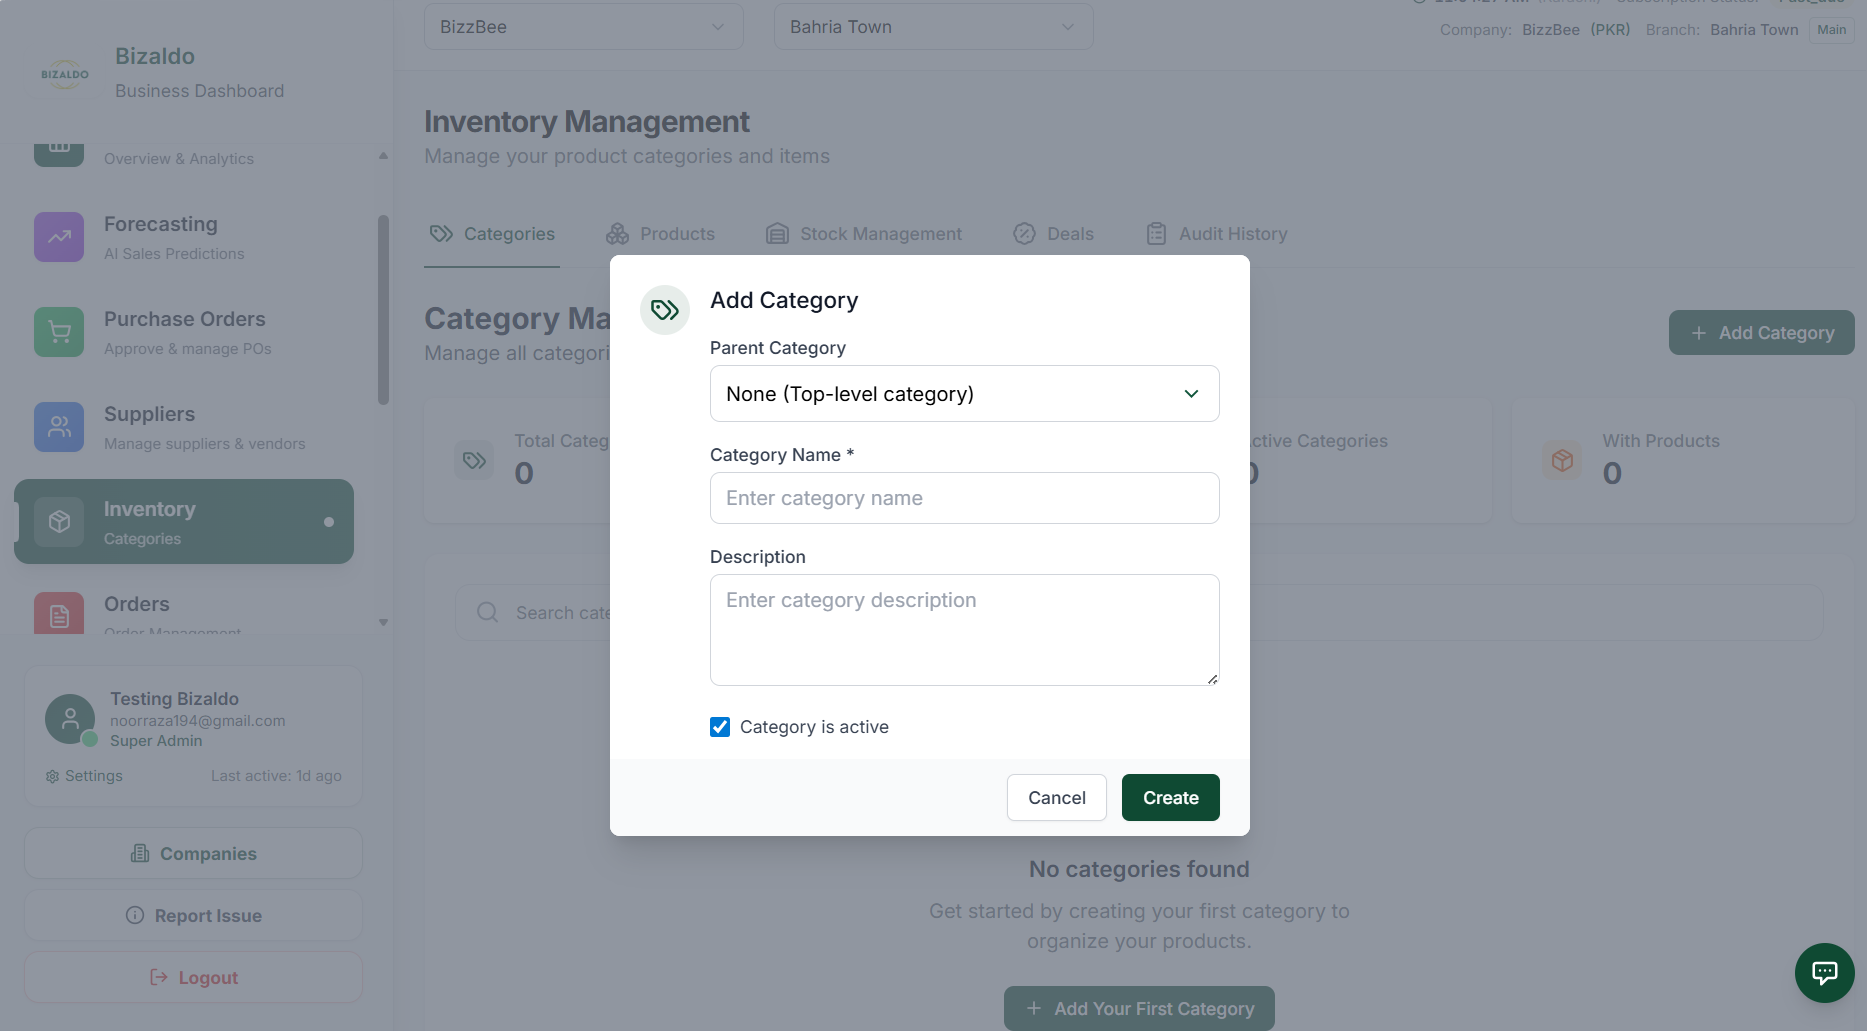
- Navigate to Inventory → Categories
- Click "Add Category"
-
Enter:
- Name — Display name
- Parent — Optional subcategory relationship
- Description — Internal notes
- Available — Active/inactive
- Click "Create"
 1234567
Category creation form with key fields highlighted
Screen Elements
Navigate to Inventory → Categories to access the category management section.
Click this button to create a new category.
Enter the display name for the category that will appear in the POS.
Select a parent category to create a subcategory relationship.
Add internal notes about this category for your team.
Enable or disable the category in the POS system.
Click to save the new category and add it to your catalog.
Best Practice: Limit top-level categories to 6-8 for easy POS navigation. Use subcategories for detailed organization.
Creating Products
Step-by-Step
Basic Information
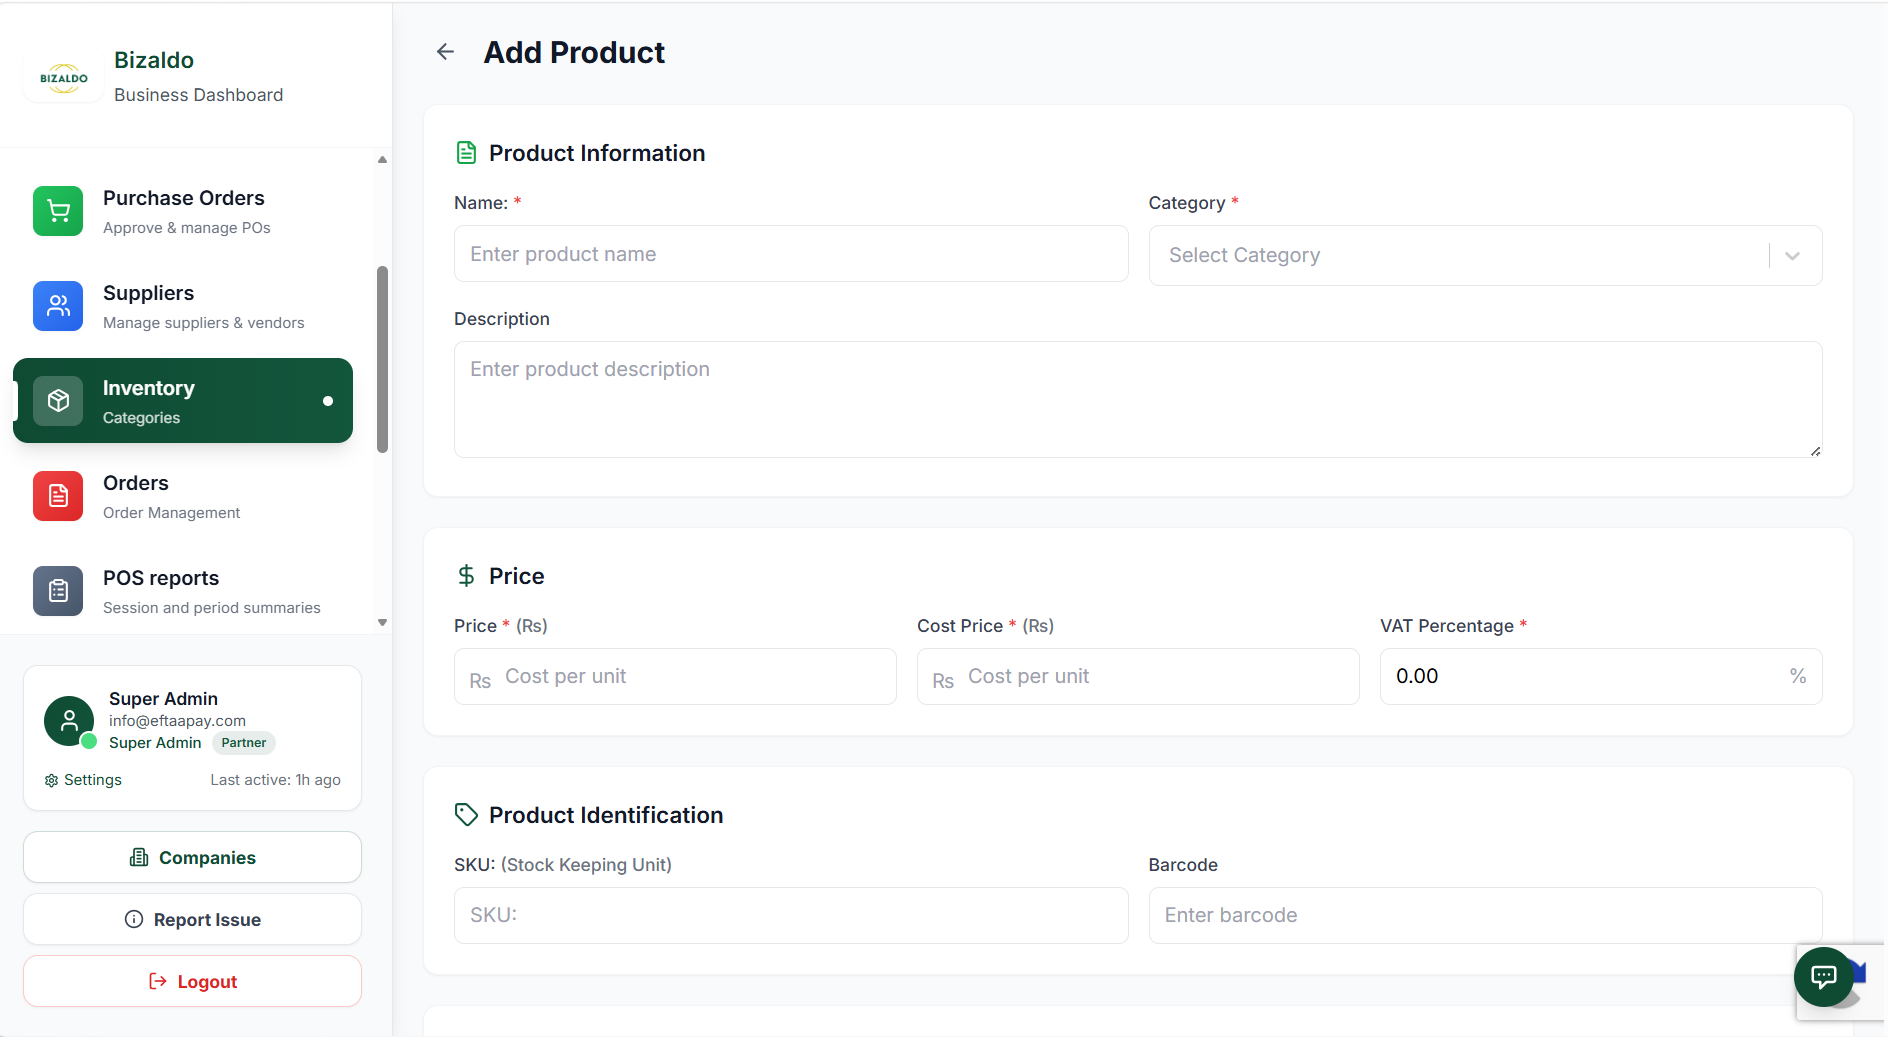
- Name — Customer-facing name (keep concise for POS buttons)
- SKU — Unique stock keeping unit (e.g., "BEV-COF-001")
- Category — Select from dropdown
- Description — Detailed description for online ordering
 1234
1234Basic information fields for creating a new product
Screen Elements
Enter the customer-facing product name that will appear on POS buttons.
Unique stock keeping unit identifier for inventory tracking.
Select the category to organize this product in the POS.
Add detailed description for online ordering and customer reference.
Pricing
- Unit Price — Selling price before tax
- Cost Price — What you pay (optional, for margin analysis)
- VAT Percentage — Tax rate (configured per product or inherited)
Pricing with VAT:
Unit Price: $10.00
VAT (8%):    $0.80
Total: $10.80 (customer pays)Pricing configuration fields for the product
Screen Elements
Enter the selling price before tax.
Enter what you pay for this product (optional, for margin analysis).
Set the tax rate for this product or inherit from category.
Inventory Settings
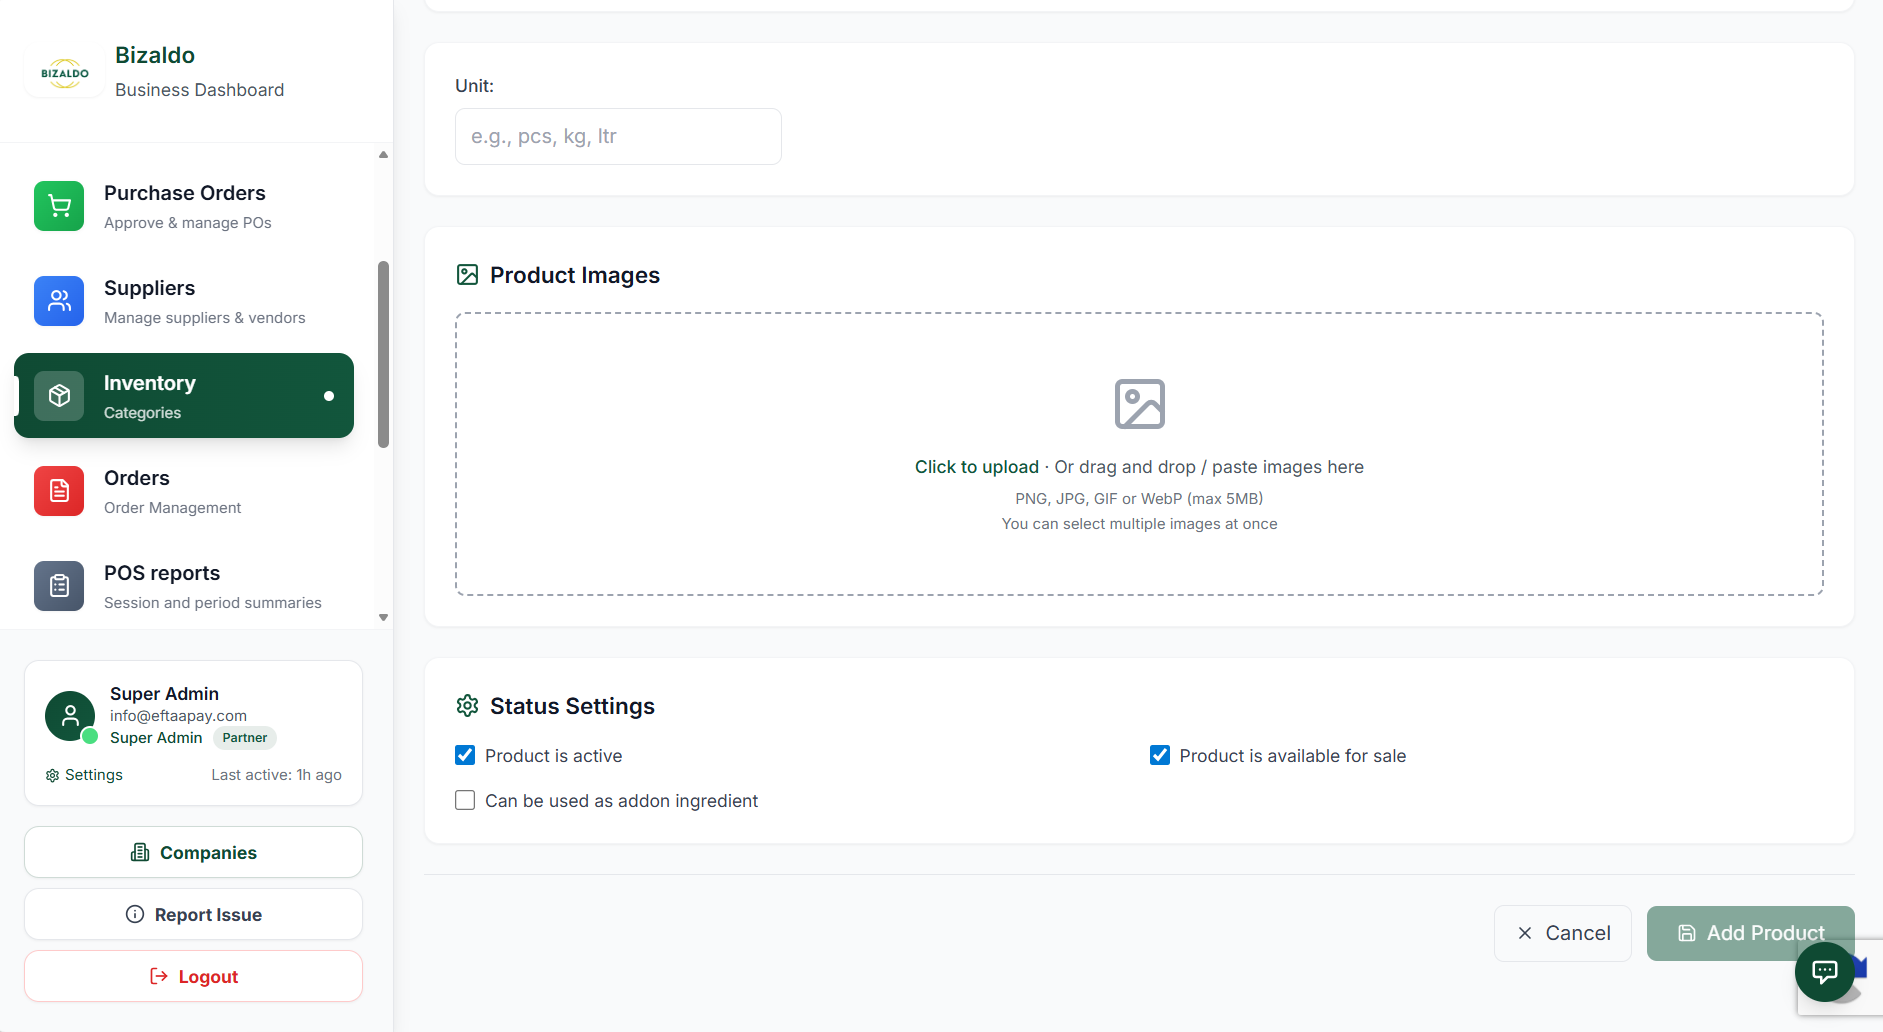
- Unit — Pieces, kg, liters, etc.
- Track Inventory — Yes/No
- Barcode — For scanning (optional)
- Active — Show in POS And Online
- Available — Available for Sale in POS
- Add-On — Can be Used as Add-On Ingredient for Other Products
 123
123Product availability and visibility settings
Screen Elements
Toggle to activate or deactivate/hide the product in POS and online ordering.
Make product available for in-store, and online ordering.
Make product available to be used as add-on ingredient for other products.
Variants, Add-ons, and Combos
Introduction
This guide explains four powerful product configuration features in Bizaldo POS: Variants define different versions of the same product. For example, a pizza can have variants like Small, Medium, and Large. Each variant represents a different size or type of the same base product. Add-ons are optional extras that customers can add to a product. For example, a burger can have add-ons like Extra Cheese, Bacon, or Sauce. Add-ons enhance the base product without changing its fundamental nature. Combos bundle multiple products together at a fixed price. For example, a "Make it a Meal" combo might include a Burger, Fries, and Drink. Combos simplify ordering by grouping related items. Deals are fixed bundles of specific products with set quantities, offered at a special deal price. They are perfect for promotions where the customer gets a predefined set of items. The key difference between these features:- Variants change the version of a product (different sizes, flavors)
- Add-ons add extras to a product (additional toppings, sides)
- Combos bundle multiple products together with choices (meal deals, packages)
- Deals bundle specific, fixed products together at a promotional price
VARIANTS
What Are Variants?
Variants define different versions of the same product. Instead of creating separate products for each version, you create one base product and add variants to it.Example:
- Pizza → Small, Medium, Large
- Coffee → Tall, Grande, Venti
- Burger → Single, Double, TripleStep 1: Add Variant Group
A variant group is a category of variants. For example, "Size" is a variant group that contains Small, Medium, and Large options.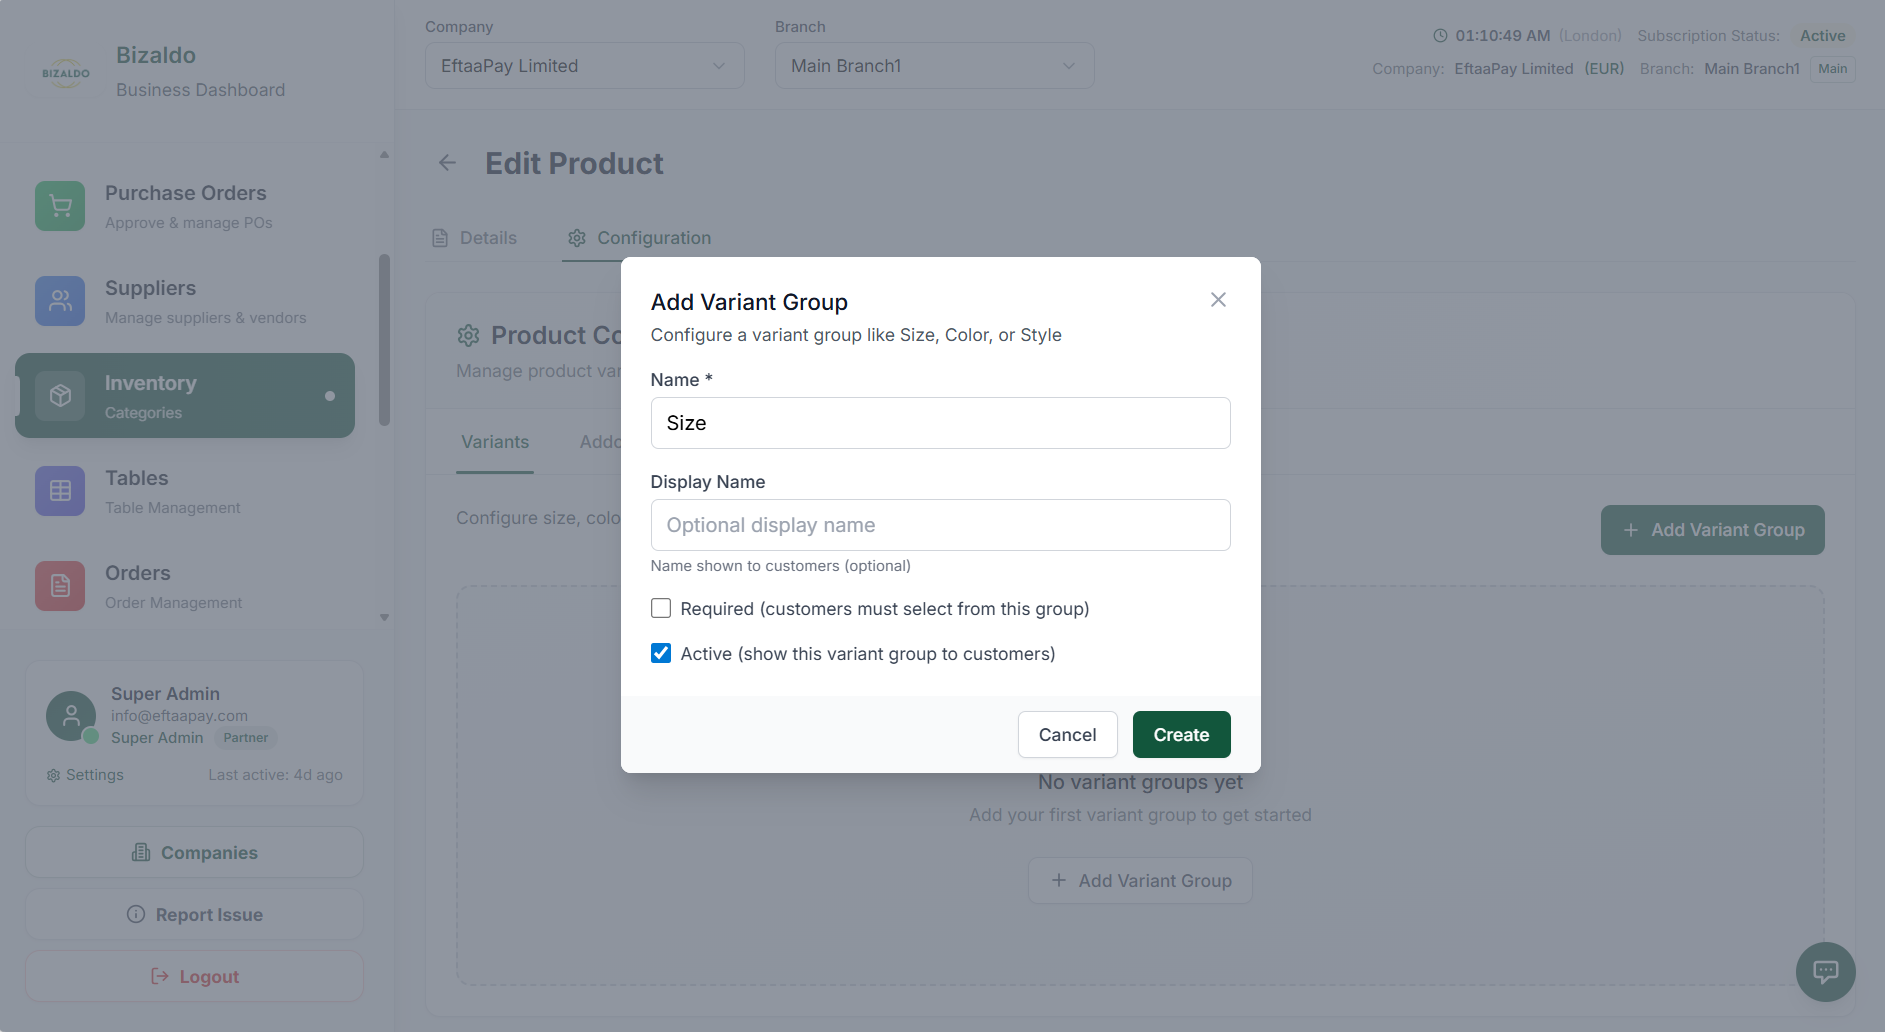 123456
Create a new variant group to organize product variants
Screen Elements
Internal identifier for the variant group (e.g., 'size').
Customer-facing name shown in POS (e.g., 'Size').
Mark if customers must select a variant from this group.
Enable or disable this variant group in the POS.
Save the variant group and add it to the product.
Discard changes and close the modal.
When to mark Required: Mark a variant as required when customers must choose one option. For example, pizza size is typically required because every pizza needs a size.
When to keep Active: Keep the variant group active when it should appear in the POS. Deactivate it temporarily if you plan to remove it but want to keep the data.
Step 2: Add Variant Option
After creating a variant group, add the specific options (variants) within that group.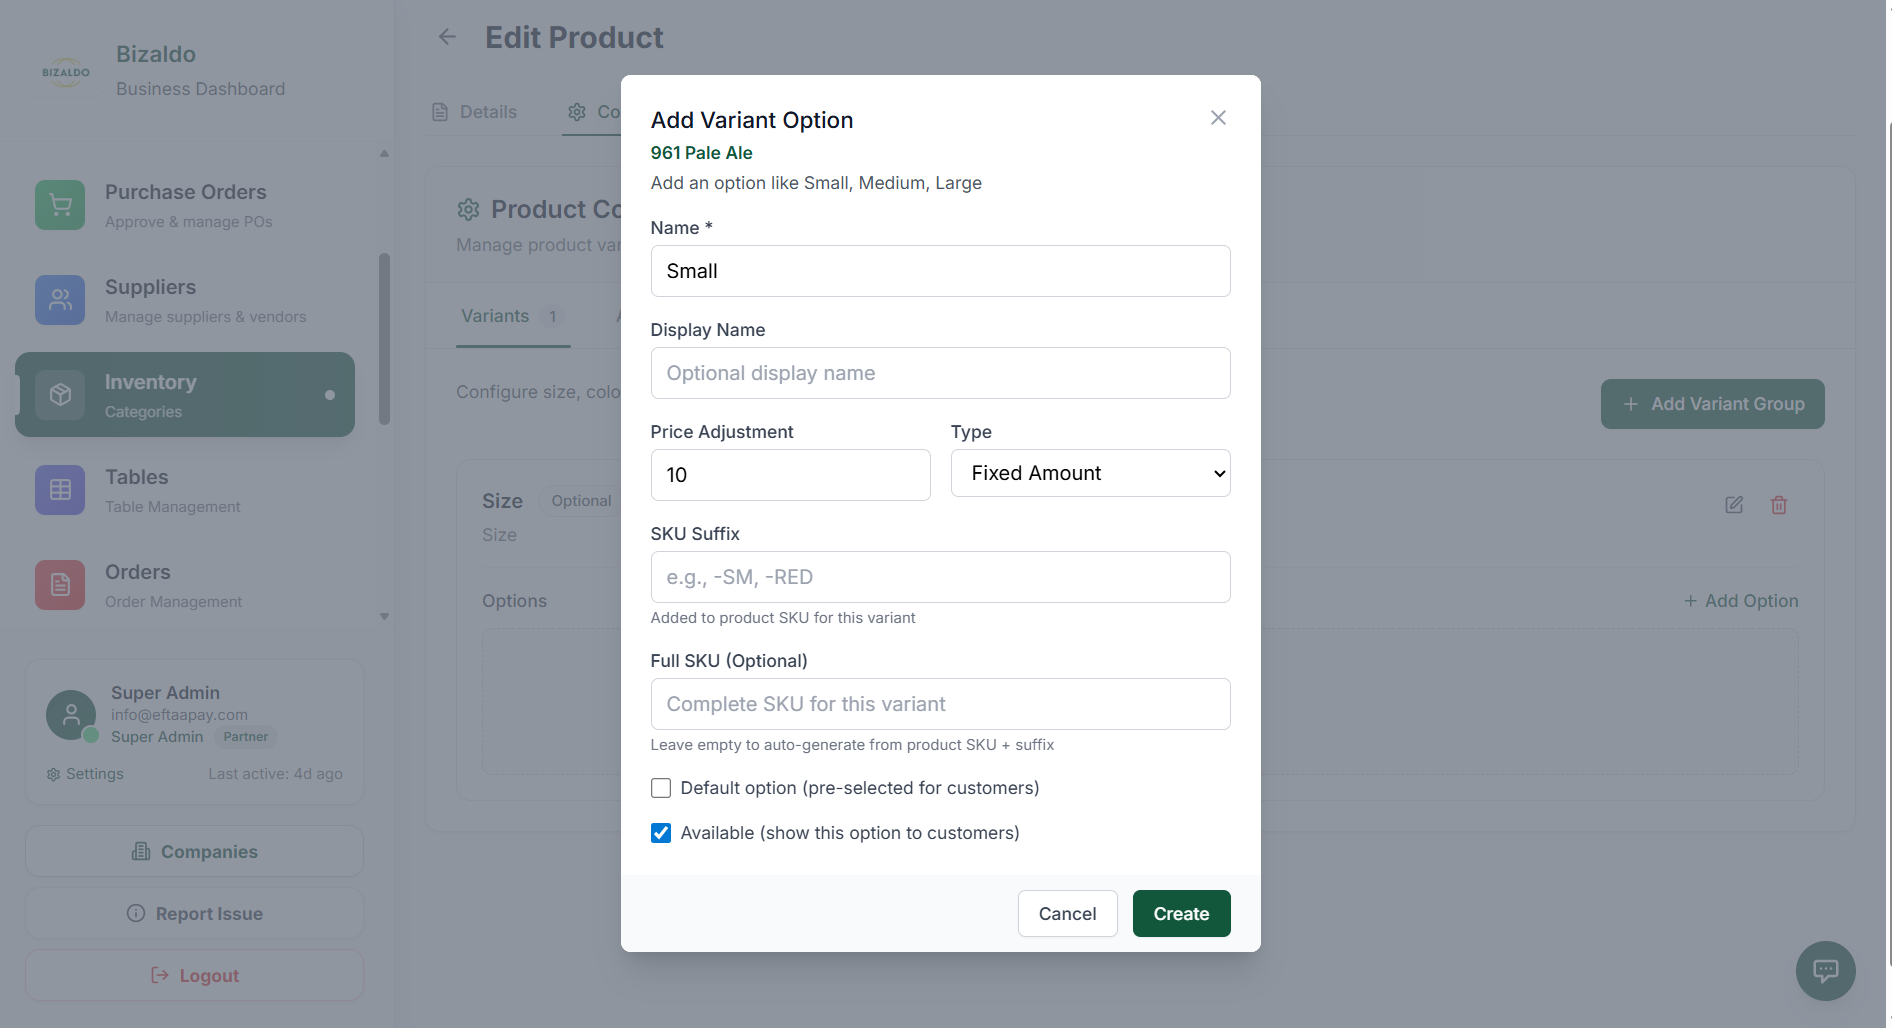 123456789
Add specific variant options within the variant group
Screen Elements
Internal identifier for this variant (e.g., 'small').
Customer-facing name shown in POS (e.g., 'Small').
Amount to add or subtract from base price.
Choose between fixed amount or percentage adjustment.
Text appended to base SKU for this variant.
Complete SKU for this specific variant.
Set as the default selection for this variant group.
Enable or disable this specific variant.
Save the variant option.
How Price Adjustment Works: Price adjustments can be positive or negative. For example: - Small pizza: -$2 (base price minus $2) - Large pizza: +$3 (base price plus $3) - Medium pizza: $0 (no adjustment, base price)
How SKU Suffix Works: The SKU suffix is appended to the base product SKU. For example: - Base SKU: PIZ-001 - Small variant suffix: -S - Full SKU: PIZ-001-S This creates unique SKUs for inventory tracking while maintaining a logical relationship to the base product.
When to Set a Default Option: Set a default option when most customers choose that variant. For example, Medium might be the default pizza size. This speeds up ordering by pre-selecting the most common choice.
Practical Example:
For a coffee product:
- Base SKU: COF-001, Base Price: $3.00
- Variant Group: Size
- Small: -$0.50, SKU Suffix: -S, Full SKU: COF-001-S, Price: $2.50
- Medium: $0.00, SKU Suffix: -M, Full SKU: COF-001-M, Price: $3.00 (Default)
- Large: +$1.00, SKU Suffix: -L, Full SKU: COF-001-L, Price: $4.00
ADD-ONS
What Are Add-ons?
Add-ons are optional extras that customers can add to a product. Unlike variants, which change the version of a product, add-ons enhance the base product with additional items.Example:
- Burger → Extra Cheese, Bacon, Sauce
- Pizza → Extra Toppings, Stuffed Crust
- Salad → Extra Dressing, CroutonsDifference from Variants: Variants change the fundamental version of a product (size, flavor). Add-ons add extras without changing the core product. A customer can choose multiple add-ons but typically only one variant per group.
Step 1: Add Addon Group
An addon group is a category of add-ons. For example, "Burger Toppings" is an addon group that contains Extra Cheese, Bacon, and Sauce.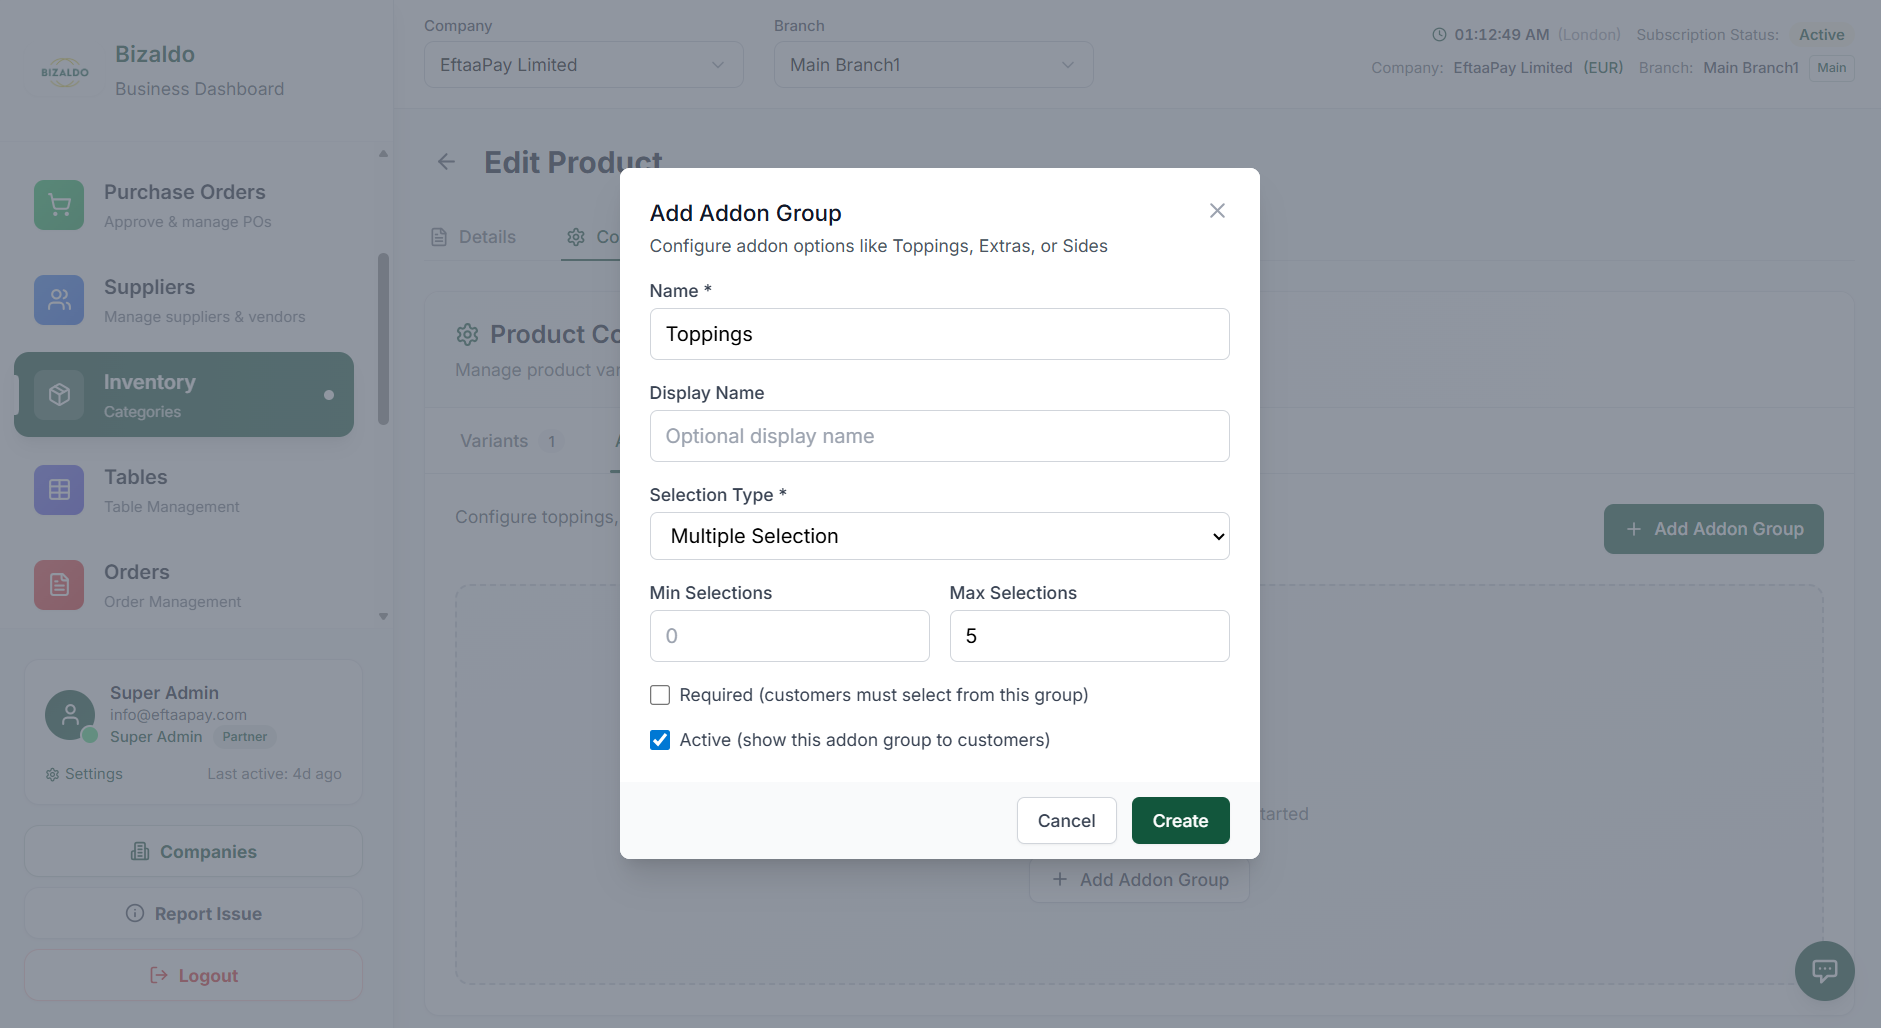 12345678
Create a new addon group to organize product add-ons
Screen Elements
Internal identifier for the addon group (e.g., 'burger_toppings').
Customer-facing name shown in POS (e.g., 'Burger Toppings').
Choose single or multiple selection.
Minimum number of add-ons customer must select.
Maximum number of add-ons customer can select.
Mark if customers must select add-ons from this group.
Enable or disable this addon group in the POS.
Save the addon group.
Single vs Multiple Selection: - Single selection: Customer can choose only one add-on from the group (e.g., choose one sauce) - Multiple selection: Customer can choose multiple add-ons (e.g., choose multiple toppings)
How Min and Max Selections Work: - Min Selections: Ensures customers select at least this many add-ons. Set to 0 for optional. - Max Selections: Limits how many add-ons customers can choose. Set to 0 for unlimited. Example: For pizza toppings, you might set Min: 0, Max: 5. This allows 0 to 5 toppings.
Step 2: Add Addon Option
After creating an addon group, add the specific add-on options within that group.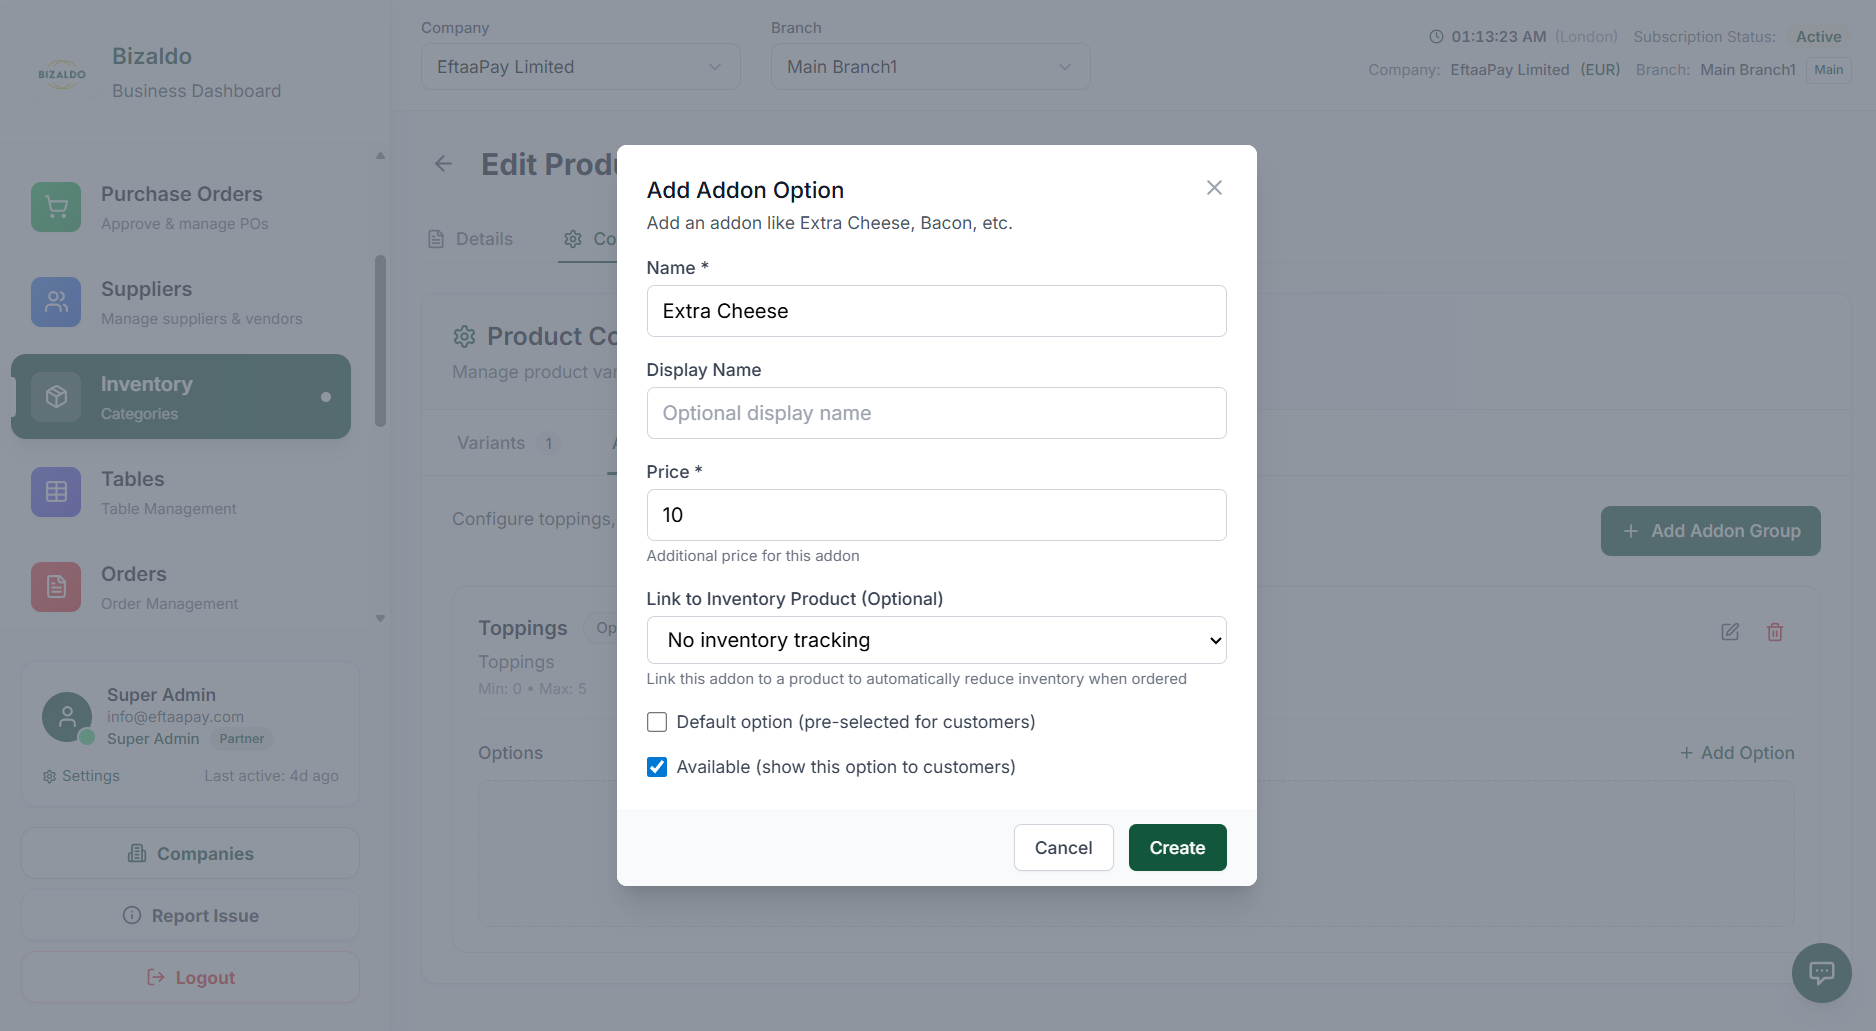 1234567
Add specific addon options within the addon group
Screen Elements
Internal identifier for this add-on (e.g., 'extra_cheese').
Customer-facing name shown in POS (e.g., 'Extra Cheese').
Fixed price for this add-on.
Connect to an inventory product for stock tracking.
Set as default selection for this addon group.
Enable or disable this specific add-on.
Save the addon option.
How Add-on Pricing Works: Add-ons have a fixed price that is added to the base product price. For example: - Burger base price: $8.00 - Extra Cheese add-on: +$1.50 - Total: $9.50 Unlike variants, add-on prices are always added to the base price, not adjusted from it.
How Inventory Linking Works: Linking an add-on to an inventory product enables stock tracking. For example, if you link "Extra Cheese" to an inventory item, the system will track cheese usage and alert you when stock is low.
When to Use Default Option: Set a default add-on when most customers choose it. For example, "Regular Sauce" might be the default for burgers. This speeds up ordering by pre-selecting the most common choice.
Practical Example:
For a burger product:
- Addon Group: Burger Toppings
- Selection Type: Multiple
- Min Selections: 0, Max Selections: 5
- Addon Options:
  - Extra Cheese: $1.50, Linked to inventory
  - Bacon: $2.00, Linked to inventory
  - Sauce: $0.50, Default option
  - Onions: $0.00, Free add-on
COMBOS
What Are Combos?
Combos bundle multiple products together at a fixed price. Customers get a set of items for one price instead of purchasing each item separately.Example:
- Make it a Meal: Burger + Fries + Drink for $12.00
- Breakfast Combo: Coffee + Pastry + Juice for $8.00
- Family Pack: 2 Large Pizzas + 2 Drinks + Dessert for $35.00Difference from Variants and Add-ons: - Variants modify the base product (size, flavor) - Add-ons enhance the base product (extras, toppings) - Combos bundle multiple products together (meals, packages) Combos simplify ordering by grouping related items and often offer better value than purchasing items separately.
Step 1: Open Combos Tab
The Combos tab is where you create and manage all combo products in your catalog.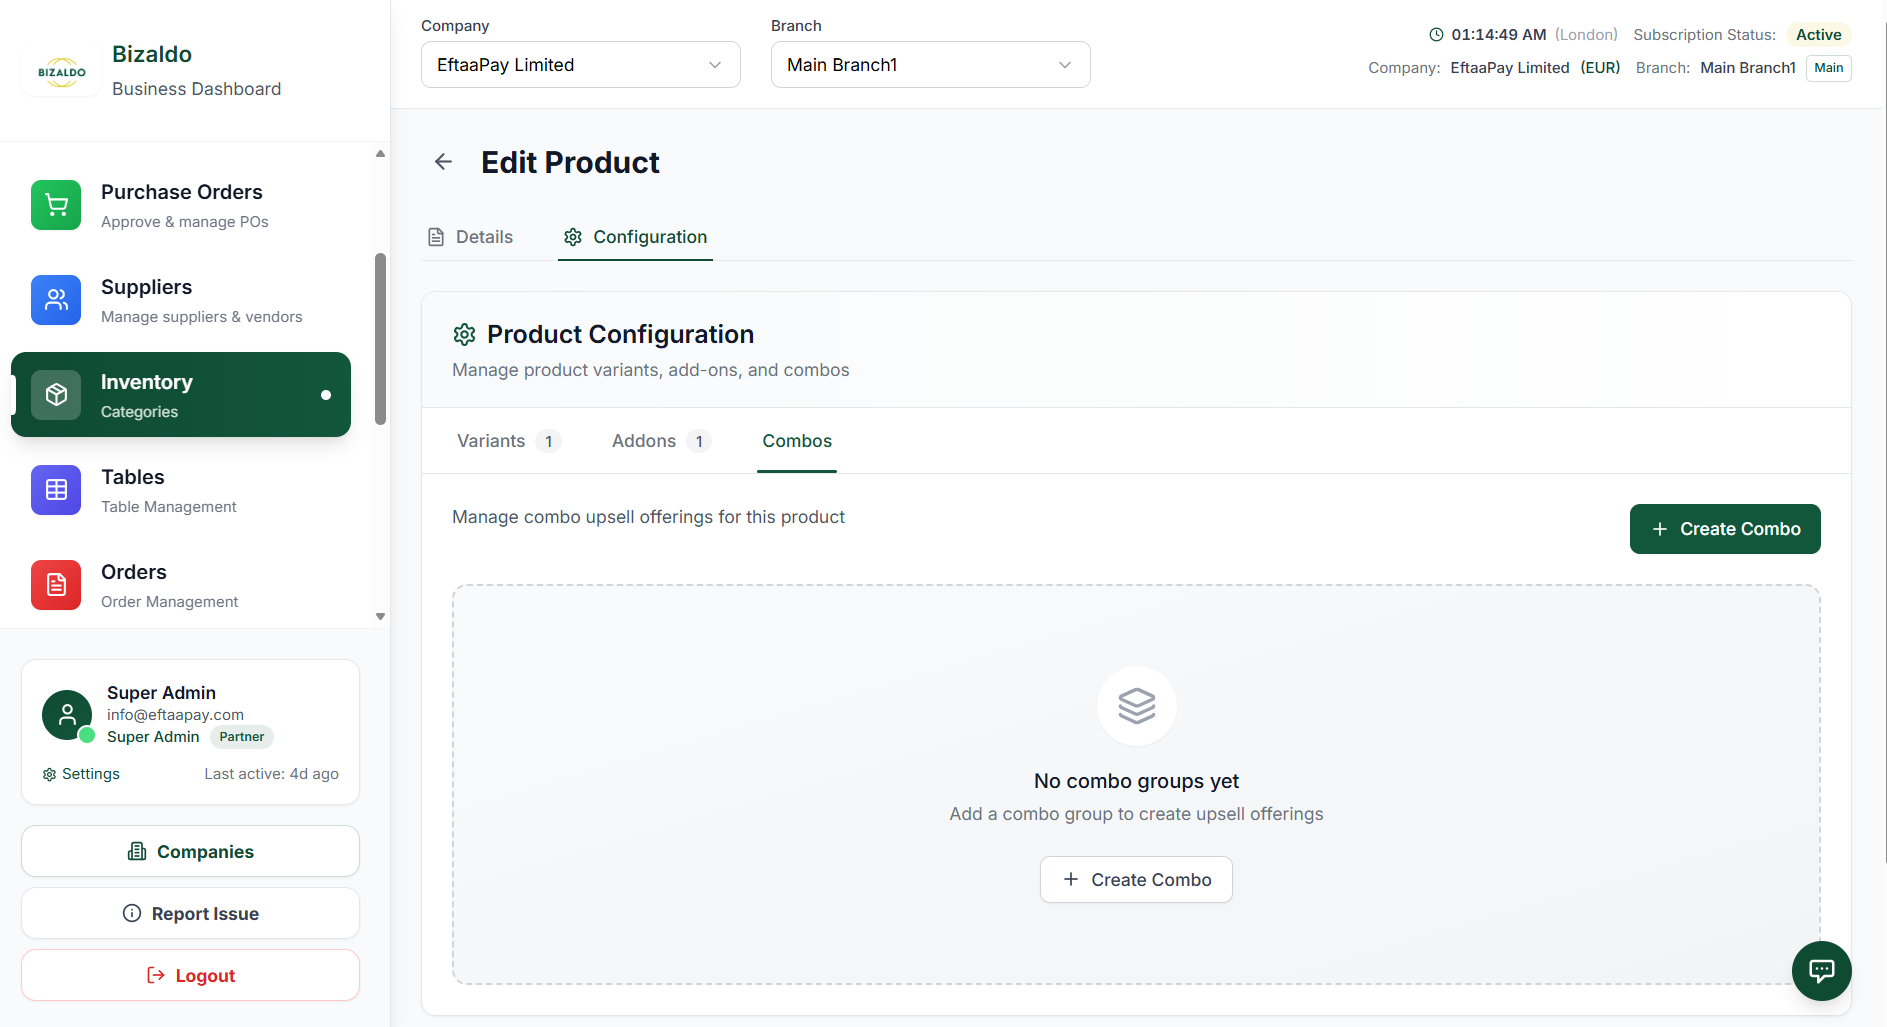 123
123Access the Combos section to create and manage combo products
Screen Elements
Navigate to this tab to access combo management.
Click to create a new combo product.
Message shown when no combos exist yet.
Step 2: Create Combo
Click the "Create Combo" button to open the combo creation modal where you define the combo details.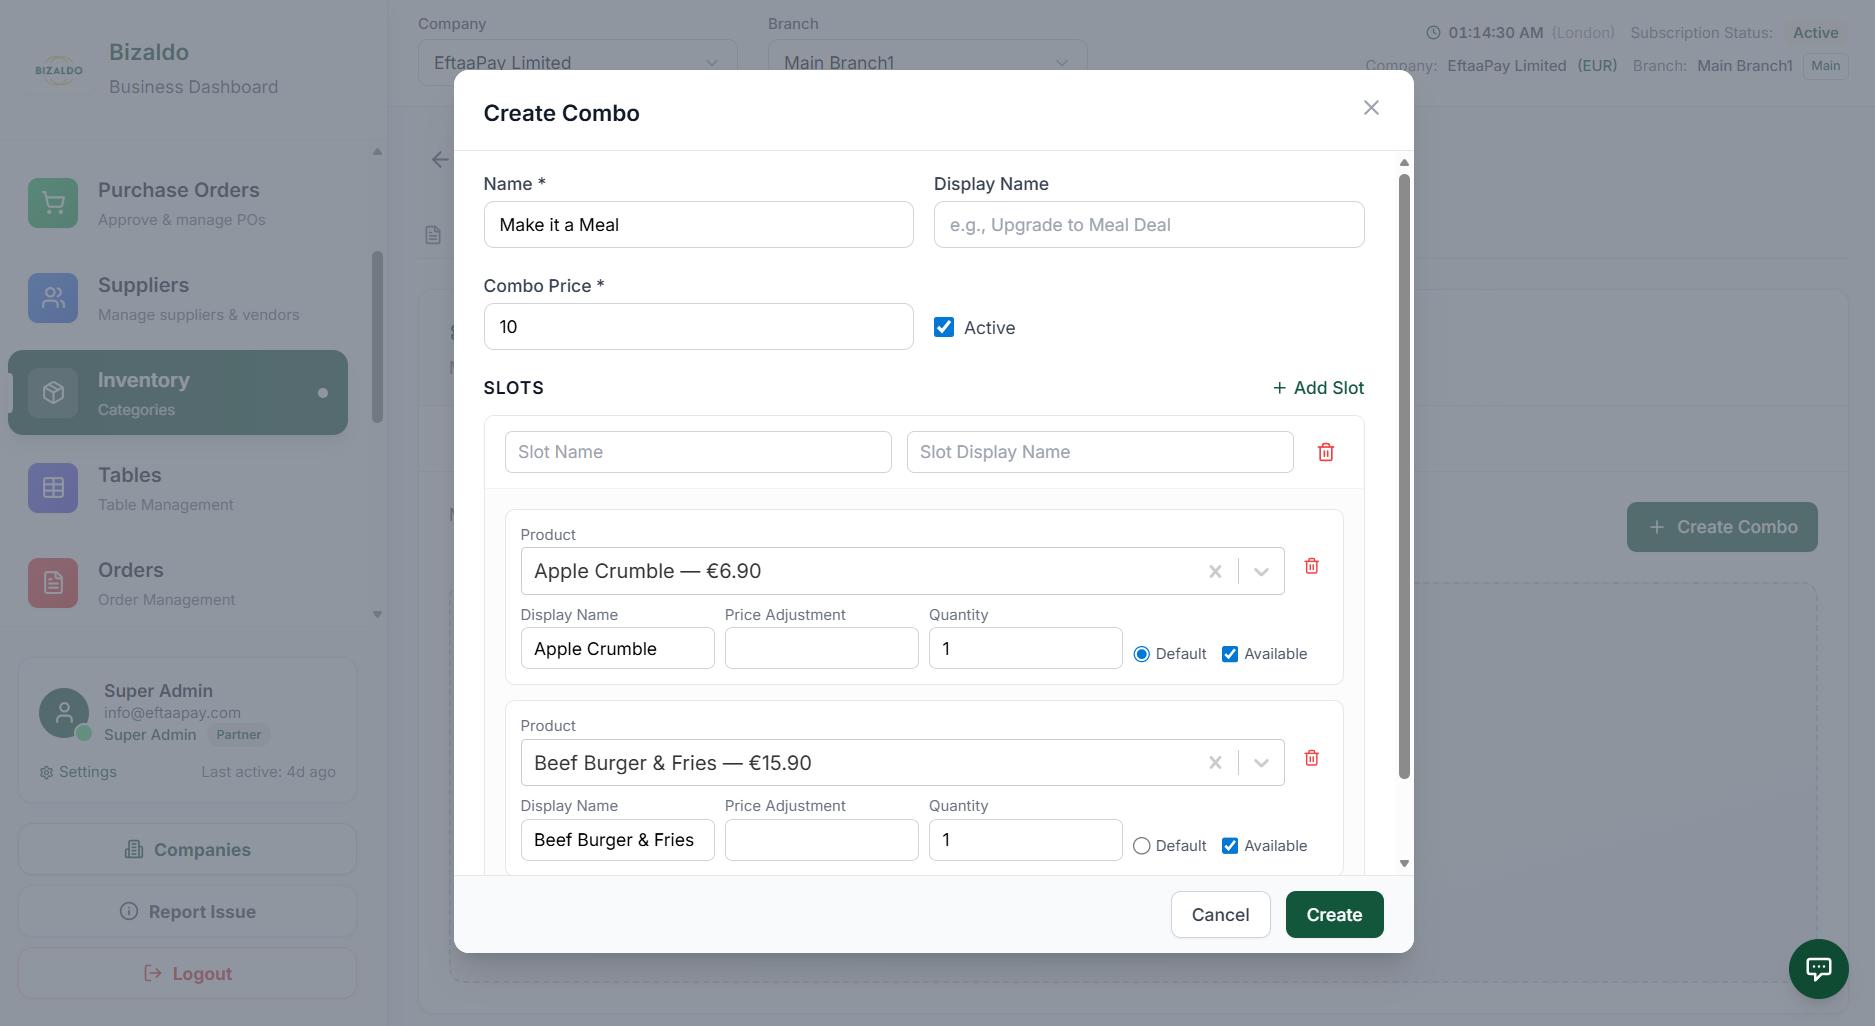 1234567
Define combo details including name, price, and slots
Screen Elements
Internal identifier for the combo (e.g., 'meal_deal_1').
Customer-facing name shown in POS (e.g., 'Make it a Meal').
Fixed price for the entire combo.
Enable or disable this combo in the POS.
Add a new slot to the combo (e.g., Main, Side, Drink).
Save the combo configuration.
Discard changes and close the modal.
How Combo Pricing Works: The combo price is a fixed price that replaces individual product pricing when the combo is selected. For example: - Individual prices: Burger $8 + Fries $3 + Drink $2 = $13 - Combo price: $12 - Customer saves: $1 The combo price applies regardless of which specific products customers choose within each slot (unless you add price adjustments).
Step 3: Configure Slots
A slot represents one required group inside the combo. Each slot contains a set of products that customers can choose from.Example slots for a "Make it a Meal" combo:
- Main: Burger, Chicken Sandwich, Salad
- Side: Fries, Onion Rings, Coleslaw
- Drink: Soda, Water, JuiceWhy Slots Are Needed: Slots organize the combo into logical groups. This ensures customers select one item from each required category. Without slots, customers could choose any combination of products, which might not make sense for your business.
Step 4: Add Products to Slot
After creating slots, add products to each slot. Customers will choose one product from each slot when ordering the combo.1234567Configure products within each combo slot
Screen Elements
Search and select products to add to this slot.
Customer-facing name for this product in the combo.
Adjust price for this specific product within the combo.
Number of this product included in the combo.
Set as default selection for this slot.
Enable or disable this product in the slot.
Remove this product from the slot.
How Price Adjustment Works Inside Combos: Price adjustments modify the combo base price for specific product choices. For example: - Combo base price: $12 - Burger: $0 adjustment (included in base price) - Premium Burger: +$2 adjustment (total $14) - Chicken Sandwich: -$1 adjustment (total $11) This allows you to offer different pricing tiers within the same combo.
How Default Selection Speeds Up Checkout: Setting a default product in each slot pre-selects the most common choice. For example, if most customers choose Burger over Chicken Sandwich, set Burger as default. Cashiers can still change the selection, but the default speeds up typical orders.
Practical Example:
For a "Make it a Meal" combo:
- Combo Price: $12.00
- Slot 1: Main (Default: Burger)
  - Burger: $0 adjustment
  - Chicken Sandwich: +$1 adjustment
  - Salad: -$1 adjustment
- Slot 2: Side (Default: Fries)
  - Fries: $0 adjustment
  - Onion Rings: +$0.50 adjustment
- Slot 3: Drink (Default: Soda)
  - Soda: $0 adjustment
  - Water: -$0.50 adjustment
  - Juice: +$0.50 adjustment
DEALS
What Are Deals?
Deals allow you to bundle specific products together and offer them at a special deal price. They are perfect for special offers, promotions, and fixed bundles.Where to find it: In the left sidebar, click Inventory then click Deals.
Example:
- Beer Bundle: 6x Pale Ale for €10.00
- Party Pack: 10x Burgers + 10x Fries for €50.00
Difference from Combos: - Combos offer choices within slots (e.g., choose 1 Drink, 1 Main). - Deals are fixed bundles with specific quantities (e.g., exactly 6 Pale Ales).
Step 1: Open Deals Tab
The Deals tab inside the Inventory Management section is where you manage deal bundles and special offers. Review the Deals Key Performance Indicators (KPIs): - Total Deals — The total number of deals created in the system - Available Deals — The number of deals currently active and available to customers - Inactive Deals — The number of deals currently disabled or hidden - Total Available Value — The combined monetary value of your active deals The deals data table displays: - NAME — The display name of the deal bundle - DEAL PRICE — The promotional price the customer pays - ORIGINAL PRICE — The reference price of all included items (shown with strikethrough) - CATEGORY — The category the deal belongs to - AVAILABLE — Status badge indicating active or inactive state - ACTIONS — Quick actions to View, Edit, or Delete the deal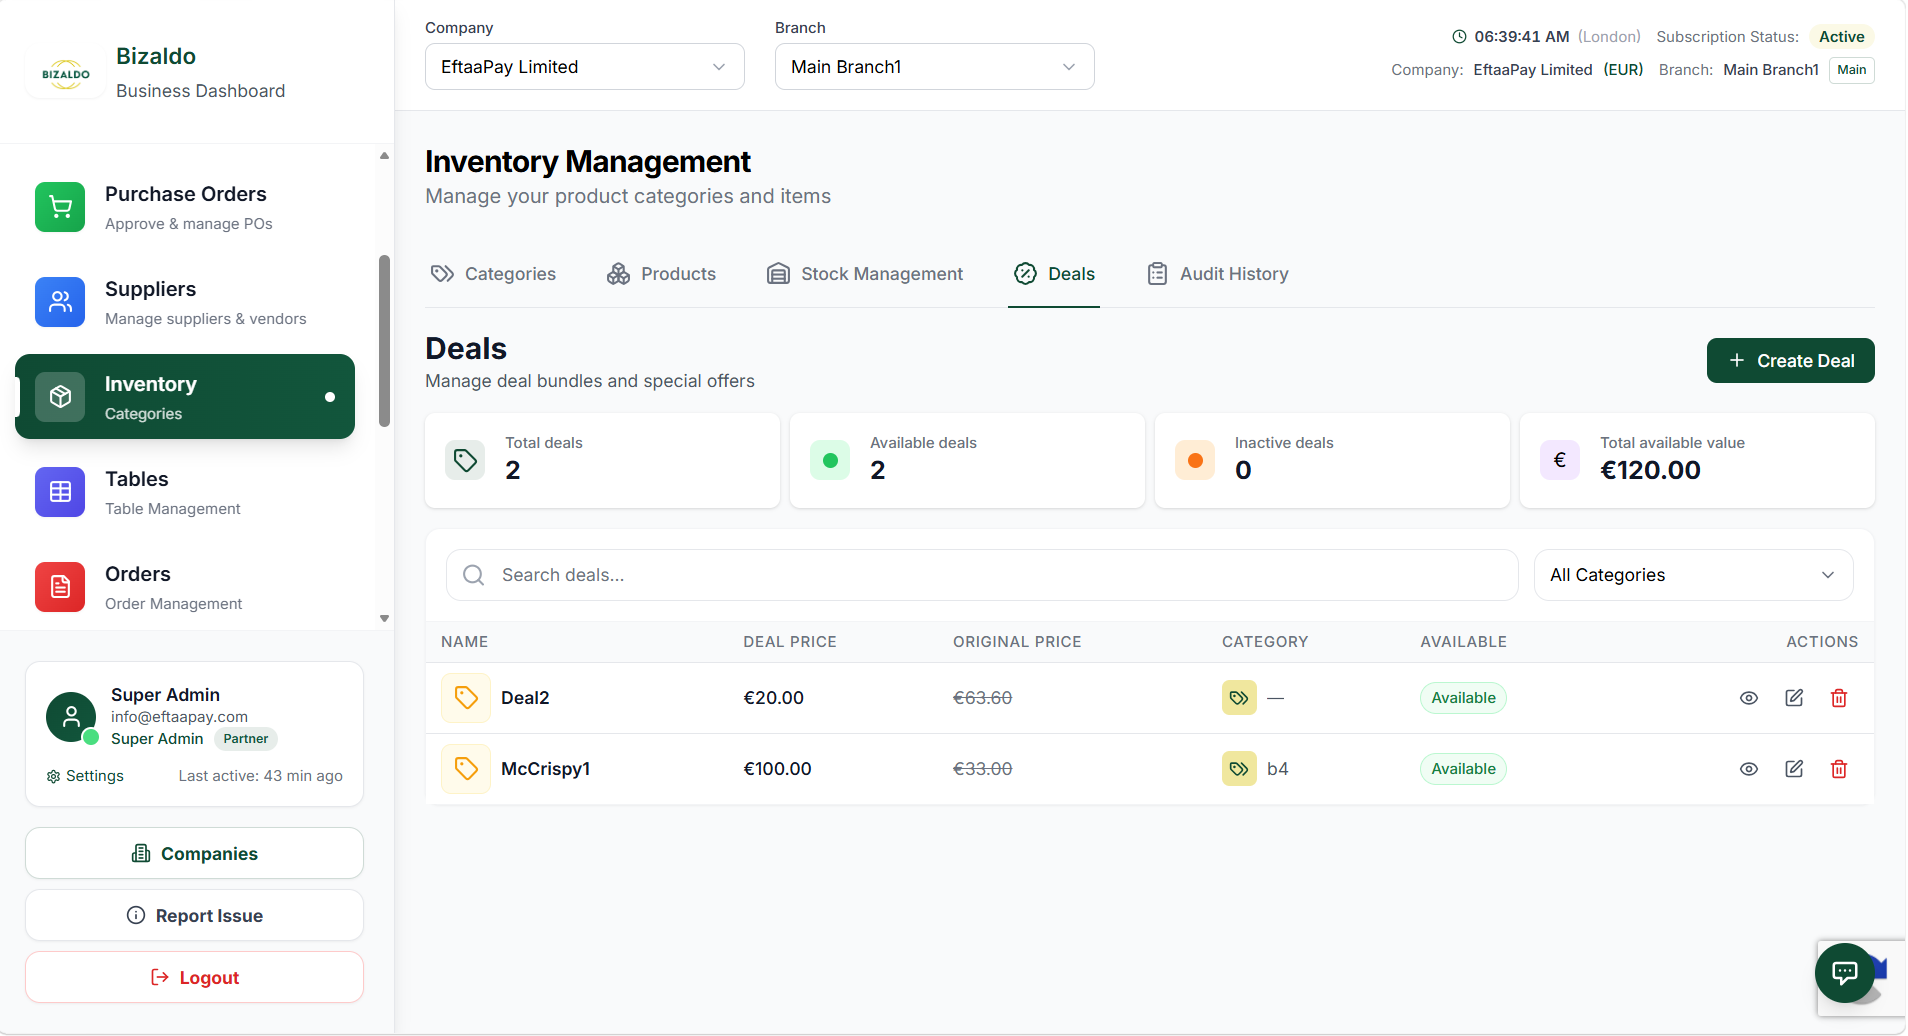 1234
1234Deals list view showing summary stats, filters, and active deals
Screen Elements
Overview of total, available, inactive deals and total available value.
Search for deals or filter by category.
Click to add a new deal bundle.
View deal name, prices, category, availability, and actions (View, Edit, Delete).
Step 2: Create a Deal
Click the "+ Create Deal" button to open the deal creation form. Here you define the deal's basic information: Enter the deal's basic information: - Name — The customer-facing title of the deal bundle - Category — Dropdown to assign the deal to a specific menu category - Deal Price — The fixed promotional price the customer will pay - Description — Detailed information about what the deal includes - Image Upload — Drag-and-drop area for a visual representation (PNG, JPG, SVG up to 2MB) - Available — Toggle to immediately make the deal active and visible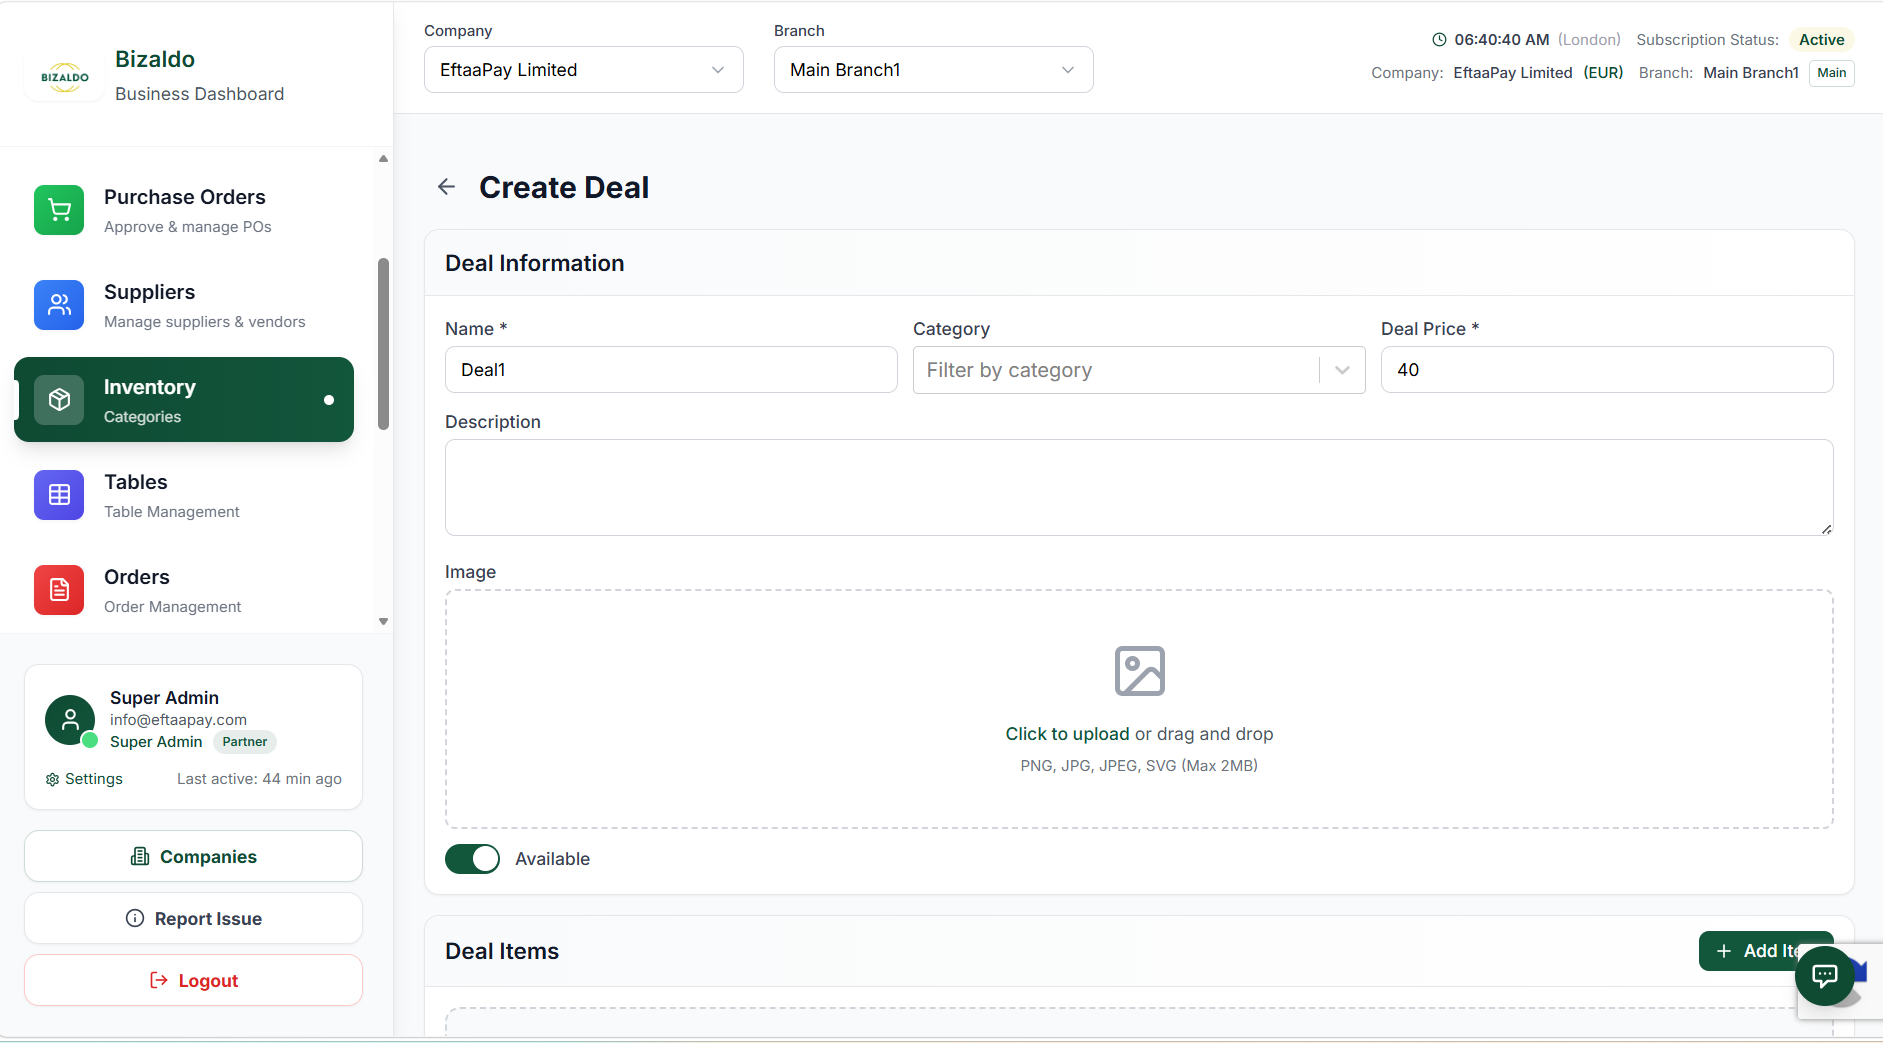 123
123Define the deal's name, category, price, and upload an image
Screen Elements
Enter Name, Category, Deal Price, and Description.
Upload a representative image (PNG, JPG, SVG) up to 2MB.
Toggle whether the deal is currently available.
Step 3: Add Deal Items
In the Deal Items section, specify which products are included in this deal and their quantities. Click the "+ Add Item" button on the top right of this section to add new rows. Configure the item rows: - Product Dropdown — Select the item from your catalog (displays name and base price) - Quantity — Input the fixed amount of this product included in the bundle - Delete Icon — Click to remove the product row from the deal Before saving, review the price comparison reference: - Deal Price — The set deal price (what the customer pays before variants/addons) - Base total (reference) — The calculated standard cost (sum of base product prices only)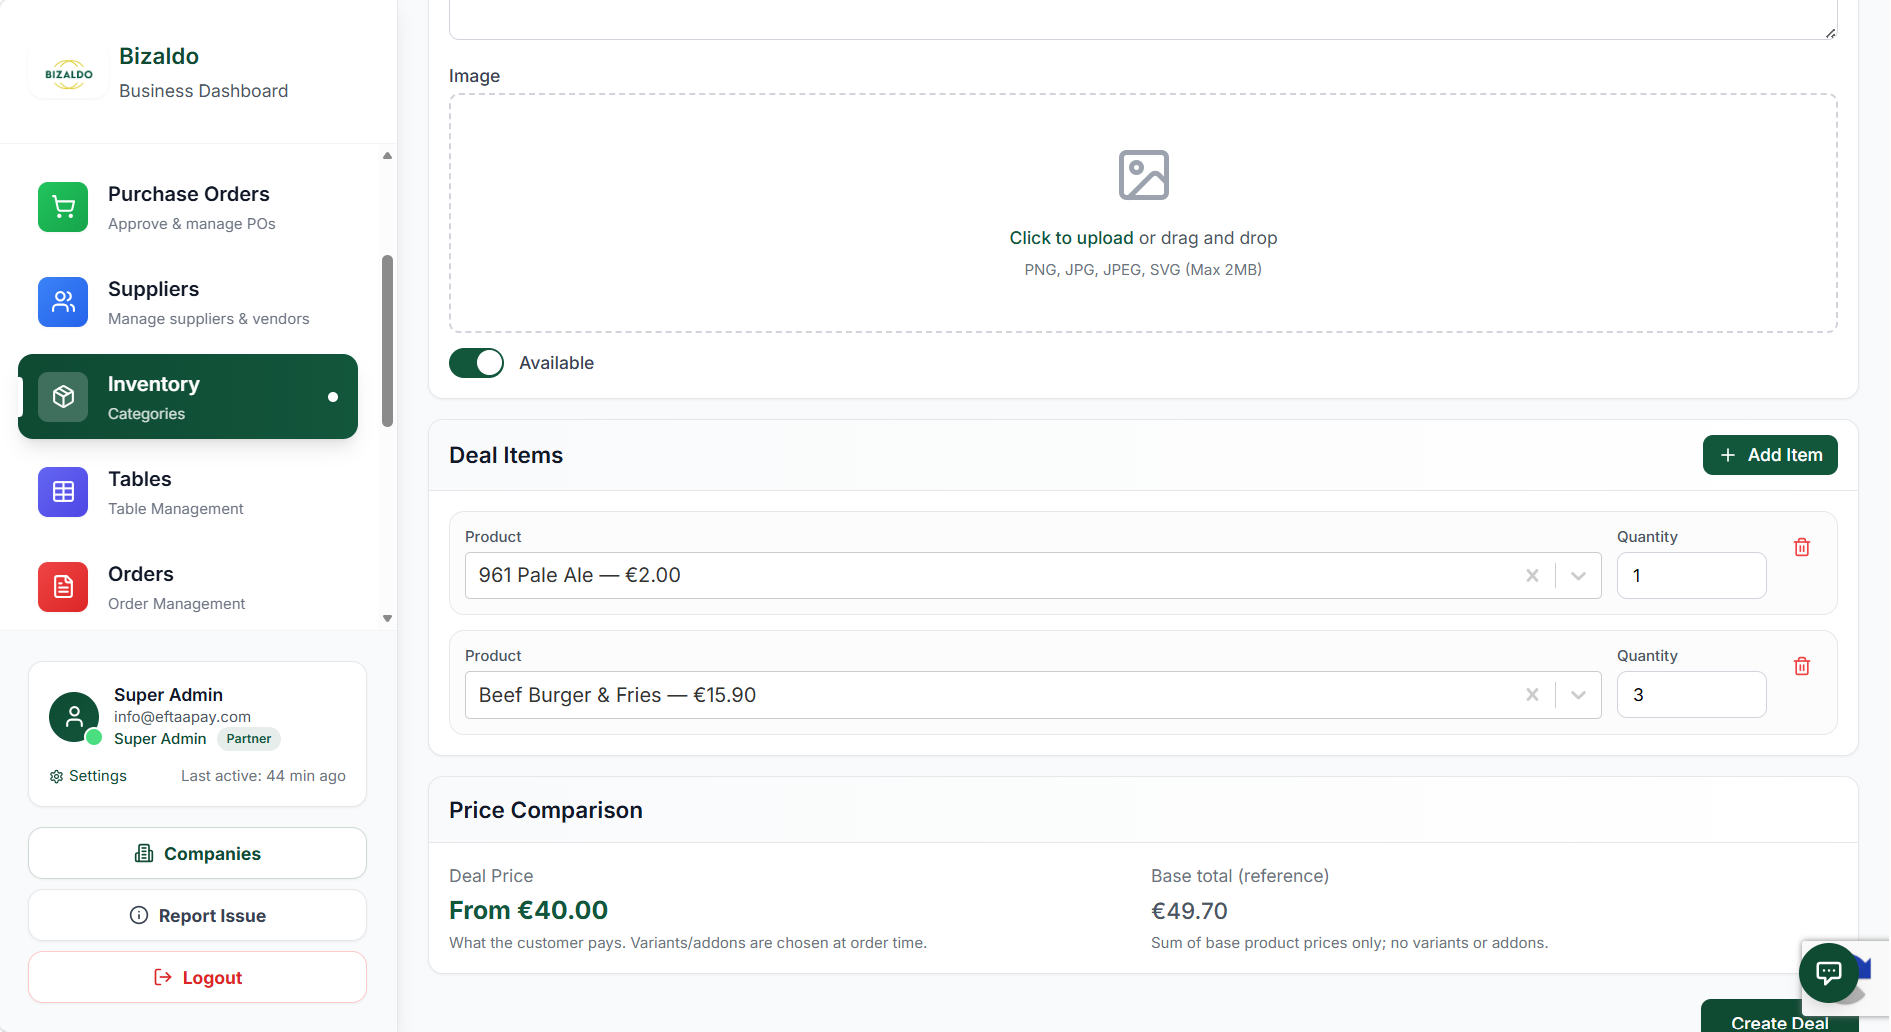 1234
1234Add specific products to the deal and review the price comparison
Screen Elements
Click to add a new product row to the deal.
Select the product and specify the fixed quantity.
Compare the customer's Deal Price against the Base total reference.
Save and publish the new deal.
How Pricing Works Across All Four Features
Understanding how pricing works across variants, add-ons, combos, and deals is essential for accurate pricing and profitability.Variant Price Adjustment: Variants adjust the base product price. The adjustment can be positive or negative:
- Positive: Increases price (e.g., Large pizza +$3)
- Negative: Decreases price (e.g., Small pizza -$2)
- Zero: No adjustment (e.g., Medium pizza)
Add-on Fixed Price: Add-ons have a fixed price that is always added to the base product price:
- Extra Cheese: +$1.50
- Bacon: +$2.00
- Sauce: +$0.50
Combo Base Price + Adjustments: Combos have a fixed base price that can be adjusted based on product selections:
- Combo base price: $12.00
- Premium product in slot: +$2.00
- Budget product in slot: -$1.00
Deal Fixed Price: Deals have a single, fixed deal price that replaces the sum of the base product prices.
- Base total (reference): $49.70
- Deal Price: $40.00 (Customer pays this amount)
Important Notes:
- Variant adjustments are relative to the base product
- Add-on prices are always additive
- Combo prices are fixed but can be adjusted per slot
- Deal prices are fixed for the bundle, with modifiers added at order time
- All pricing is calculated before tax
- VAT is applied to the final calculated price
Best Practices for Restaurants
Follow these best practices to optimize your product configuration and improve customer experience.Use Clear Names:
- Use simple, descriptive names for variants, add-ons, and combos
- Avoid technical jargon that customers might not understand
- Keep display names short for better POS readability
Keep Required Fields Consistent:
- Mark variants as required only when customers must choose
- Use required add-ons sparingly to avoid frustrating customers
- Ensure required fields are actually necessary for the product
Set Defaults to Speed Ordering:
- Set default variants for the most common choices
- Pre-select popular add-ons to reduce cashier clicks
- Use default slot selections in combos for faster checkout
Use Inventory Linking for Stock Control:
- Link add-ons to inventory products for accurate stock tracking
- Monitor stock levels for popular add-ons
- Set up low stock alerts to prevent running out
Avoid Unnecessary Price Adjustments:
- Keep pricing simple when possible
- Use price adjustments only when necessary
- Complex pricing can confuse customers and slow down checkout
- Consider separate products instead of complex adjustments
Organize Variants Logically:
- Group related variants together (e.g., all sizes in one group)
- Use consistent naming conventions across products
- Limit the number of variants to avoid overwhelming customers
Test Before Launch:
- Test all variants, add-ons, and combos in the POS
- Verify pricing calculations are correct
- Ensure inventory tracking works as expected
- Check that defaults behave properly
Regular Review and Updates:
- Review variant and add-on performance regularly
- Remove unpopular options to simplify the menu
- Update pricing based on costs and competition
- Adjust defaults based on customer preferences
In One Sentence
Product Management enables you to organize, price, and maintain your catalog with SKU-based tracking, category organization, modifier options, and performance analytics.Key Actions
| Action | How To |
|---|---|
| Add product | Products → Add Product → Fill form |
| Edit product | Find product → Edit → Update fields |
| Change price | Product → Toggle "Available" off |
| Mark unavailable | Product → Toggle "Available" off |
| Add modifier | Product → Modifiers → Add group |
Outputs
Product Management creates: - Online menu — Web/app display - Inventory SKUs — Stock tracking identifiers - Price lists — Current selling prices - Cost records — Purchase price history - Analytics data — Sales performance metricsTroubleshooting
Product Not Showing in POS
- Check "Available" is enabled
- Verify category is active
- Confirm user has permission
- Refresh product grid (F5)
- Check if set to "Online Only"
Price Not Updating
- Clear cache and reload POS
- Check if price overridden at order level
- Verify no active promotions affecting price
- Confirm VAT calculation settings
Barcode Not Scanning
- Verify barcode is correctly entered
- Check scanner is connected and configured
- Test with different barcode format (EAN, UPC)
- Ensure product is available
Related Documentation
- Orders — Processing products in orders
- Inventory — Stock level management
- Settings — System configuration
- Getting Started — Initial product setup