Table Management
Table Management gives you a real-time view of every table in your restaurant — their status, capacity, area assignment, and reservation state — so your front-of-house team always knows what is available and what is occupied.Where to find it: In the left sidebar, click Tables → Table Management.
Overview
The Table Management page is your central hub for monitoring and controlling all tables across your restaurant's areas and floors.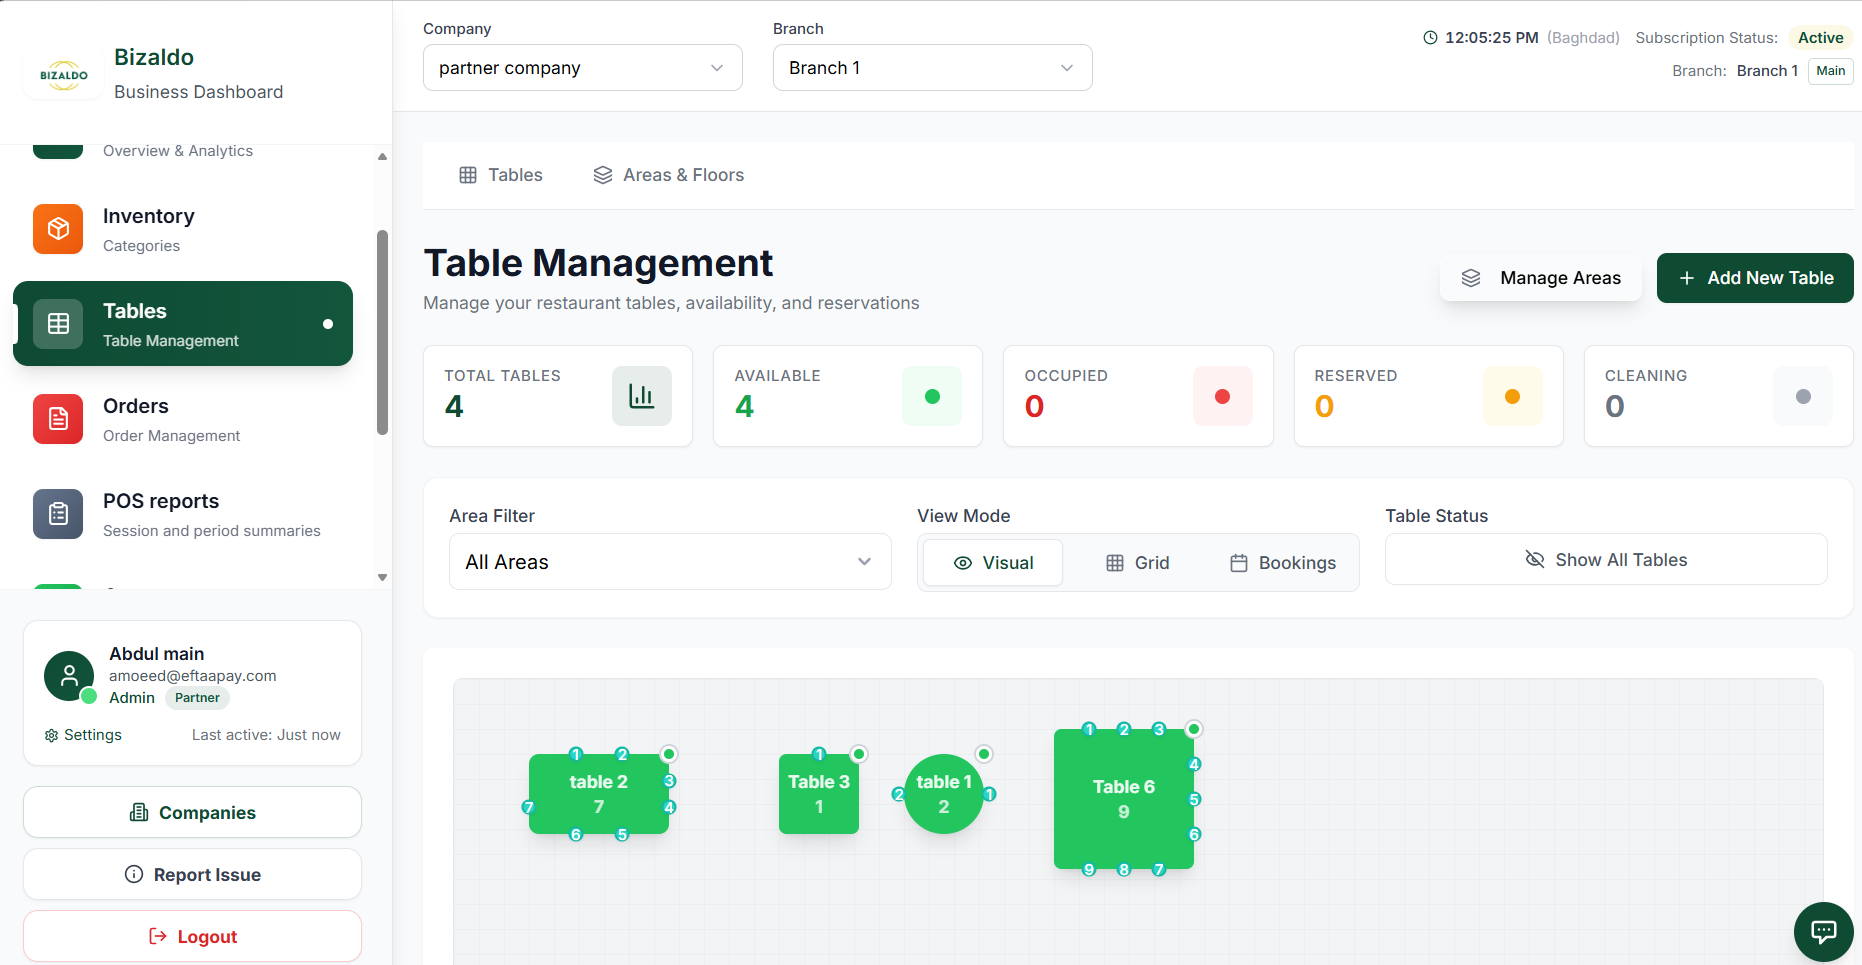 1234567891011
Table Management page — KPI summary cards, filters, and visual floor plan
Screen Elements
Total number of tables configured across all areas in this branch.
Tables that are free and ready to seat guests (shown in green).
Tables currently in use with an active order (shown in red).
Tables with an upcoming or active reservation (shown in amber).
Tables marked as being cleaned before next seating (shown in grey).
Opens the Areas & Floors manager to create or edit seating areas.
Opens the form to add a new table to the selected area.
Filter the floor plan to show tables from a specific area only.
Switch between Visual (floor plan), Grid, and Bookings views.
Show All Tables or filter by a specific status.
Interactive layout showing tables with seat counts and current status colour.
KPI Summary Cards
The status cards at the top of the page give you an instant snapshot of your restaurant's seating situation.| KPI | Colour | What It Means |
|---|---|---|
| Total Tables | — | Total number of tables configured in this branch |
| Available | Green | Tables that are free and ready to seat guests |
| Occupied | Red | Tables with an active ongoing order |
| Reserved | Amber | Tables with an upcoming or active reservation |
| Cleaning | Grey | Tables currently being cleaned before next use |
Tabs
The page has two main tabs:- Tables — The main floor-plan view with KPI cards and table layout.
- Areas & Floors — Manage seating areas (e.g., Indoor, Outdoor, Rooftop) and floor configurations.
Filters & View Modes
Area Filter
Use the Area Filter dropdown to narrow the floor plan to a single seating area (e.g., *All Areas*, *Indoor*, *Outdoor*). This is useful in large venues with multiple floors or sections.View Mode
| Mode | Description |
|---|---|
| Visual | Interactive floor-plan layout — see tables as shapes with seat numbers and live status |
| Grid | Tabular list of all tables with status, area, and capacity columns |
| Bookings | Calendar-style view of upcoming reservations per table |
Table Status Filter
The Table Status control lets you quickly isolate a subset of tables:- Show All Tables — Default; all tables visible
- Filter to Available, Occupied, Reserved, or Cleaning only
Visual Mode
The Visual view displays tables as coloured shapes on an interactive floor-plan canvas. Each shape shows the table name, seat count, and current status colour.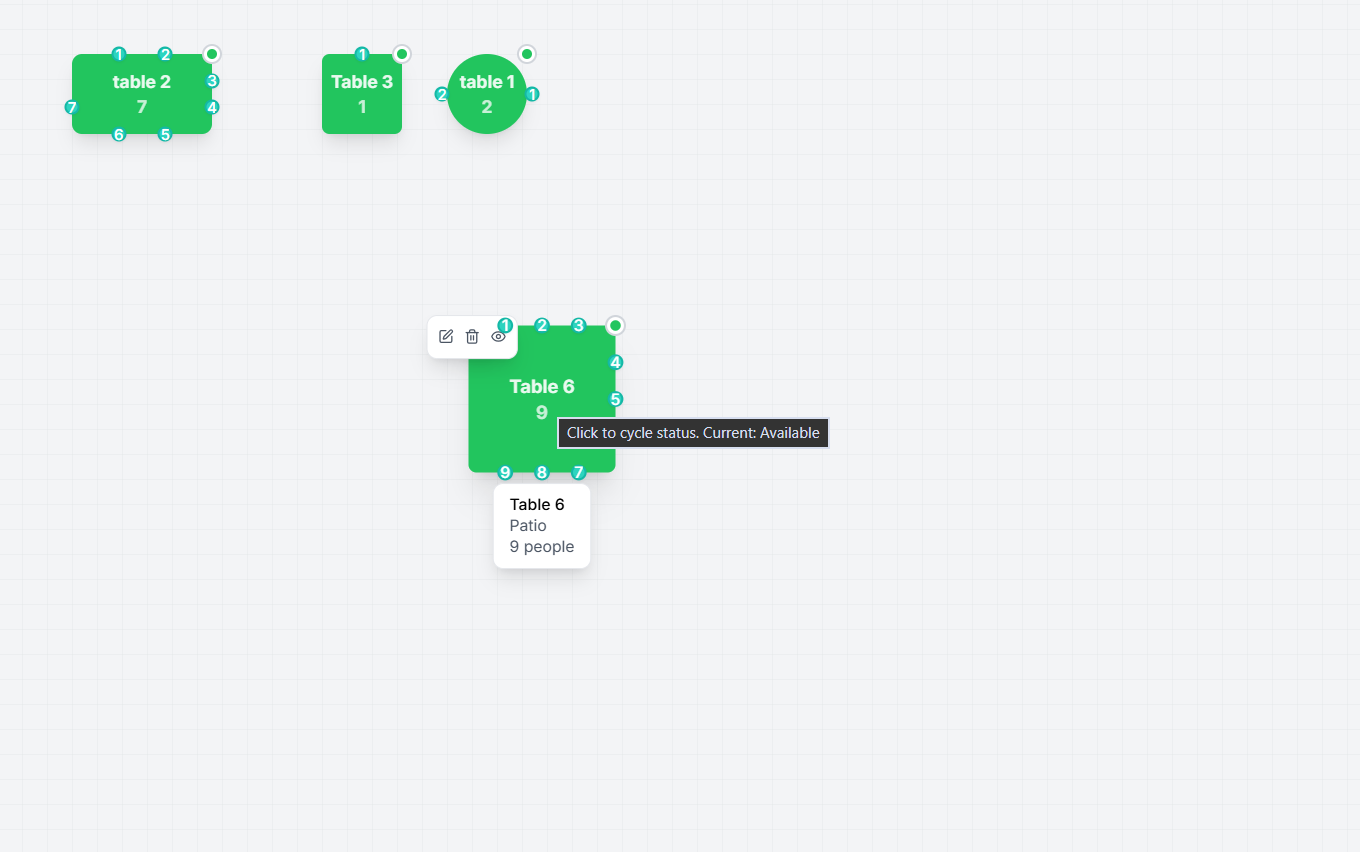 1234
1234Visual mode — click a table to reveal its action icons and info card
Screen Elements
Opens the Edit Table form to update name, capacity, area, shape, or status.
Permanently removes the table after a confirmation prompt.
Hides the table from the active floor plan without deleting it.
The dot on the table corner shows the current status. Click to cycle through statuses.
Visual Mode — Action Icons
When you click a table on the floor plan, three icons appear above it:| Action Name | Action |
|---|---|
| Edit | Opens the Edit Table form |
| Delete | Permanently deletes the table (with confirmation) |
| Deactivate | Hides the table without deleting it |
Drag to reposition — In Visual mode, you can click and drag any table shape to a new position on the floor plan canvas. The layout is saved automatically.
Grid Mode
The Grid view displays all tables as cards in a structured list. Each card shows the table's name, capacity, area, and current status, along with action buttons.Grid mode — table cards with icons and status action buttons
Screen Elements
Opens the Edit Table form for that table.
Generates and displays a QR code for the table's order link.
Permanently removes the table after confirmation.
Shows the current table status (e.g., Available, Occupied).
Click to change the table's status to Occupied.
Click to deactivate the table and remove it from the active floor plan.
Grid Mode — Action Icons & Buttons
Each table card in Grid view has:| Control | Action |
|---|---|
| Edit icon | Opens the Edit Table form |
| QR Code icon | Generates the table's order QR code |
| Delete icon | Permanently deletes the table |
| → Occupied button | Changes the table's status to Occupied |
| Deactivate button | Deactivates the table (hides from floor plan) |
Status cycling in Grid view: Click → Occupied to mark a table as occupied. To deactivate it, click Deactivate. These buttons update the status directly without opening any form.
Table QR Code
Click the QR Code icon on any table card to open the Table QR Code modal. This generates a scannable QR code that customers can use to access the table's order page directly.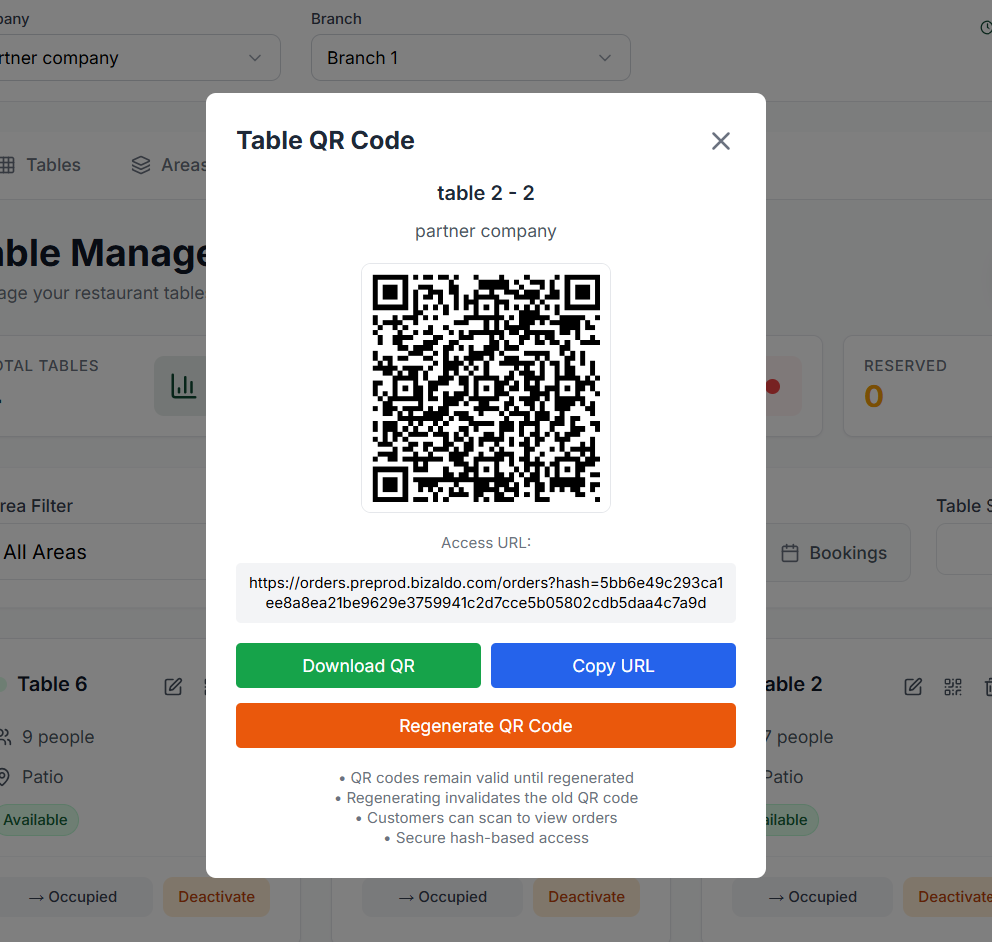 12345678
Table QR Code modal — scan, download, copy, or regenerate the table's order QR code
Screen Elements
Identifies which table this QR code belongs to (e.g., table 2 - 2).
The company this table's QR code is linked to.
Scannable QR code — customers scan this to open the table's order page on their device.
The direct URL encoded in the QR code. Can be shared or used for testing.
Downloads the QR code as an image file for printing or sharing.
Copies the access URL to the clipboard.
Creates a new QR code and invalidates the previous one. Use this if the old code was compromised.
Reminder that codes remain valid until regenerated, regenerating invalidates the old one, customers can scan to view orders, and access is secured via a unique hash.
| Action | Description |
|---|---|
| Scan QR | Customer scans with phone to open the table order page |
| Download QR | Save the QR image for printing on table cards or menus |
| Copy URL | Copy the direct order link to clipboard |
| Regenerate QR Code | Issue a new QR and invalidate the old one |
[!WARNING]
Regenerating a QR code invalidates the previous one. Any printed QR codes for that table will stop working and must be reprinted.
Manage Tables
Adding a New Table
Click + Add New Table (top-right) to open the Create New Table form.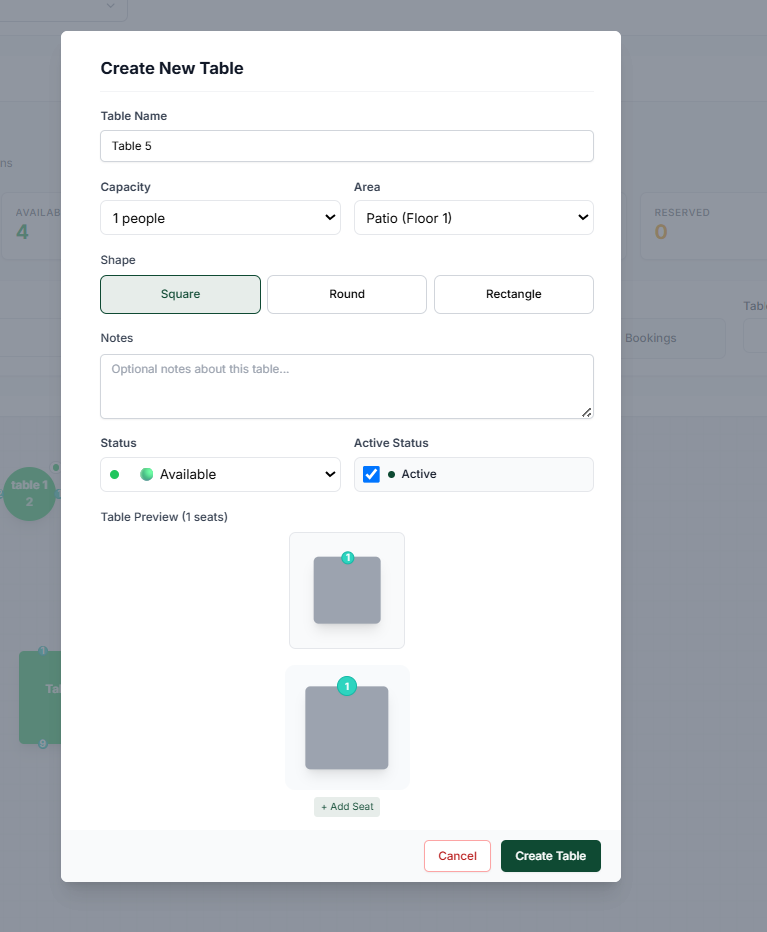 123456789
Create New Table modal
Screen Elements
A unique display name for the table (e.g., Table 5, VIP 1).
Number of people the table can seat.
Assign to a seating area or floor (e.g., Patio – Floor 1).
Visual shape: Square, Round, or Rectangle.
Optional staff-facing notes about this table.
Initial table status (e.g., Available).
Toggle visibility on the live floor plan.
Live preview of the table shape and seat layout.
Add seats to the preview, then click Create Table to save.
Editing a Table
Click any table on the floor plan and select Edit to open the Edit Table form.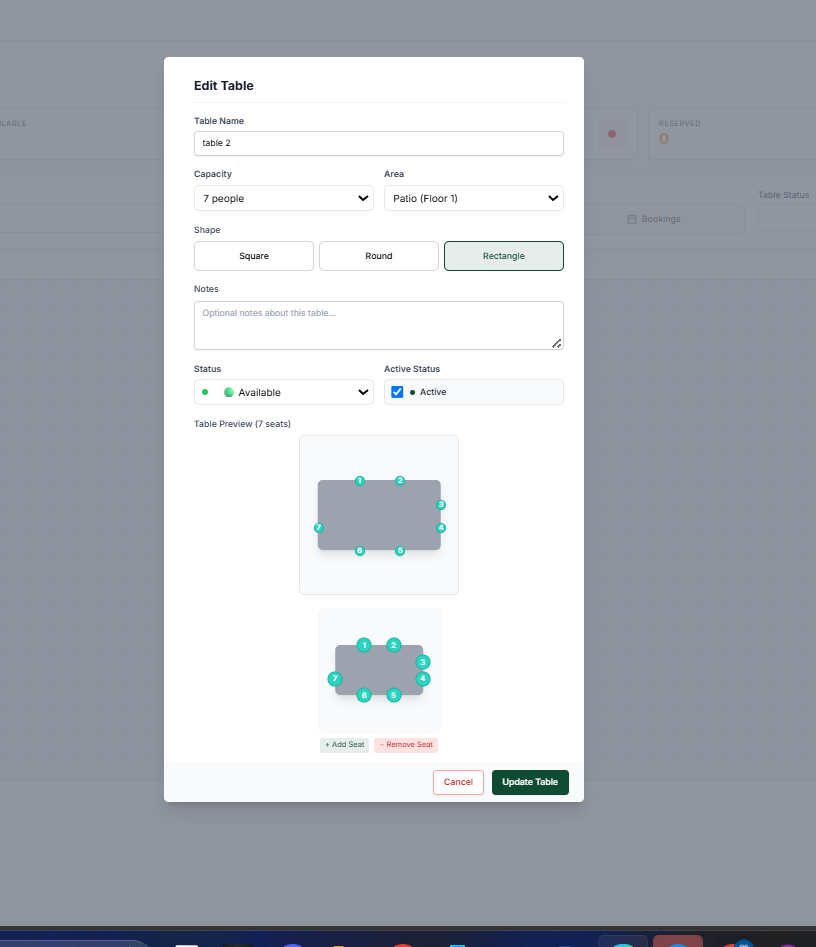 12345678910
Edit Table modal
Screen Elements
Update the table's display name.
Adjust the number of seats.
Reassign to a different area or floor.
Change between Square, Round, or Rectangle.
Update or add staff-facing notes.
Manually change the current table status.
Deactivate a table without deleting it.
Live preview of the updated shape and seat positions.
Add or remove individual seats in the preview.
Save all changes to the table.
Deleting a Table
Click the trash icon on a table card (Grid view) or select Delete from the table options on the floor plan to permanently remove a table.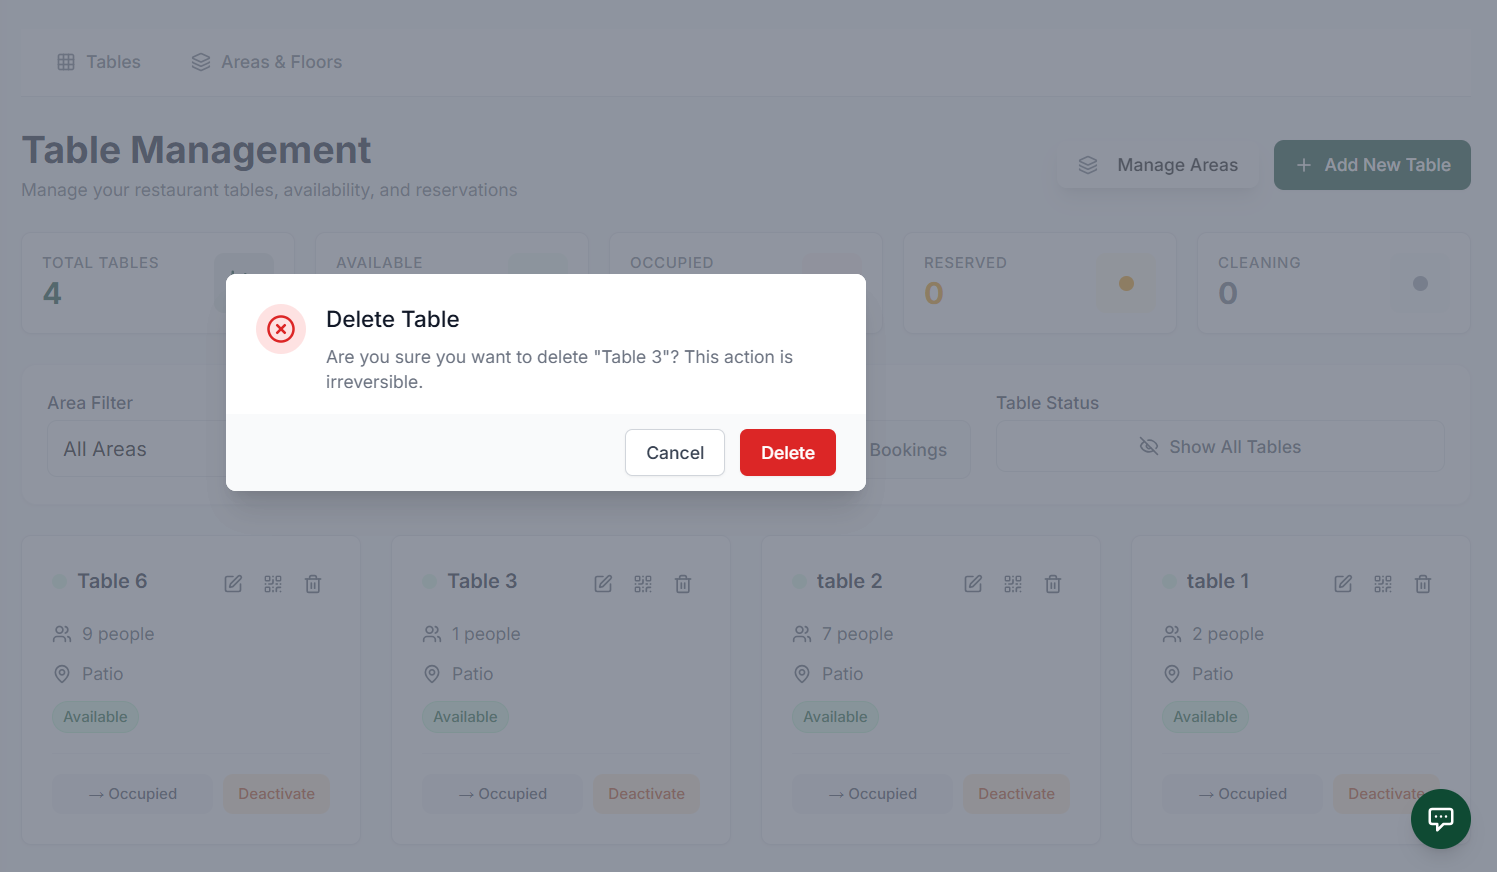 12345
12345Delete Table confirmation dialog
Screen Elements
Trash icon on each table card — click to initiate deletion.
A confirmation modal appears to prevent accidental deletion.
Clearly states the action is irreversible before you confirm.
Close the dialog and keep the table.
Permanently removes the table. This cannot be undone.
[!CAUTION]
Deleting a table is permanent and irreversible. Use Deactivate instead if you only want to hide the table temporarily.
Areas and Floors
The Areas and Floors tab lets you organise your restaurant into named seating zones (e.g., Patio, Indoor, Rooftop). Every table belongs to an area, and areas are linked to a specific floor number.Where to find it: Click the Areas and Floors tab at the top of the Table Management page, or click Manage Areas from the Tables view.
Areas Overview
Grid View
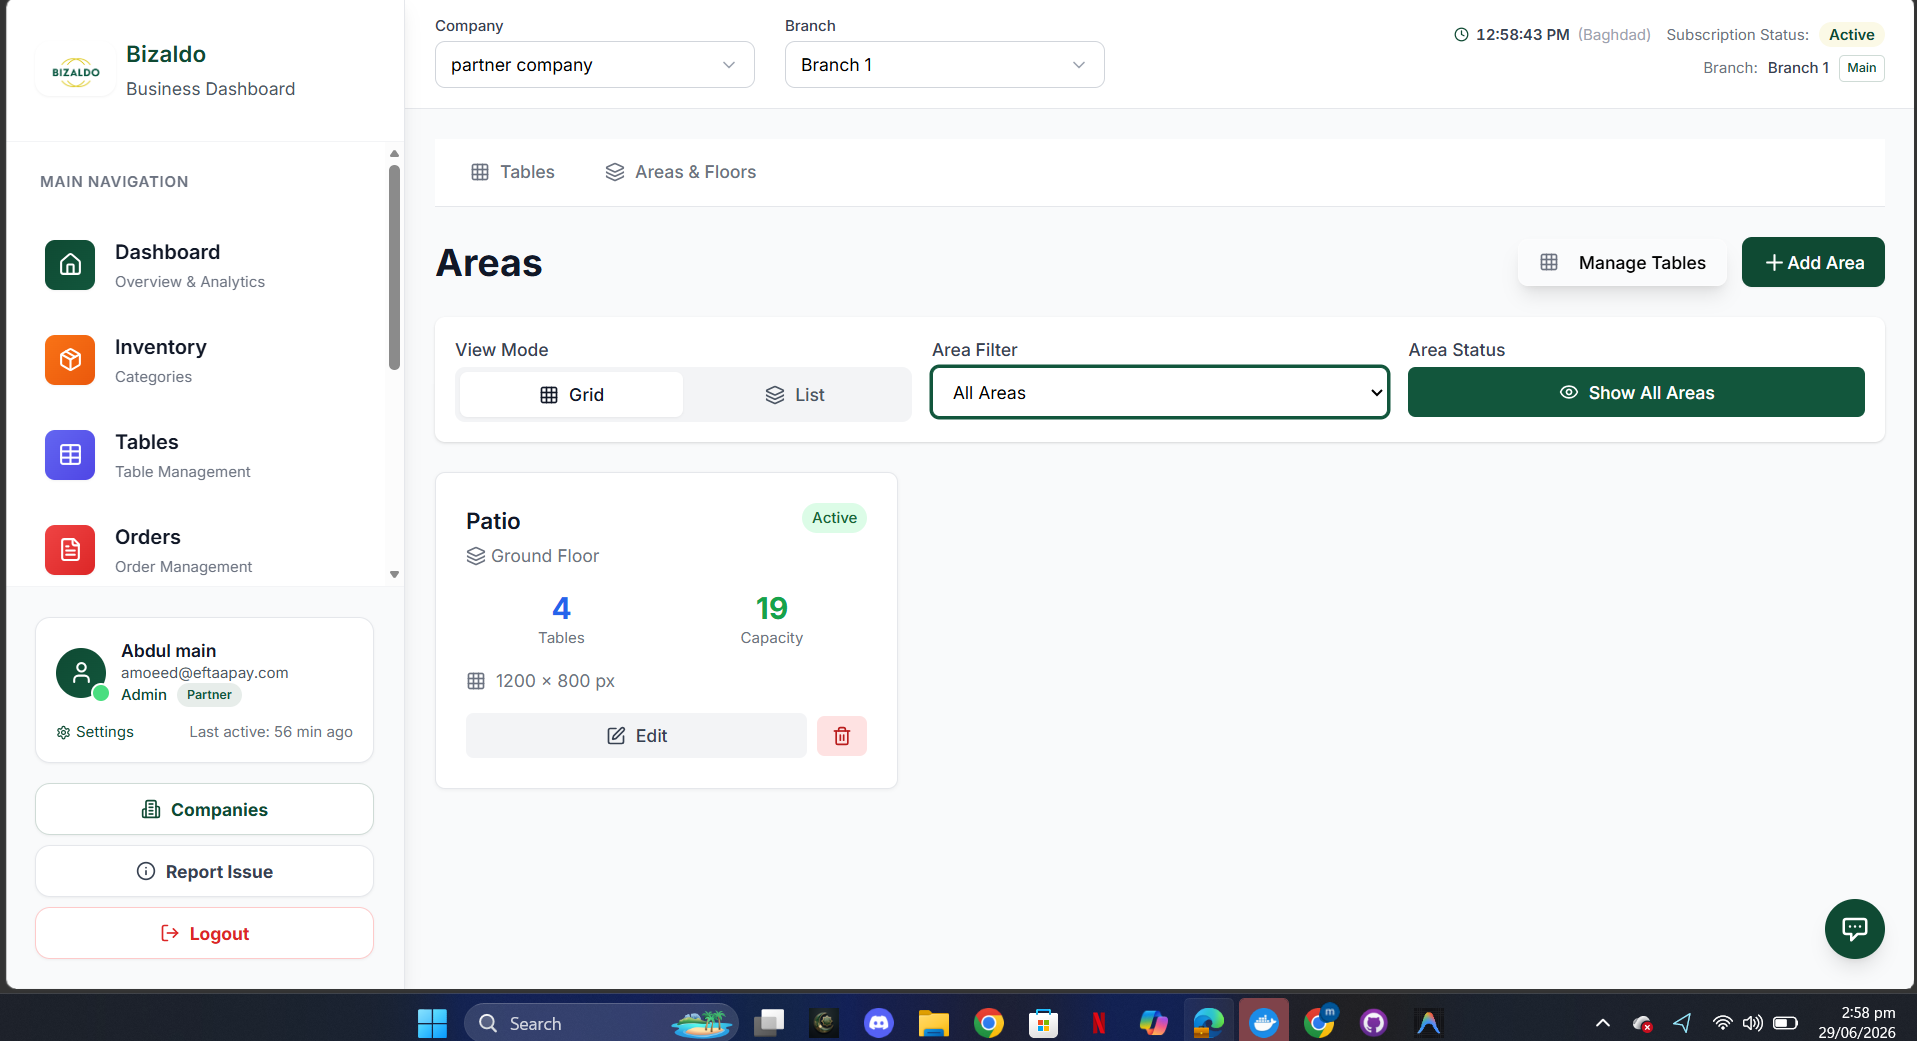 123456789
Areas page showing area cards in Grid view with table count, capacity, and actions
Screen Elements
Switch to the Areas & Floors management tab.
Click to open the Create New Area form.
Navigate back to the Tables floor plan view.
Toggle between Grid (cards) and List (table rows) views.
Filter the list to show a specific area.
Show all areas or filter by active/inactive status.
Each card shows the area name, floor, table count, total capacity, and canvas dimensions.
Opens the Edit Area form for this area.
Permanently deletes the area and all its associated tables.
List View
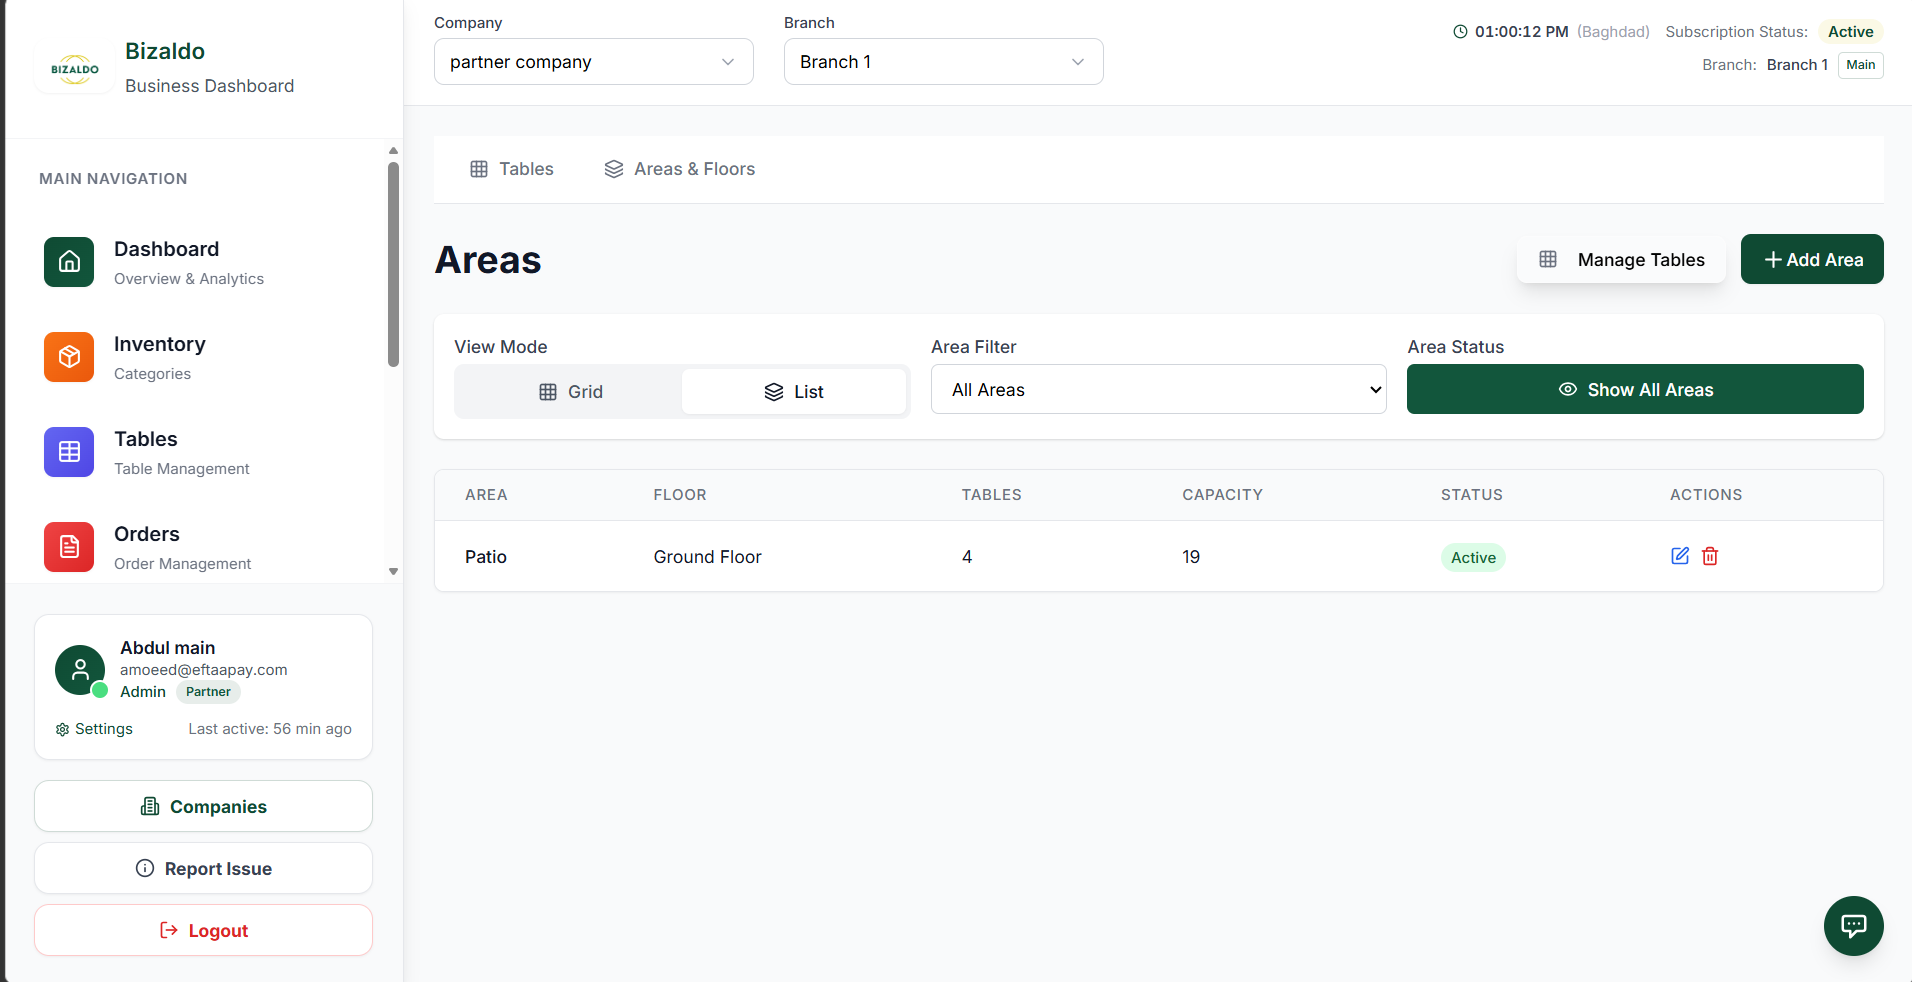 1234567
Areas page in List view — shows area name, floor, tables, capacity, status, and actions in a table
Screen Elements
Switch to List view to see all areas in a compact tabular format.
The name of the seating area (e.g., Patio).
The floor this area is assigned to (e.g., Ground Floor).
Number of tables configured within this area.
Total seat capacity across all tables in this area.
Whether the area is Active or Inactive.
Edit or delete the area directly from the list row.
Manage Areas
Creating an Area
Click + Add Area (top-right) to open the Create New Area form.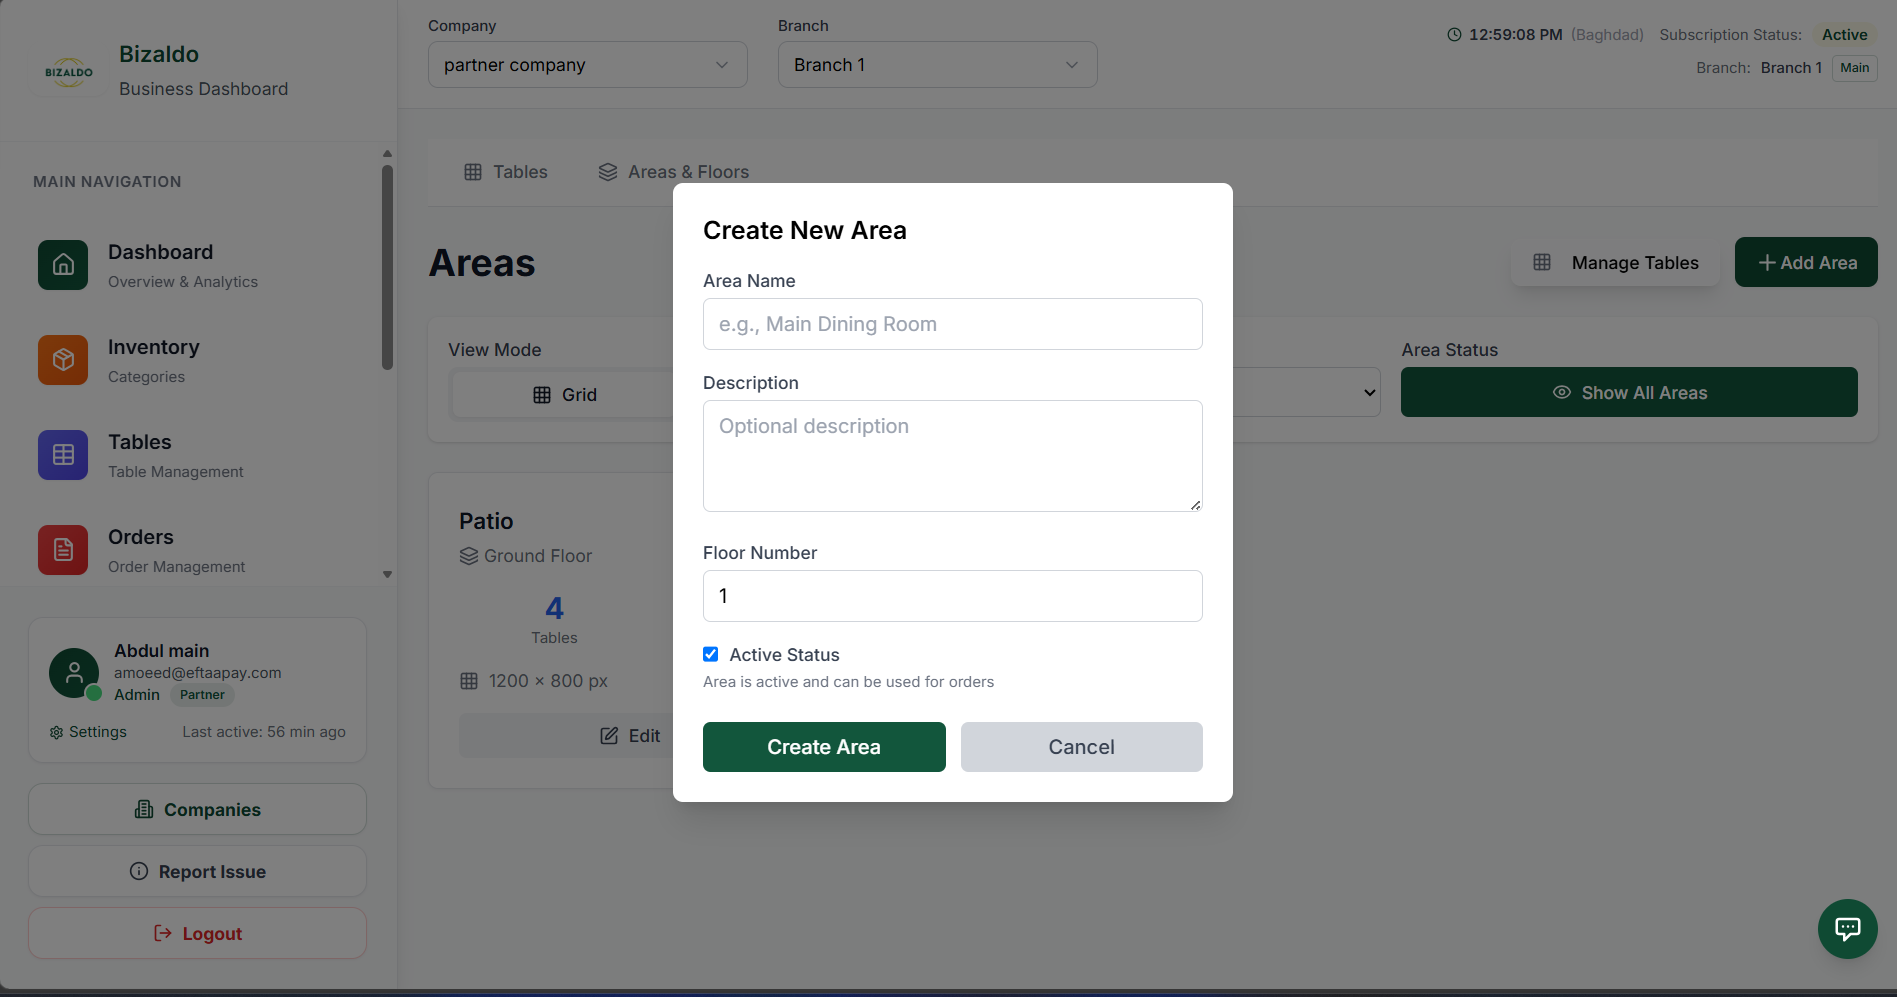 12345
12345Create New Area modal — define the area name, description, floor, and status
Screen Elements
A unique name for the seating zone (e.g., Main Dining Room, Rooftop).
Optional description of this area visible to staff.
The floor this area is on (e.g., 1 for Ground Floor, 2 for First Floor).
When checked, the area is active and available for table assignments and orders.
Save and create the new area.
| Field | Description |
|---|---|
| Area Name | Unique name for the zone (e.g., *Patio*, *Indoor*, *VIP Room*) |
| Description | Optional staff-facing notes about the area |
| Floor Number | Floor level the area is on |
| Active Status | Makes the area available for table and order use |
Editing an Area
Click Edit on an area card or list row to open the Edit Area form.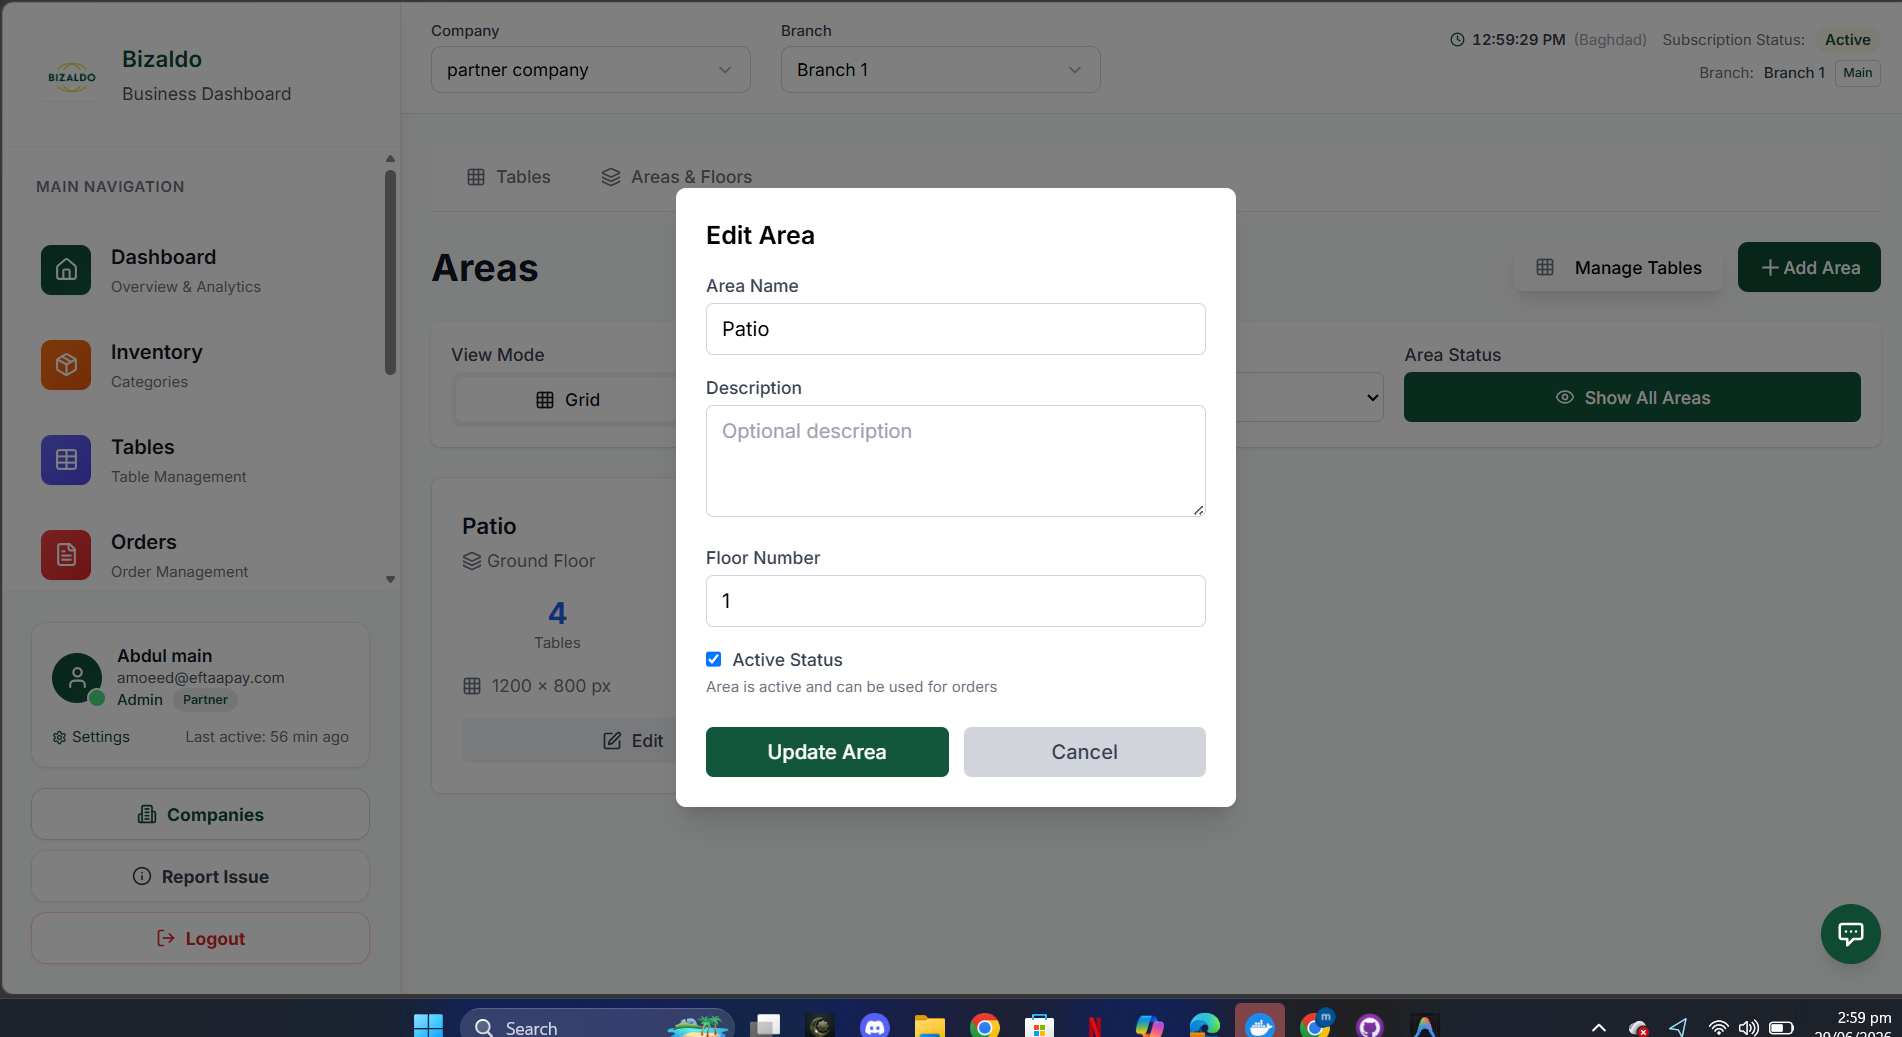 12345
12345Edit Area modal — update area name, description, floor, and active status
Screen Elements
Update the area's display name.
Update or add a description for staff.
Change which floor this area belongs to.
Toggle the area active or inactive without deleting it.
Save all changes to the area.
Deleting an Area
Click the trash icon on an area card or list row to open the Delete Area confirmation.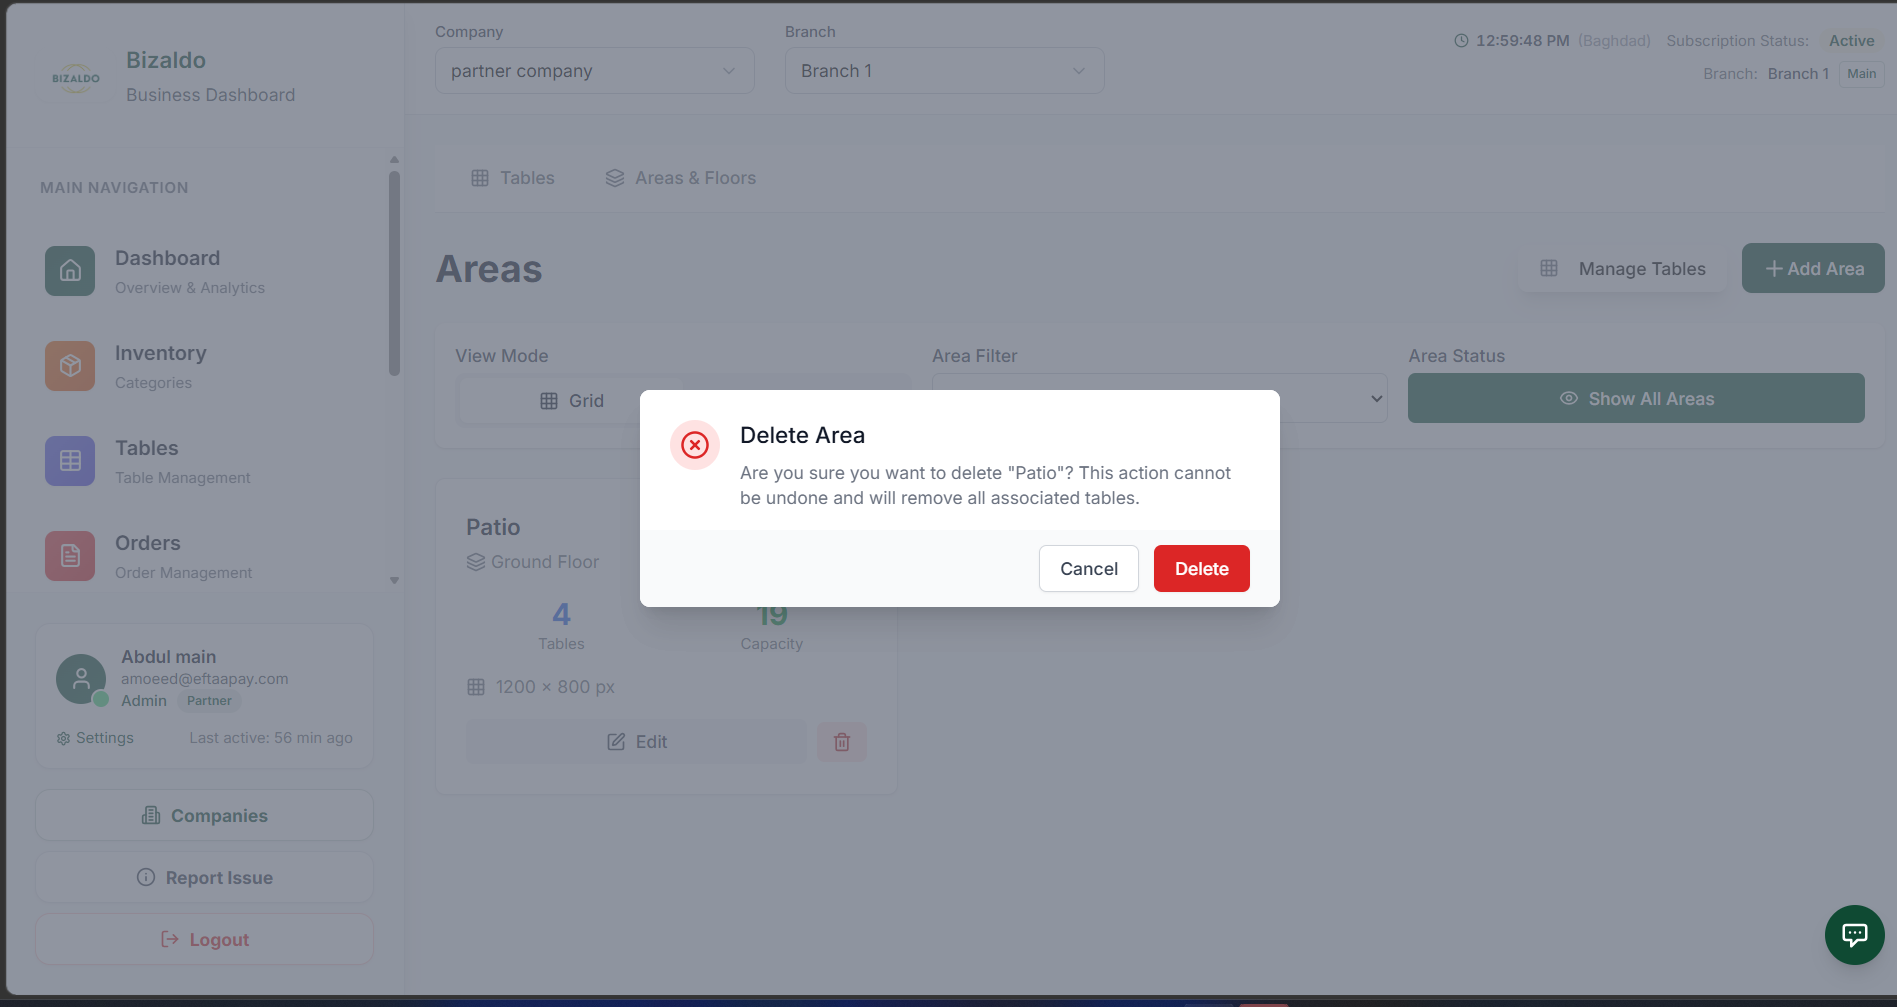 1234
1234Delete Area confirmation — warns that all associated tables will also be removed
Screen Elements
Confirms which area is about to be deleted.
Warns that the action cannot be undone and will remove all associated tables.
Close the dialog and keep the area.
Permanently deletes the area and all its tables.
[!CAUTION]
Deleting an area permanently removes all tables assigned to it. This action cannot be undone. Use Active Status in Edit Area to deactivate an area instead.
Bookings
The Bookings view provides a calendar-based dashboard for managing table reservations. You can view booking counts, check table availability, filter by reservation status, and create new bookings.Where to find it: On the Table Management page, locate the View Mode control selector and click Bookings.
Bookings Overview
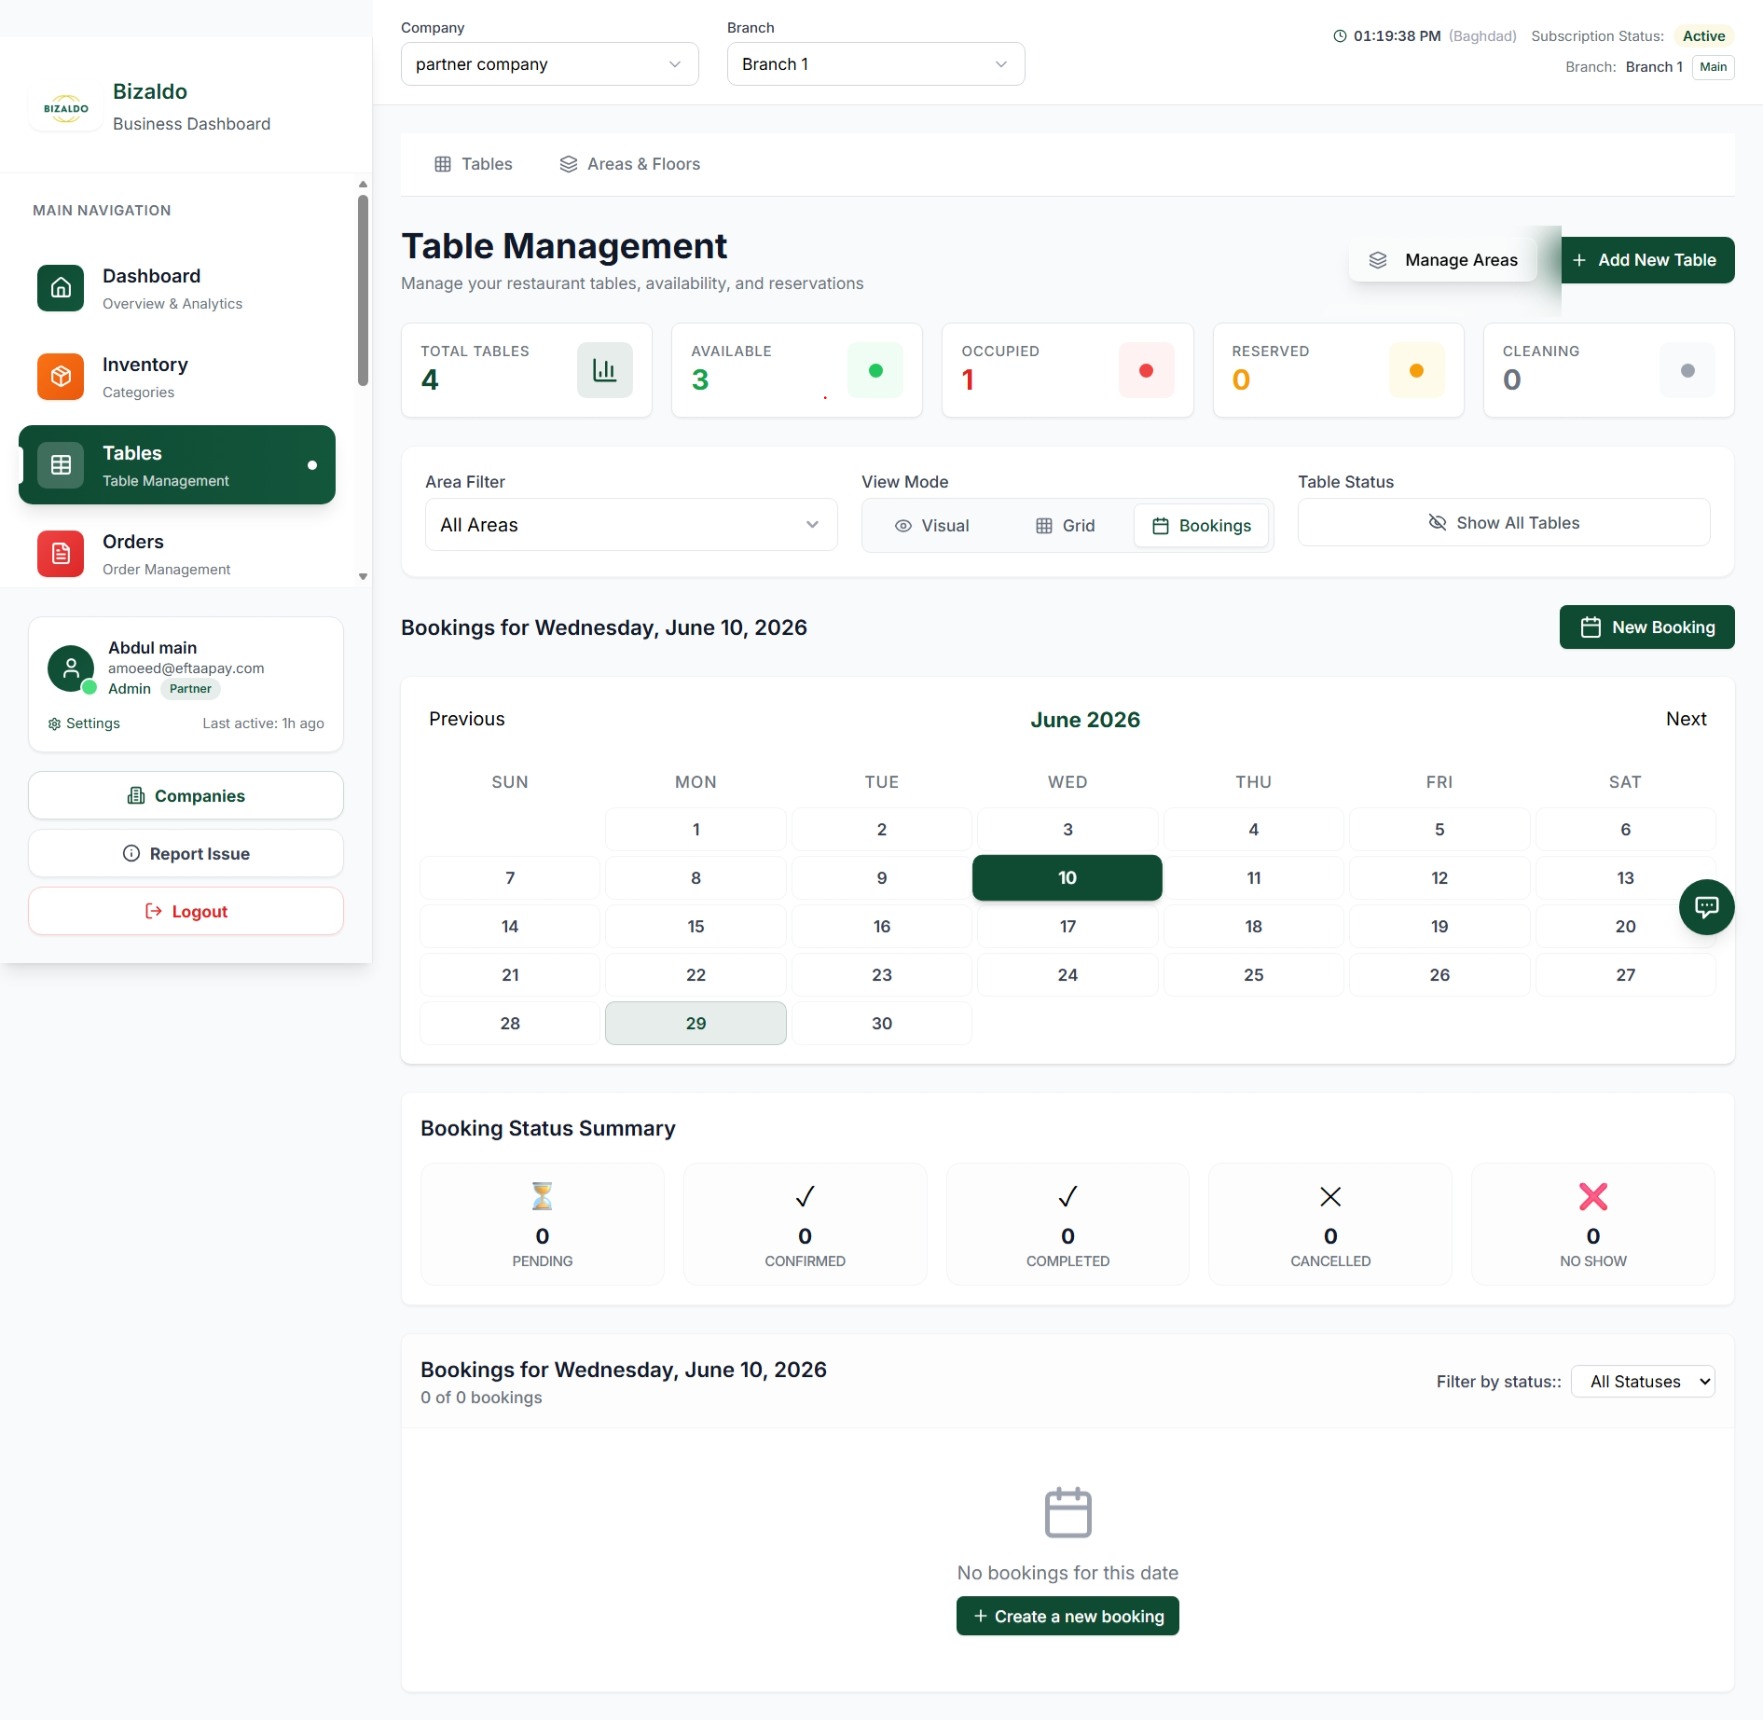 1234567
Bookings mode — check daily reservation counts, calendar dates, and manage customer bookings
Screen Elements
Click Bookings in the View Mode selector to open this dashboard.
Click + New Booking to schedule a new reservation.
Shows the currently active date for the calendar view and list.
Select any date in the calendar to view its bookings and status summary.
Shows counts for Pending, Confirmed, Completed, Cancelled, and No Show reservations on the selected date.
Filter the daily bookings list by specific reservation statuses.
Create a booking for the selected date directly from the empty state view.
Key Capabilities
In Bookings mode, staff can:- Navigate Dates: Select any day on the calendar to view its scheduled reservations.
- Track Booking Statuses: Get an at-a-glance breakdown of bookings categorized as *Pending*, *Confirmed*, *Completed*, *Cancelled*, or *No Show*.
- Quickly Filter: Use the status dropdown filter to focus on specific booking types (e.g. pending confirmations).
- Add Reservations: Click + New Booking or the button in the empty state block to configure customer name, date, time, and assigned table.
Booking Status Summary (KPIs)
The Booking Status Summary cards provide an overview of your reservations for the selected day:| Status | Description |
|---|---|
| PENDING | Reservation request received but not yet confirmed with the guest |
| CONFIRMED | Reservation successfully confirmed and table allocated |
| COMPLETED | Guests arrived, dined, and the booking session was closed |
| CANCELLED | Reservation cancelled by the guest or restaurant staff |
| NO SHOW | Guests failed to arrive for their scheduled reservation time |
Manage Bookings on Admin
Creating a Booking
To schedule a new reservation, click the + New Booking button on the top-right of the bookings card or inside the empty state.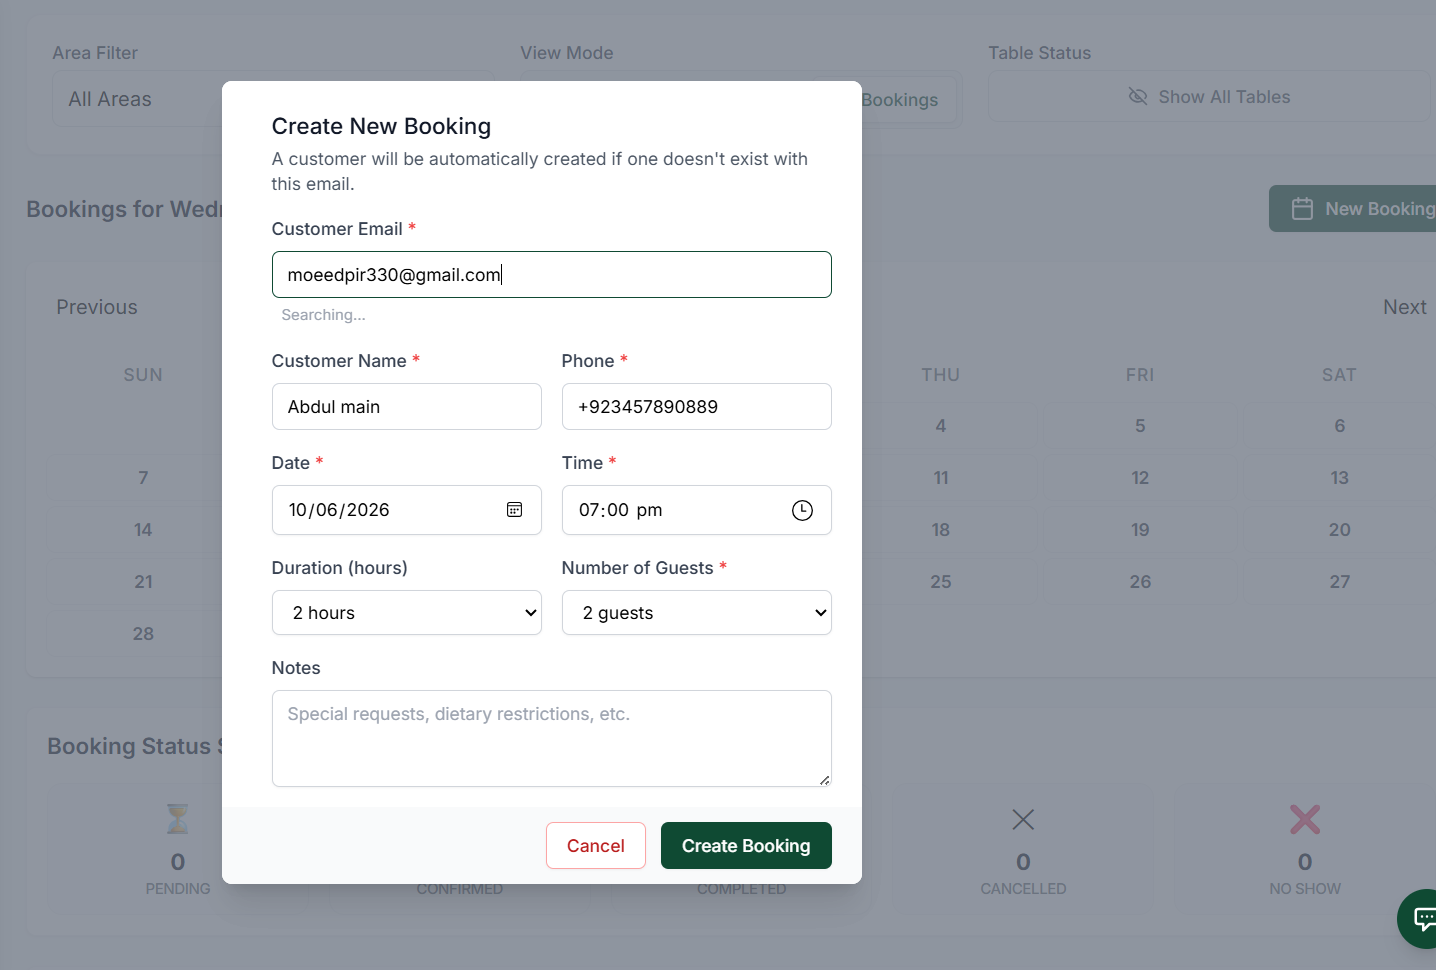 12345
12345Create New Booking modal — details auto-populate depending on email history
Screen Elements
Enter email. If the customer exists, their name and phone will auto-populate. If not, a new profile is created automatically.
Enter customer's name and contact phone number.
Set reservation date and time. Selecting a date in the calendar prior to clicking 'New Booking' will pre-fill this field.
Specify booking length (in hours) and table size requirement.
Saves the reservation and schedules it.
[!TIP]
Base on Selected Date: Selecting a date in the calendar grid before clicking + New Booking will automatically set that date in the booking form, helping prevent scheduling errors.
Editing a Booking
To modify booking details (such as changing the time, guest count, or updating staff notes), click the Edit icon (pencil) next to the booking entry in the bookings list.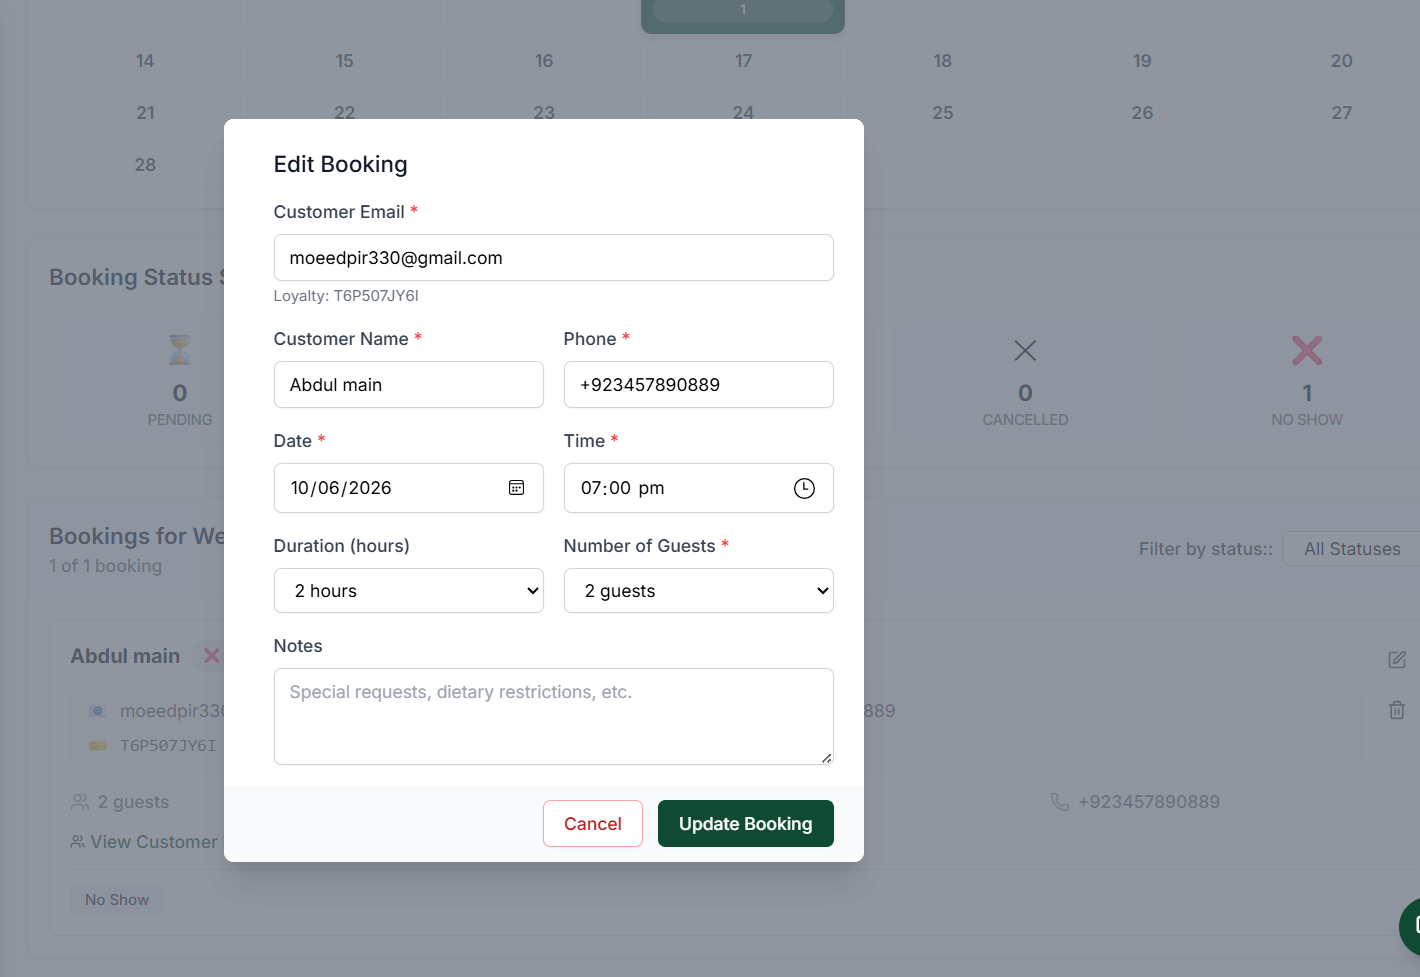 1234567
Edit Booking modal — update reservation dates, times, guest counts, and notes
Screen Elements
Shows the reservation email address linked to the booking.
Displays customer's system loyalty number (if applicable).
Update guest name and phone number records.
Change the reservation date and target arrival time.
Adjust session length and party size requirement.
Add or update staff notes, dietary preferences, or VIP indicators.
Save all reservation changes.
Updating Booking Statuses
Once a booking is created, it is listed under the daily bookings list for the selected date.Manage booking entries, verify loyalty IDs, and click quick buttons to confirm or cancel
Screen Elements
Displays the current status badge (e.g., Pending, Confirmed).
Displays email, phone, and loyalty code (e.g., T6P507JY6I).
Displays the allocated table for this reservation.
Click to see a detailed customer card with tags, country, and payment preferences.
Click Confirm to change status to Confirmed, or Cancel to mark as Cancelled directly from the list.
Customer & Booking Details
Clicking View Customer Details opens the detailed client profile modal overlay.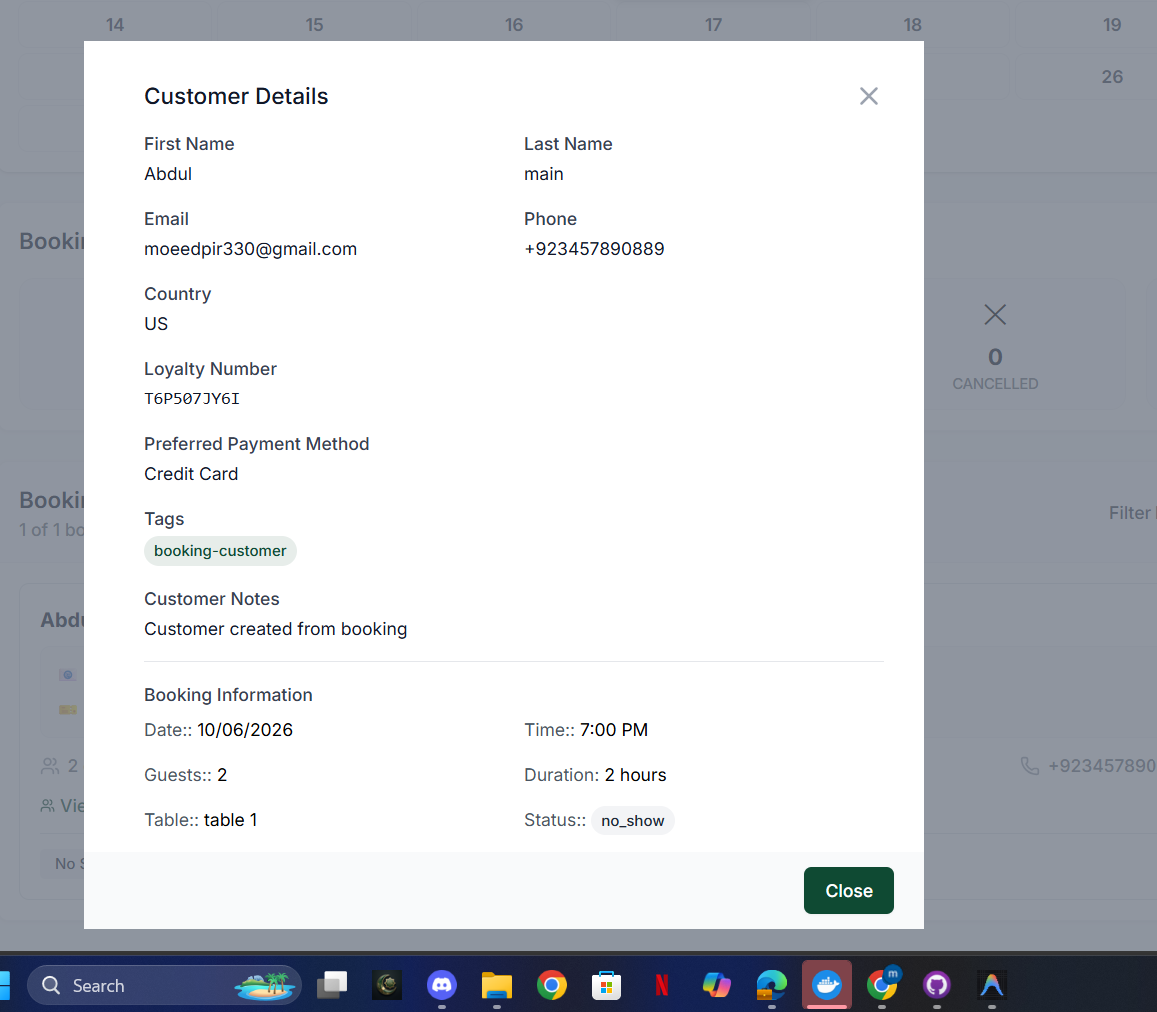 12345
12345Detailed customer view showing loyalty profiles, payment preferences, notes, and booking records
Screen Elements
Displays full name, email, phone, country, and loyalty number.
Saves customer's primary payment preference (e.g., Credit Card).
Displays internal staff notes and tags (e.g., booking-customer).
Summarises session details: date, time, guest count, duration, assigned table, and current status.
Closes the details card to return to the bookings view.
Manage Bookings on Tablet App
The Tablet POS Application allows front-of-house staff to view, create, edit, and update guest reservations directly from a portable tablet terminal.Where to find it: Open the left navigation sidebar of the Tablet POS app and tap the Bookings tab.
Bookings Overview
The Bookings screen displays a monthly calendar grid on the left and a detailed booking list for the selected date on the right.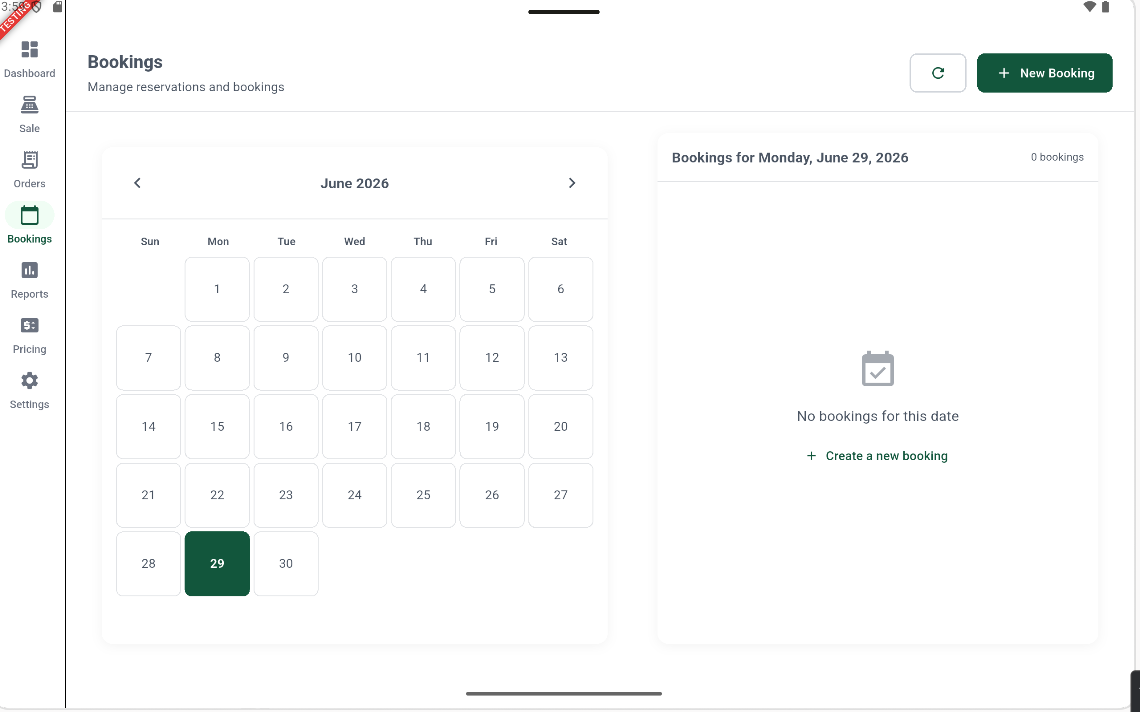 12345
12345Tablet POS App Bookings screen — navigate dates and view reservation schedules
Screen Elements
Tap the Bookings icon in the left-hand navigation sidebar to access this screen.
Tap + New Booking in the top-right to schedule a new reservation.
Select any date on the calendar to load its daily booking entries.
The currently active calendar date (e.g., June 29).
Displays all reservation cards scheduled for the selected calendar date.
Creating a Booking
Tap + New Booking or the Create a new booking empty state link to open the form modal.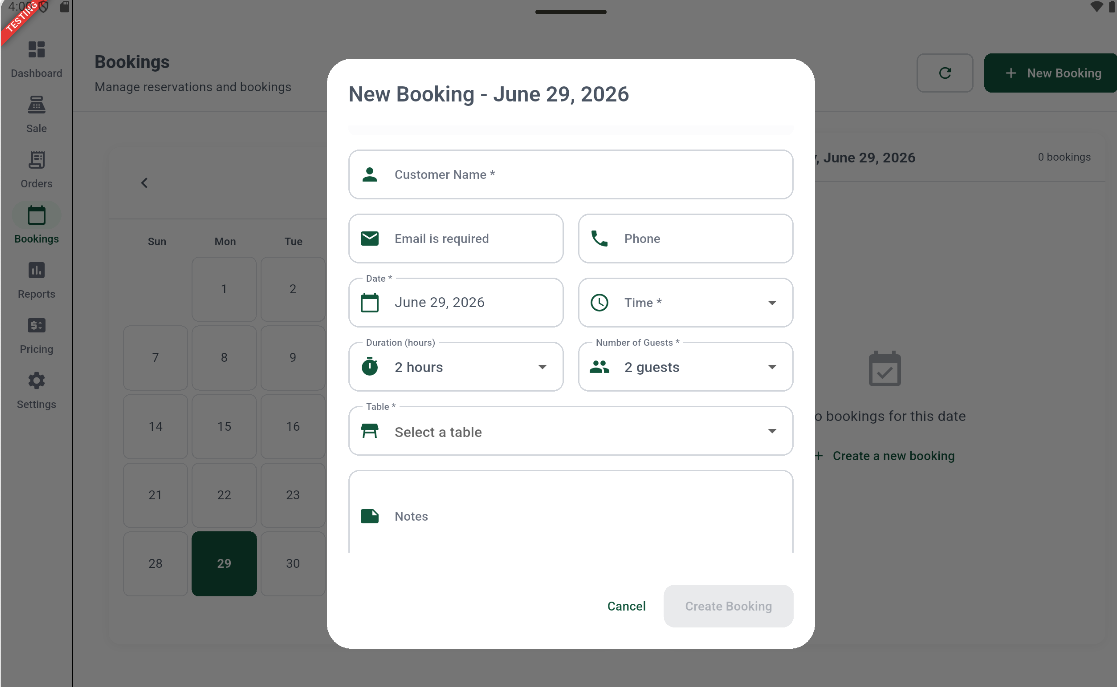 1234567
Create New Booking modal — fill in customer details, booking times, and table allocations
Screen Elements
Enter guest's name.
Required email address and primary contact phone number.
Select reservation date and target arrival time.
Specify session duration (hours) and party size details.
Assign a table to this booking from the active branch list.
Enter special requests, VIP customer indicators, or dietary notes.
Save and schedule the reservation.
Editing a Booking
Tap the Edit icon (pencil) on any daily booking card to modify guest details, times, or table allocation.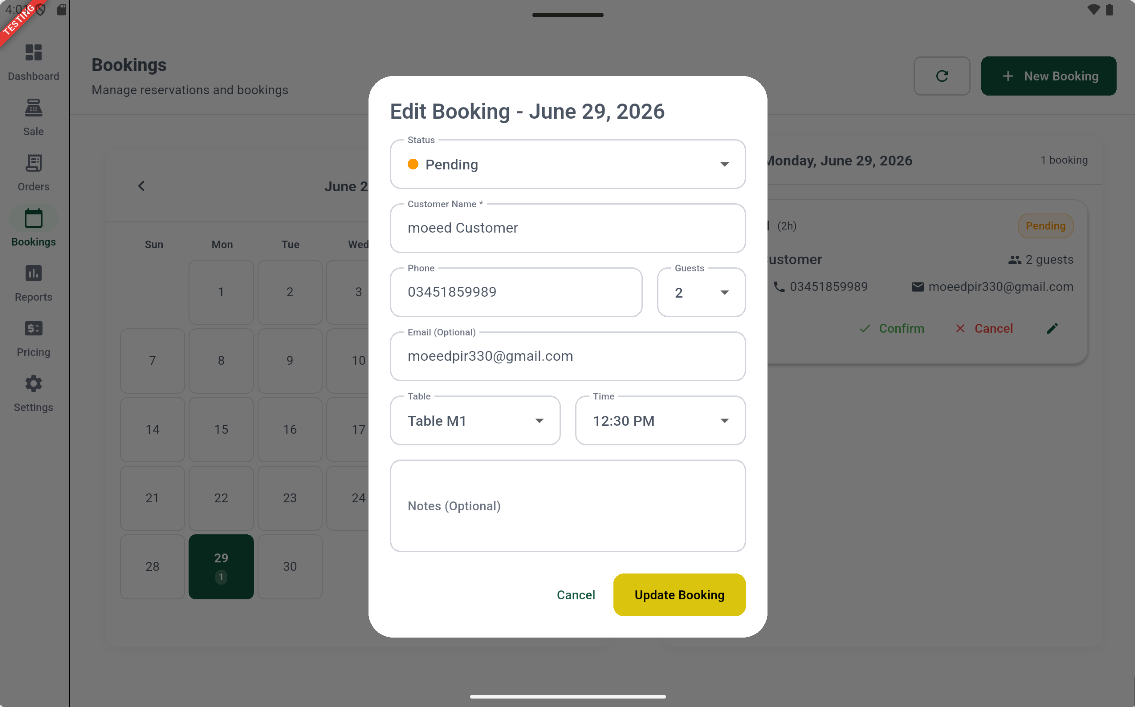 123456789
Edit Booking modal — edit reservation details or manually change guest statuses
Screen Elements
Select the booking status (Pending, Confirmed, Completed, Cancelled, or No Show).
Edit the guest's name.
Edit the primary contact number.
Select the number of guests for this booking.
Edit the optional customer email address.
Change the table allocation for the reservation.
Change the booking time.
Update special instructions, dietary info, or seating preferences.
Save all updates to the booking.
Confirming a Booking
Tap Confirm on a daily booking card list row to launch the confirmation dialog.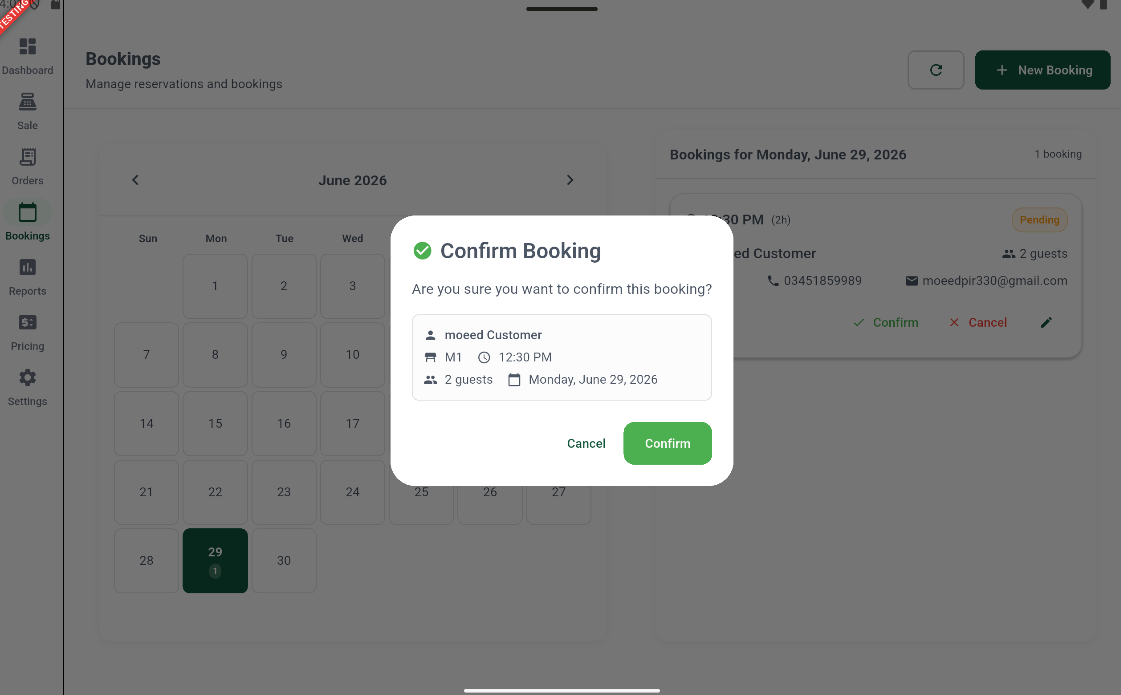 123
123Confirm Booking modal — review table and time details before final confirmation
Screen Elements
Displays modal asking to confirm the table allocation.
Verify guest details, table number, time, and party size.
Tap the green Confirm button to mark status as Confirmed.
Cancelling a Booking
Tap Cancel next to a reservation entry to trigger the cancellation confirmation.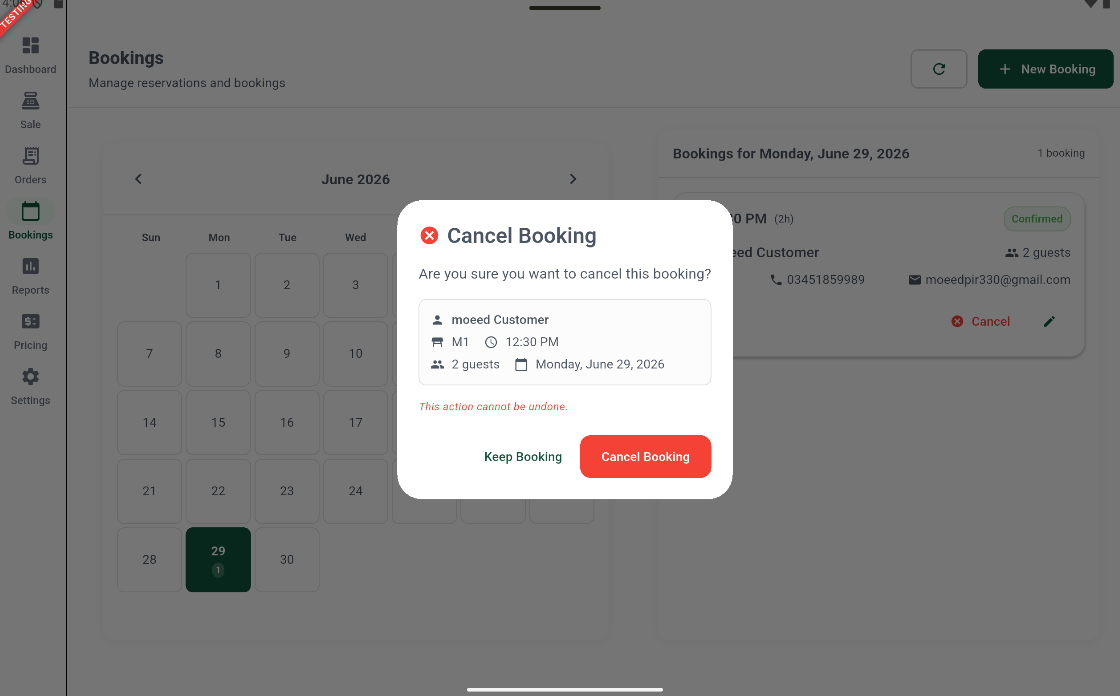 12345
12345Cancel Booking modal — review details and tap Cancel Booking to permanently void the session
Screen Elements
Displays confirmation dialog confirming cancellation intent.
Review details (guest name, table name, time, guest count, and date).
Highlights that this action cannot be undone.
Tap to dismiss dialog and retain booking status.
Tap to permanently cancel the reservation.
Key Actions
| Action | How To |
|---|---|
| Add a new table | Click + Add New Table (top-right) |
| Edit table details | Click the table on the floor plan → Edit |
| Change table status | Click the table → Set Status |
| Manage areas/floors | Click Manage Areas or switch to the Areas & Floors tab |
| Filter by area | Use the Area Filter dropdown |
| Switch view | Click Visual, Grid, or Bookings in the View Mode control |
| Delete a table | Grid view → trash icon on the table card → confirm Delete |
| Create a booking (Web) | Switch to Bookings view → Click + New Booking |
| Edit a booking (Web) | Switch to Bookings view → Click edit icon next to reservation entry |
| Confirm/Cancel reservation (Web) | Switch to Bookings view → Click Confirm or Cancel buttons on reservation entry |
| Create a booking (Tablet) | Bookings tab → Tap + New Booking |
| Edit a booking (Tablet) | Bookings tab → Tap Edit icon (pencil) next to reservation card |
| Confirm a booking (Tablet) | Bookings tab → Tap Confirm next to reservation card → tap Confirm |
| Cancel a booking (Tablet) | Bookings tab → Tap Cancel next to reservation card → tap Cancel Booking |
Related Documentation
- Order Management — Link orders to tables
- POS Terminal — Open orders directly from the floor plan
- Reports — Table turnover and occupancy analytics