Kitchen Display (KDS)
The Kitchen Display System (KDS) — also called the Kitchen Application or Kitchen Tablet app — shows incoming orders to kitchen staff in real time. It replaces paper chits with a digital board and keeps preparation status in sync with Order Management, the Bizaldo Tablet App, and the TV Application. KDS is available for restaurant companies.Where to find it: Open Kitchen Display from Dashboard Quick Actions, or from Branch Management on a specific branch. Download installers from Apps in the sidebar.
Full Setup Overview
- Download Kitchen app — Dashboard sidebar → Apps → Kitchen installers
- Install on kitchen device — Android tablet, Windows PC, or Mac
- Generate pass key — Dashboard → Kitchen Display (or Branch Management)
- Activate in Kitchen app — Enter 8-character pass key
- (Optional) Printer — Configure IP in Kitchen app settings
- Go live — Place test order at POS → appears on KDS
Step 1 — Download the Kitchen app
From the dashboard
- Sign in to the Bizaldo dashboard.
- In the sidebar, click Apps (Explore Bizaldo Apps).
- Scroll to the Kitchen installers section (shown only for restaurant companies).
- Choose your platform and download:
| Platform | Installer | Notes |
|---|---|---|
| Android | `.apk` file | Install on a kitchen tablet; allow installs from unknown sources if prompted |
| Windows | `.exe` installer | Run on a kitchen PC or mini PC connected to a display |
| macOS | `.dmg` disk image | Open and drag the app to Applications |
iOS
Hardware Recommendations
| Component | Recommendation |
|---|---|
| Display | 10"–15" tablet or monitor visible from the prep line |
| Device | Android tablet (most common), Windows mini PC, or Mac |
| Network | Stable Wi‑Fi on the same LAN as POS and printers |
| Printer *(optional)* | Network thermal receipt printer (ESC/POS, port 9100) |
Step 2 — Install the app
Android
- Download the `.apk` from Apps.
- On the tablet, open the downloaded file.
- If prompted, enable Install unknown apps for your browser or file manager.
- Complete installation and open Bizaldo Kitchen.
Windows
- Download the `.exe` from Apps.
- Run the installer and follow the prompts.
- Launch Bizaldo Kitchen from the Start menu.
- For a permanent install, pin the app and disable sleep on the display PC.
macOS
- Download the `.dmg` from Apps.
- Open the disk image and drag the app to Applications.
- If macOS blocks the app, open System Settings → Privacy & Security and allow it.
- Launch Bizaldo Kitchen.
Step 3 — Kitchen activation codes (pass keys)
Activation ties a kitchen device to a branch using an 8-character pass key generated in the dashboard.Open the activation modal
Option A — Dashboard (recommended)- Select the correct company and branch in the dashboard header.
- On the Dashboard, click Kitchen Display in Quick Actions.
- Go to Branch Management.
- Find the branch and use the kitchen activation action (pass key / kitchen icon).
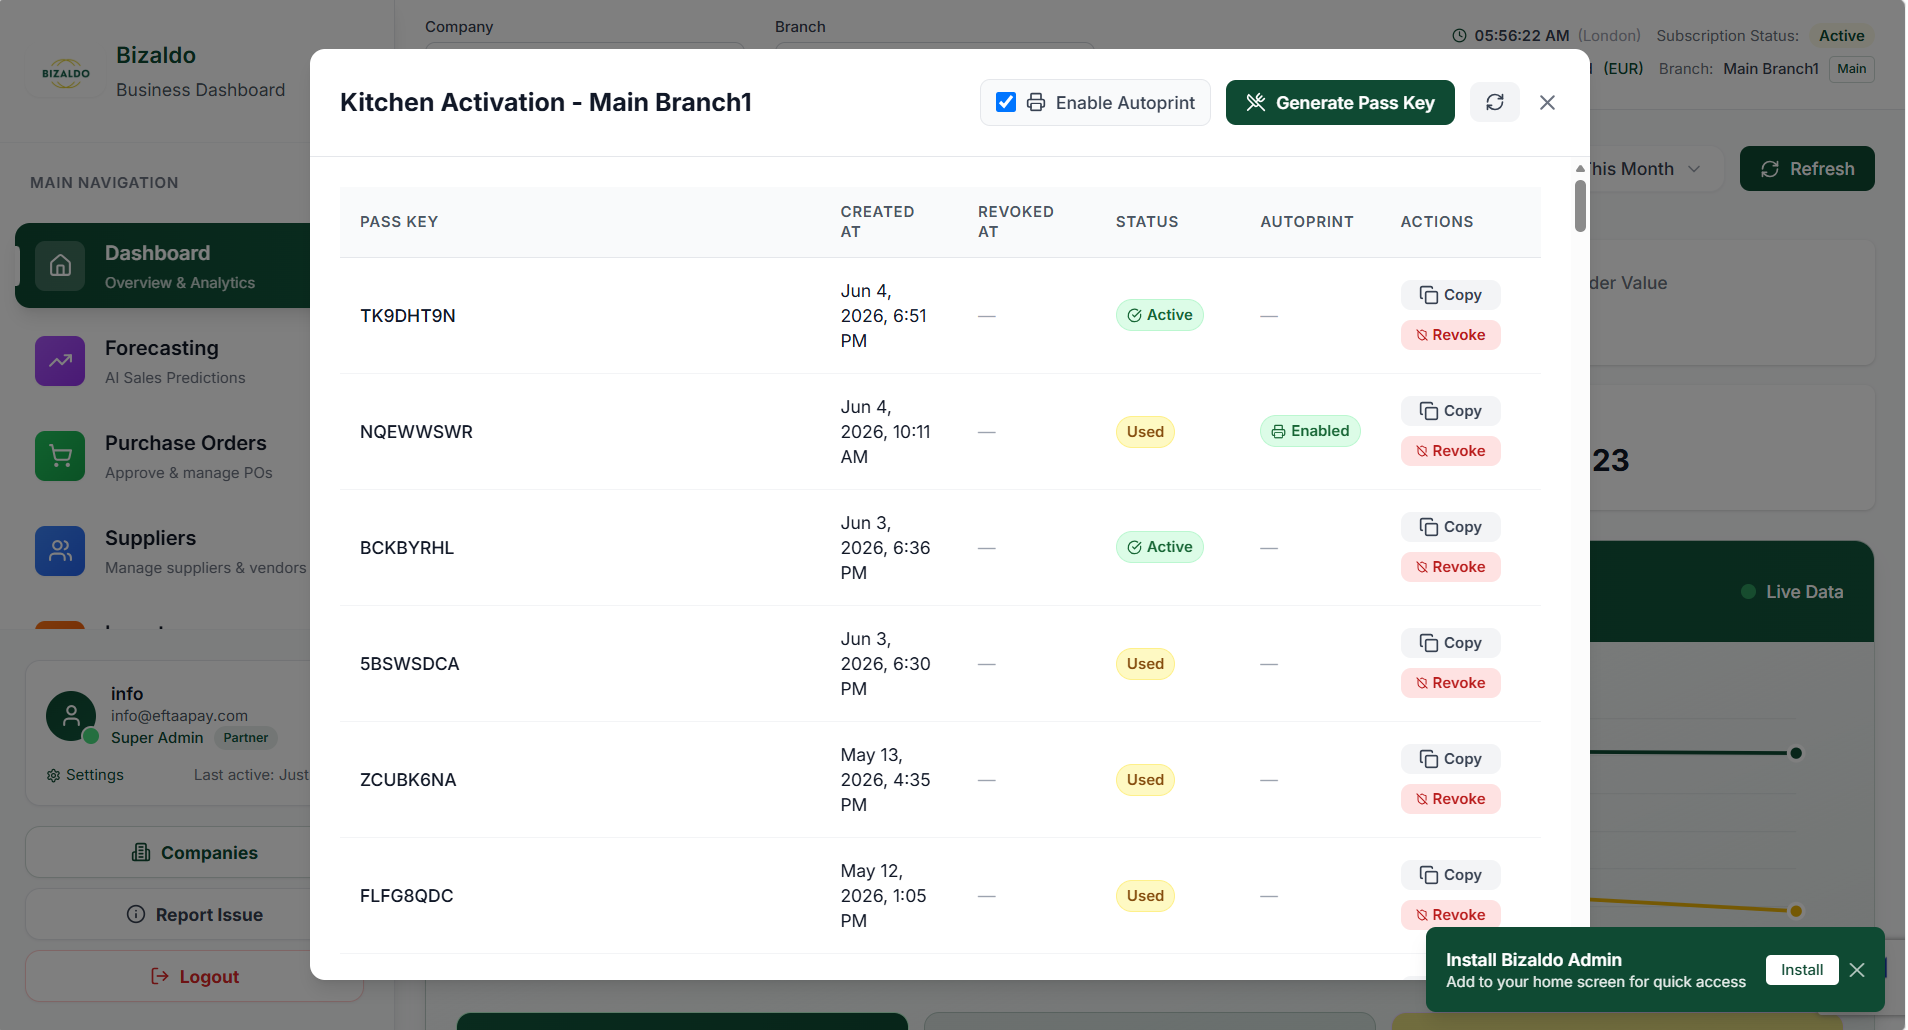 1234
1234Figure 1 — Generate a pass key and optionally enable autoprint from the dashboard
Screen Elements
Toggle on if the kitchen should automatically print a ticket for each new order.
Create a unique activation code for this kitchen display.
Copy this key and enter it in the Kitchen Application.
Active keys can still be paired; Used keys were already consumed.
Pass key types
| Mode | How to Create | Best For |
|---|---|---|
| Simple pass key | Leave Link to Kitchen Station off → click Generate Pass Key | Single kitchen screen showing all orders |
| Station + pass key | Enable Link to Kitchen Station → set name and categories → Create Station & Key | Multiple prep areas (grill, cold, drinks) |
| Update existing station | Enable station mode → type an existing station name → adjust categories → Save Station | Change category routing without a new device |
Activation options explained
Auto-print receipts
Toggle Auto-print receipts before generating a key. When enabled, each new order automatically prints to the kitchen printer configured in the app.Autoprint and pending orders
Link to Kitchen Station
Enable this to route only specific product categories to a named station:- Toggle Link to Kitchen Station.
- Enter a Station Name (e.g. `Grill`, `Cold Prep`, `Bar`). Existing station names appear as suggestions.
- Select one or more Categories from the dropdown. Parent categories can be selected; child categories inherit routing.
- Click Create Station & Key.
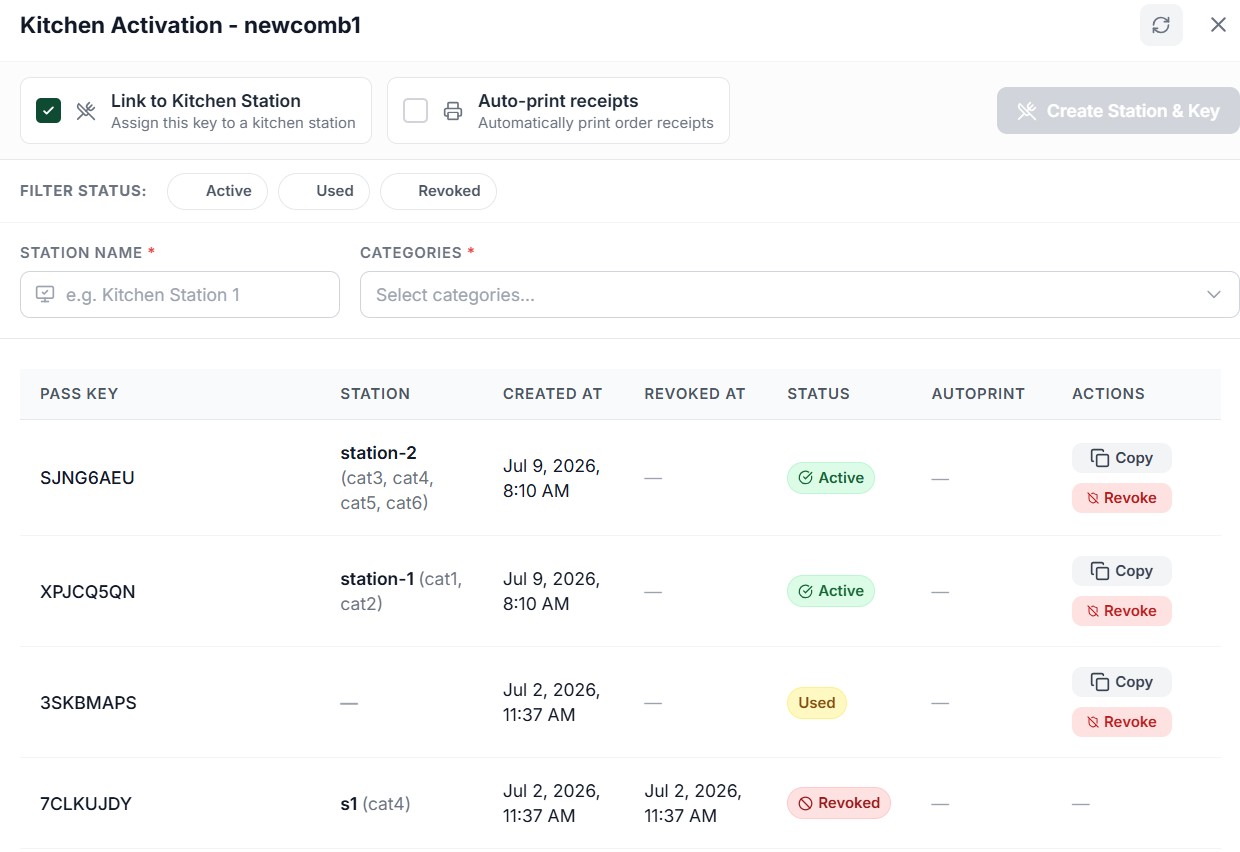 12345
12345Figure 2 — Setup a kitchen station and generate a station-specific pass key
Screen Elements
Toggle on to configure station-specific routing for specific categories.
Enable automatic ticket printing when new orders are sent to this station.
Specify a unique name for the prep station (e.g., station-1, station-2).
Select the categories of products that this station will display and prepare.
Click to generate the unique 8-character pass key for this station.
Pass key lifecycle
| Status | Meaning |
|---|---|
| Active | Key can be used to pair a device |
| Used | Key was consumed after successful pairing (single-use) |
| Revoked | Key was manually revoked; backend rejects it immediately |
Managing keys in the table
The activation modal lists all keys for the branch:| Pass Key | Station | Created At | Revoked At | Status | Autoprint | Actions |
|---|
Real-time effects on the Kitchen App
- Updating Station Categories: To modify which categories are prepared at an existing station, open the activation modal, enable Link to Kitchen Station, enter or search for the existing Station Name, adjust the categories, and save. The active Bizaldo Kitchen App on that station will update in real-time and adjust the visible categories on the screen immediately, without requiring reactivation.
- Revoking Active Keys: If a kitchen tablet/device is already active and paired, clicking Revoke in the dashboard will immediately log out/disconnect the device. The Kitchen App on the device will exit the orders screen and return to the activation page, prompting for a new pass key.
Step 4 — Activate the Kitchen app on the device
- Open the Bizaldo Kitchen app on the kitchen tablet or PC.
- On the activation screen, enter the 8-character pass key from the dashboard table.
- Wait for automatic pairing — the app connects to your branch.
- The app proceeds to the orders screen and begins receiving orders confirmed at POS.
- Confirm the key status is Active (not Used or Revoked)
- Confirm you selected the correct branch when generating the key
- Generate a fresh pass key and try again
Step 5 — Kitchen printer setup (optional)
Network printers on the same LAN as the kitchen device can print physical tickets.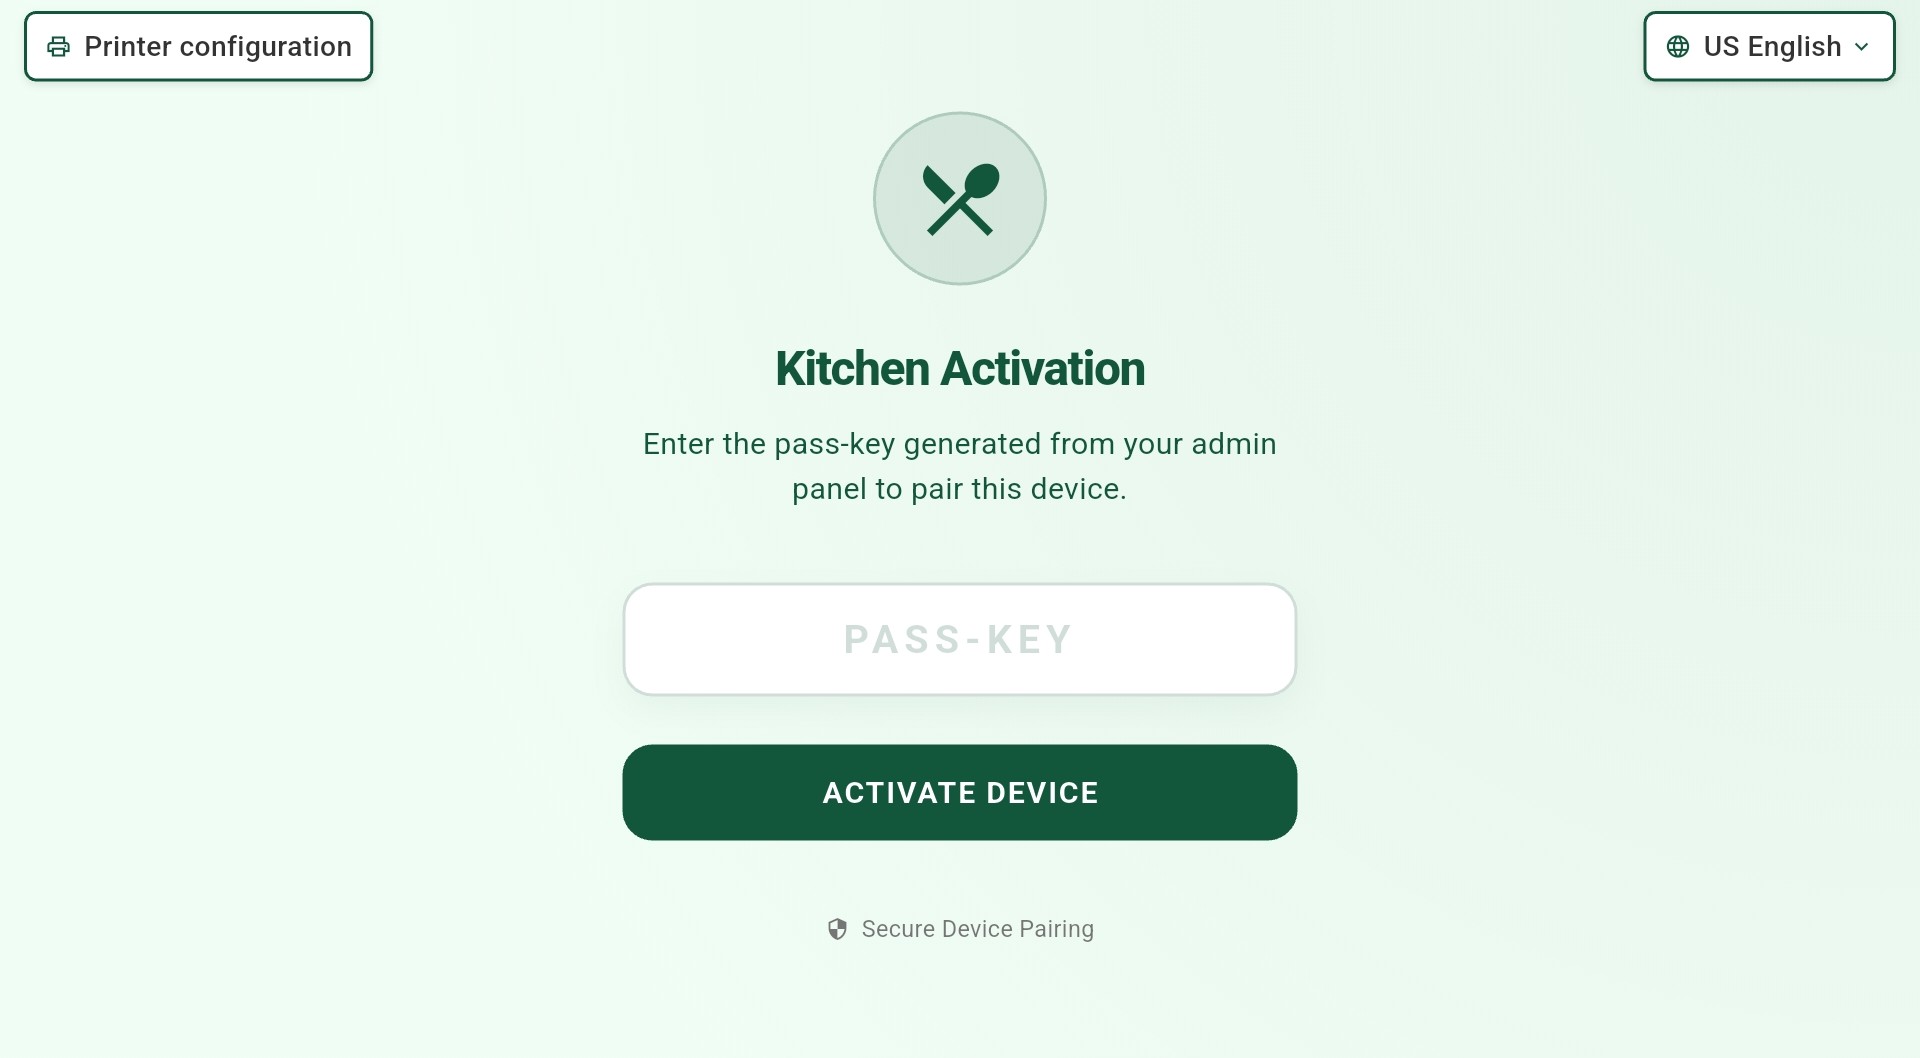 123
123Figure 3 — Enter the pass key on the Kitchen app activation screen
Screen Elements
Optional shortcut to kitchen printer settings before or after activation.
Enter the 8-character pass key copied from the dashboard.
Pair this device to your branch.
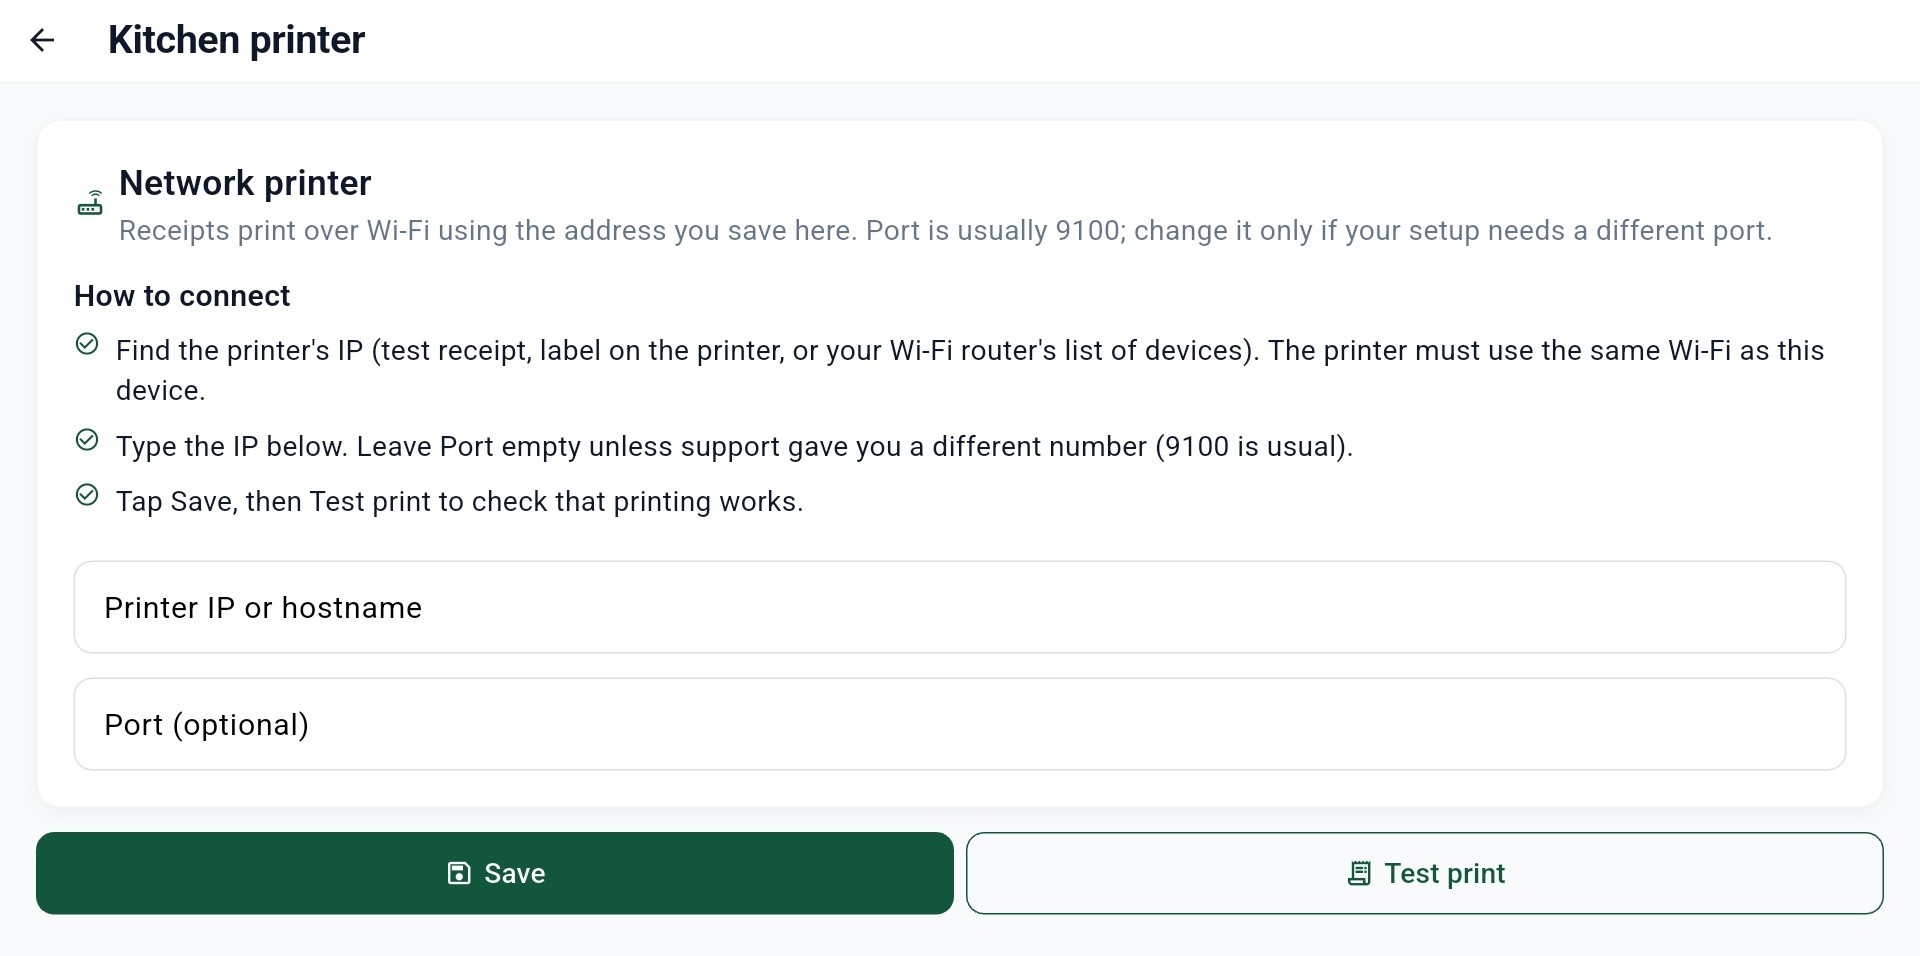 1234
1234Figure 4 — Enter printer IP and test the connection
Screen Elements
IP address of the kitchen printer on your local network.
Usually 9100 unless support specified otherwise.
Save printer settings.
Print a test ticket to verify connectivity.
Printer configuration steps
- In the Kitchen app, open Settings → Printer Configuration.
- Enter the printer IP address (find this on the printer's network config page or router DHCP list).
- Set Port to `9100` (default for most network receipt printers).
- Click Save.
- Click Test Print to verify connectivity.
- Autoprint was enabled on the pass key used for activation, and
- Printer IP/port are correct, and
- Printer and kitchen device are on the same network
Using the Kitchen Display
After activation, the Kitchen Display shows a horizontal board of order cards. Each card is one order with its items, status, and actions.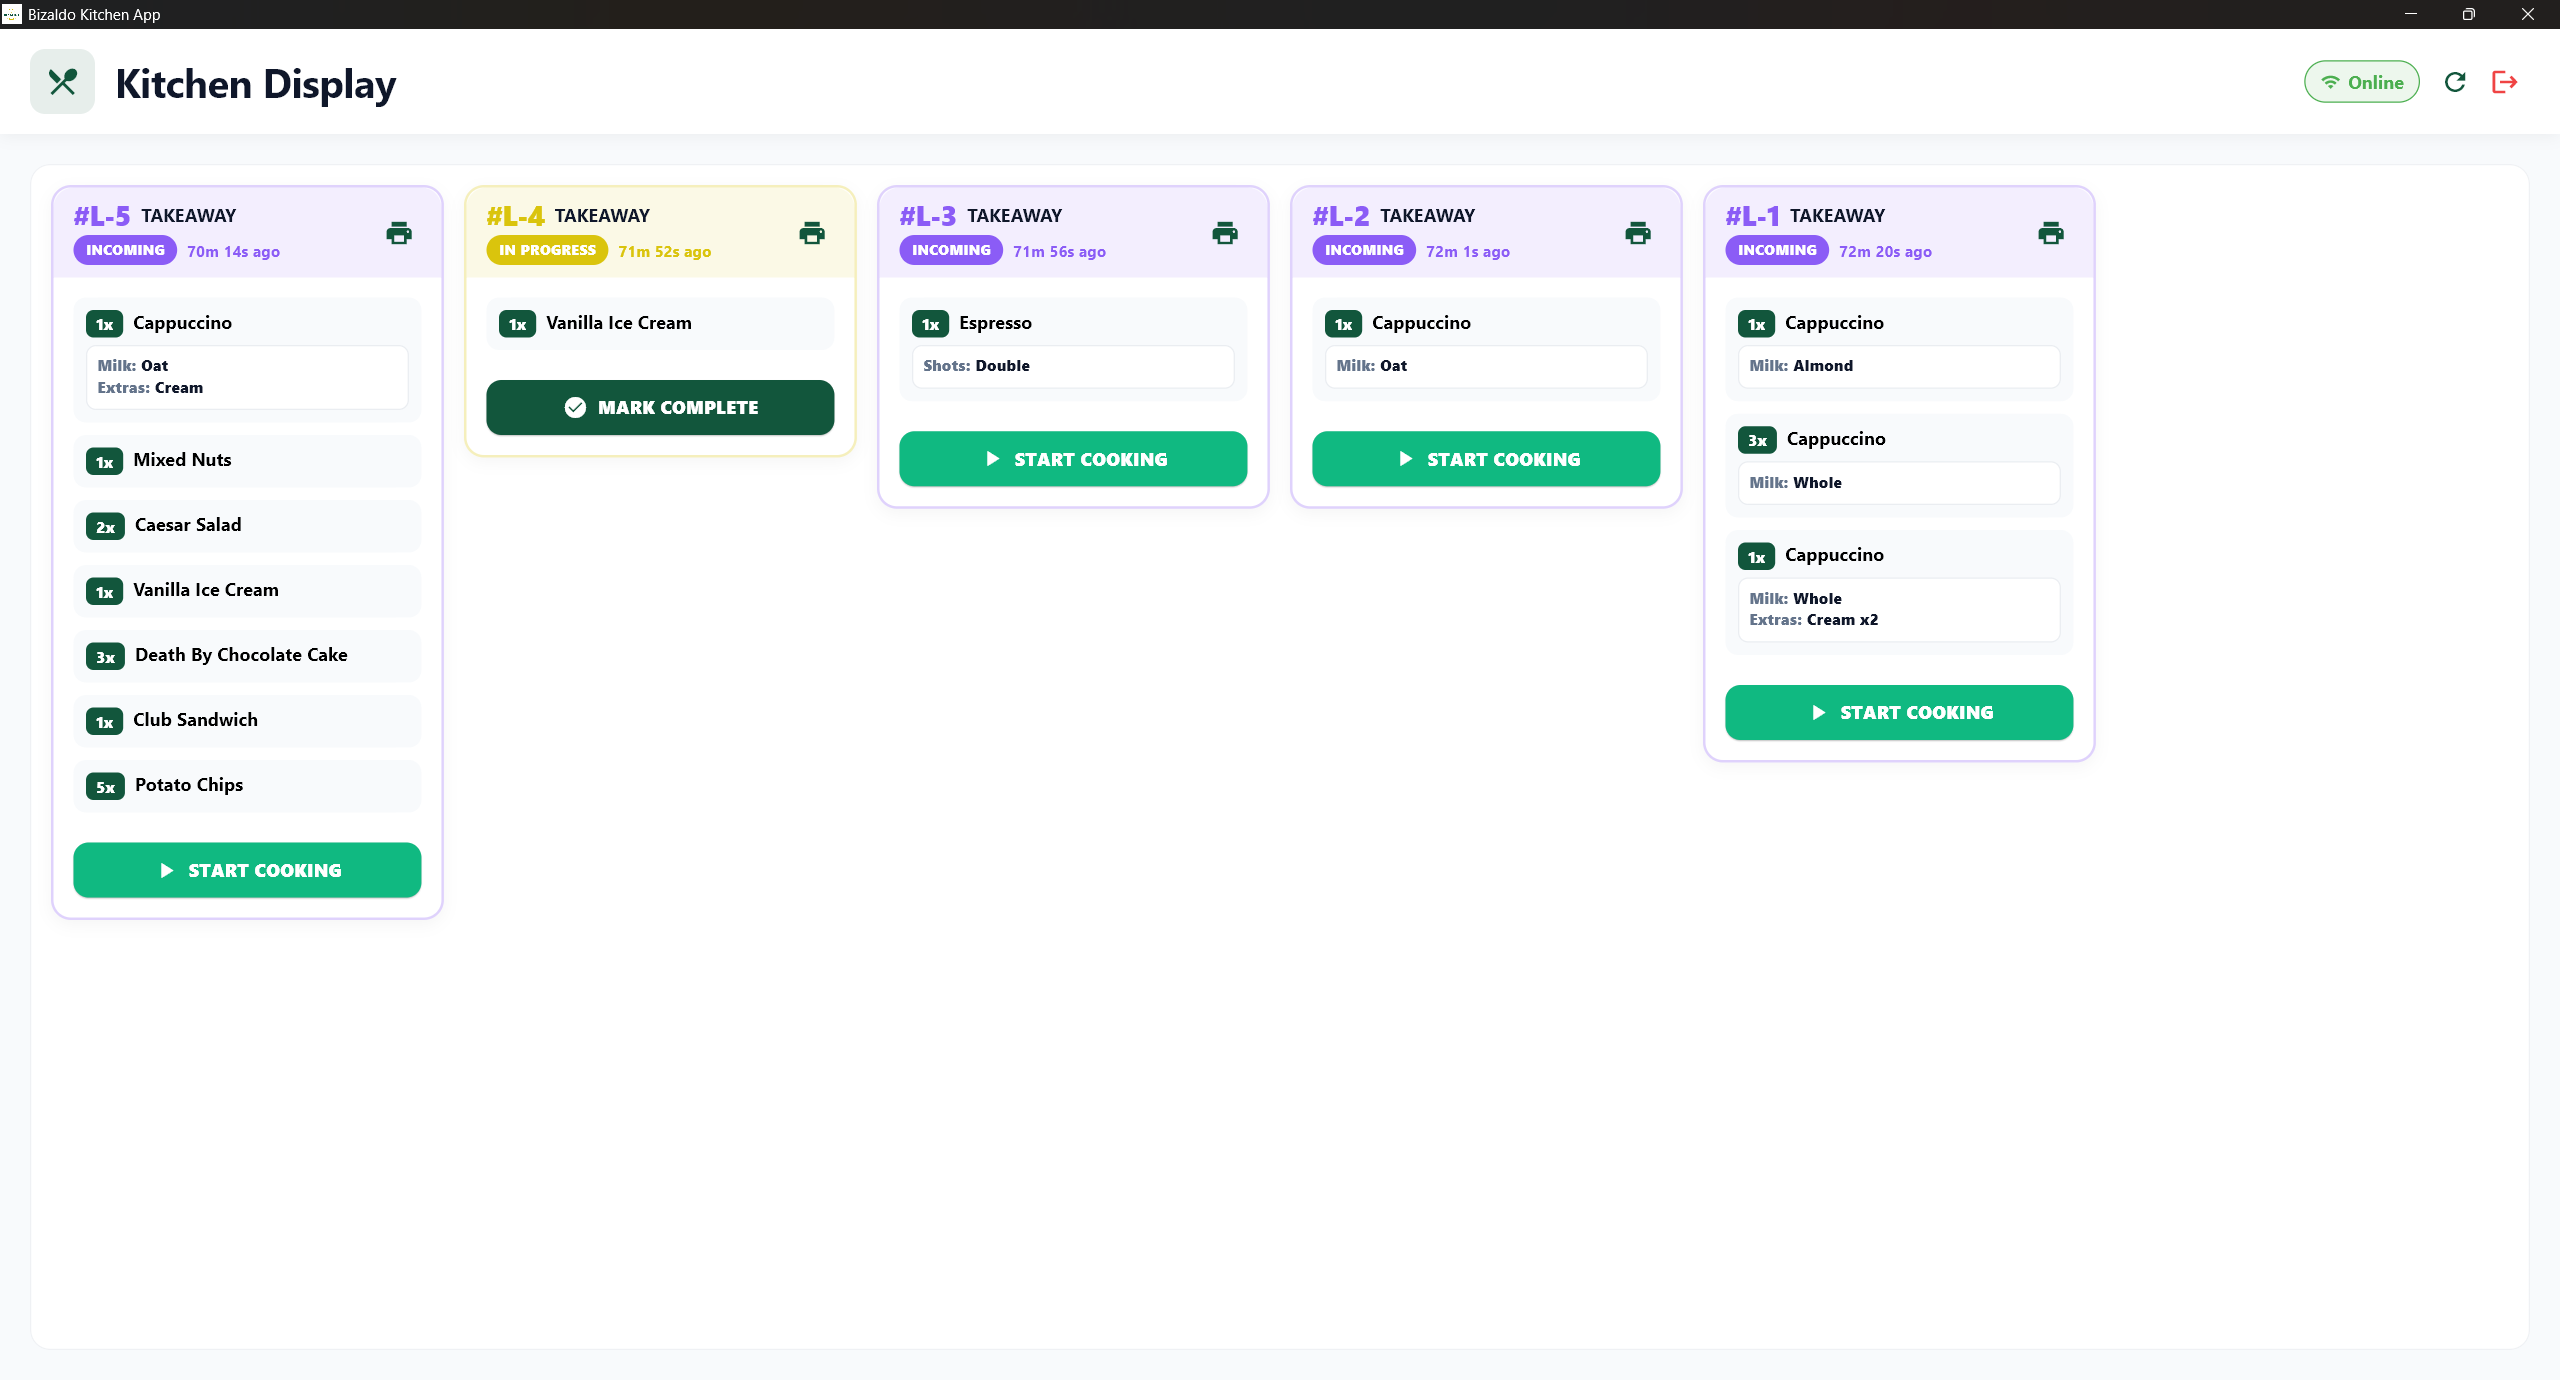 1234567
Figure 5 — Kitchen Display with order cards, timers, and action buttons
Screen Elements
Order number and type (e.g. #L-5 TAKEAWAY) with elapsed time since the order was placed.
New orders waiting to be started. Tap START COOKING to move to In Progress.
Orders currently being prepared. Tap MARK COMPLETE when finished.
Quantities, product names, and modifiers (e.g. Milk: Oat, Extras: Cream).
Begins preparation for an Incoming order.
Marks an In Progress order as done and syncs to POS and TV.
Shows the display is connected and receiving live order updates.
Order statuses
| Status | Meaning | Action |
|---|---|---|
| INCOMING | New order sent from POS after payment or confirmation | Tap START COOKING |
| IN PROGRESS | Kitchen staff are preparing the order | Tap MARK COMPLETE when done |
Station-filtered views
When running a larger restaurant operations flow, you can set up multiple dedicated preparation screens (e.g., *Grill*, *Salad Station*, *Drinks Bar*) by using Station-filtered views.Station Flow Setup & Activation
- Enable Station Routing: In the dashboard's Kitchen Activation modal, toggle on Link to Kitchen Station (see Figure 2).
- Define Station Name: Give the station a clear identifier (e.g. `station-1` or `station-2`).
- Select Categories: Select the product categories that this station is responsible for preparing.
- Generate & Activate: Click Create Station & Key and enter the resulting pass key on the kitchen device's activation screen.
Split Order Workflow
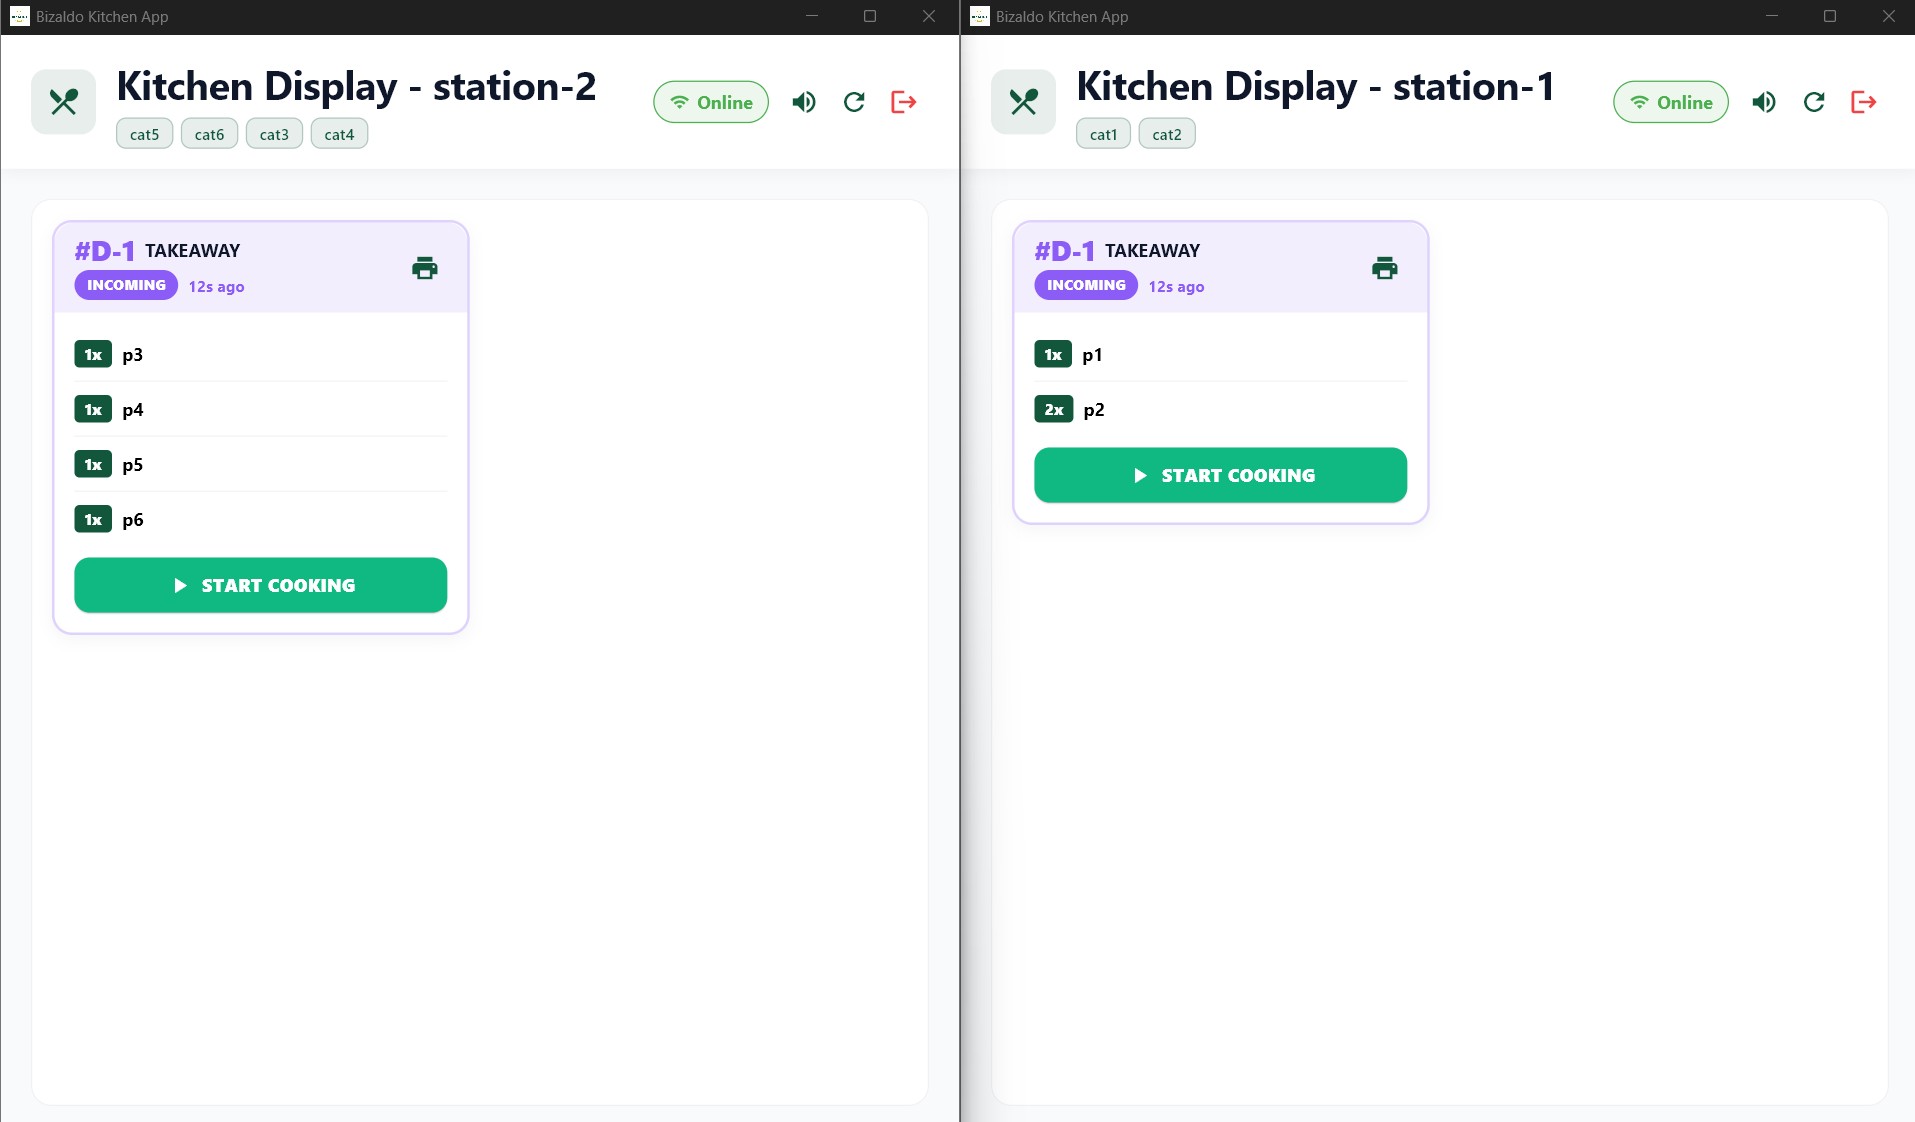
Once activated, the station display operates in station flow. When a customer places a single order containing items from multiple categories, the KDS splits the items dynamically:- Each station only displays the order items that belong to its assigned categories.
- Kitchen staff at each station can start cooking and mark complete their station's items independently.
 1234
1234Figure 6 — Order splitting and item routing between station-2 (left) and station-1 (right)
Screen Elements
Displays categories (cat5, cat6, cat3, cat4) assigned to the left station.
Displays categories (cat1, cat2) assigned to the right station.
Only products belonging to cat3–cat6 (p3, p4, p5, p6) appear on the station-2 screen.
Only products belonging to cat1–cat2 (p1, p2) appear on the station-1 screen for the same order (#D-1).
Station Rules & Constraints
- Category Exclusivity: A product category assigned to one active station cannot be assigned to another station. This prevents duplicate preparation of the same items. If you attempt to select an already assigned category, the dashboard will mark it as *In use*.
- Station-Specific Auto-Print: If Auto-print receipts is enabled for a station (e.g. *station-1*), its receipt printer will print only the order items belonging to the categories routed to that station. Items routed to other stations will not print on this station's receipt, preventing kitchen clutter and confusion.
What staff see on each card
- Order number (e.g. `#L-5`) and order type (Takeaway, Dine In, Delivery)
- Status badge and elapsed time since the order was placed
- Line items with quantities and modifiers (variants, add-ons, notes)
- Print icon to print a ticket for that order
- START COOKING or MARK COMPLETE depending on current status
Troubleshooting
| Issue | What to Check |
|---|---|
| No orders appearing | Order reached Confirmed at POS; device activated with valid key; branch matches POS |
| Activation fails | Key is Active; correct 8-character code; generate a new key if Used or Revoked |
| Wrong items on screen | Station categories — verify station assignment and category mapping |
| Printer not printing | IP correct, same network, port 9100; autoprint enabled on pass key; run Test Print |
| Delayed updates | Network connectivity; refresh the kitchen display |
| Duplicate prints | Autoprint activated while backlog existed — see warning above |
| Category "In use" | Another active station owns that category; revoke or reassign the other station first |
How KDS fits the order flow
- POS Checkout & Confirmation — Order is confirmed at POS and sent via WebSocket to the Kitchen Display (INCOMING).
- Preparation Starts — Inventory is deducted, and preparation begins on KDS (START COOKING → IN PROGRESS).
- Completion & Pickup — Order is marked complete (MARK COMPLETE) and syncs to the TV Display for pickup, with reports and analytics updated.
Go-Live Checklist
- Kitchen app downloaded from Apps and installed on kitchen device
- Correct company and branch selected in dashboard
- Pass key generated and status is Active
- Device activated; key shows Used
- (Optional) Printer configured and test print succeeded
- (Optional) Stations and categories configured for multi-prep workflows
- Test order from POS appears on KDS; use START COOKING then MARK COMPLETE
- TV display updated when order marked ready (if using TV app)
Related Documentation
- TV Application — Customer-facing order status screens
- Dashboard Overview — Quick Actions for Kitchen Display
- Order Management — Full order lifecycle
- Troubleshooting — Printer setup and common kitchen issues