Customer Management
Customer Management in Bizaldo serves as the centralized database for tracking customer relationships, purchasing behaviors, and lifetime value. Segmenting customers accurately allows you to run targeted promotions, design effective loyalty programs, and analyze retention.Where to find it: In the left sidebar, click Customers.
Customer Segmentation Logic
Bizaldo dynamically segments customers into distinct tiers based on their lifetime purchase count (total distinct orders). This classification is calculated automatically based on purchase history.Dynamic Customer Classification
| Status/Tier | Order Count | Description / Profile |
|---|---|---|
| VIP | 10 or more orders | Highly loyal, repeat customers. Ideal for exclusive rewards. |
| Regular | 5 to 9 orders | Consistent buyers. Target with engagement campaigns. |
| New | 1 to 4 orders | First-time or recent buyers. Focus on encouraging a second order. |
| Prospect | 0 orders | Registered accounts with no purchase history yet. |
Customer View
KPI, Filters & Search
At the top of the Customers screen, four KPI cards provide immediate insights into customer metrics for the selected company and branch:- Total Customers: The total count of all registered customers in the database.
- New This Month: The total number of registered customers who have placed between 1 and 4 orders.
- Total Revenue: The sum of all successful orders placed by registered customers (in local currency, e.g., د.أ).
- Average Spent: The total revenue divided by the total number of customers.
- Search Bar: Real-time search across customers by name, email, or phone number.
- Status Dropdown: Filter the customer list using the segmentation tiers (*All Statuses*, *VIP*, *Regular*, *New*, *Prospect*).
Viewing Customer Details
Click on the View button on any customer card to open the detailed customer view. From this page, you can review the customer's complete information and order history. To update their information, click the Edit button to navigate to the edit page.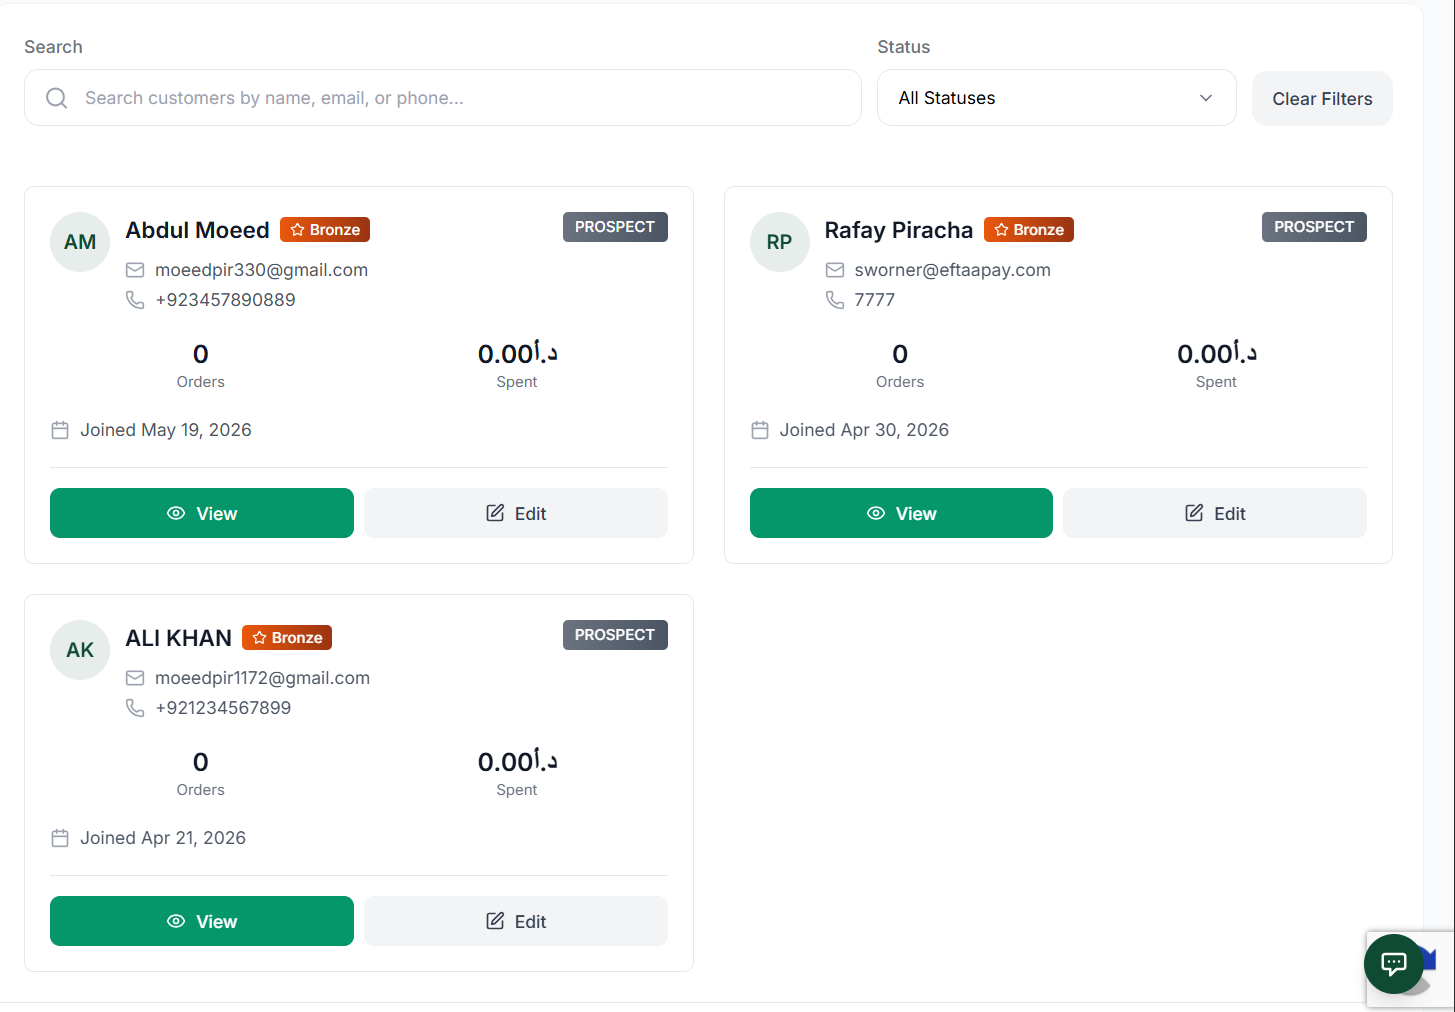 12
12Detailed view of a customer's profile and order history
Screen Elements
Click here to navigate to the edit page and update the customer's details.
Click here to view the customer's details.
Customer Detail View
The customer detail page displays core information, address, and spending history. It also shows order totals and outstanding balance.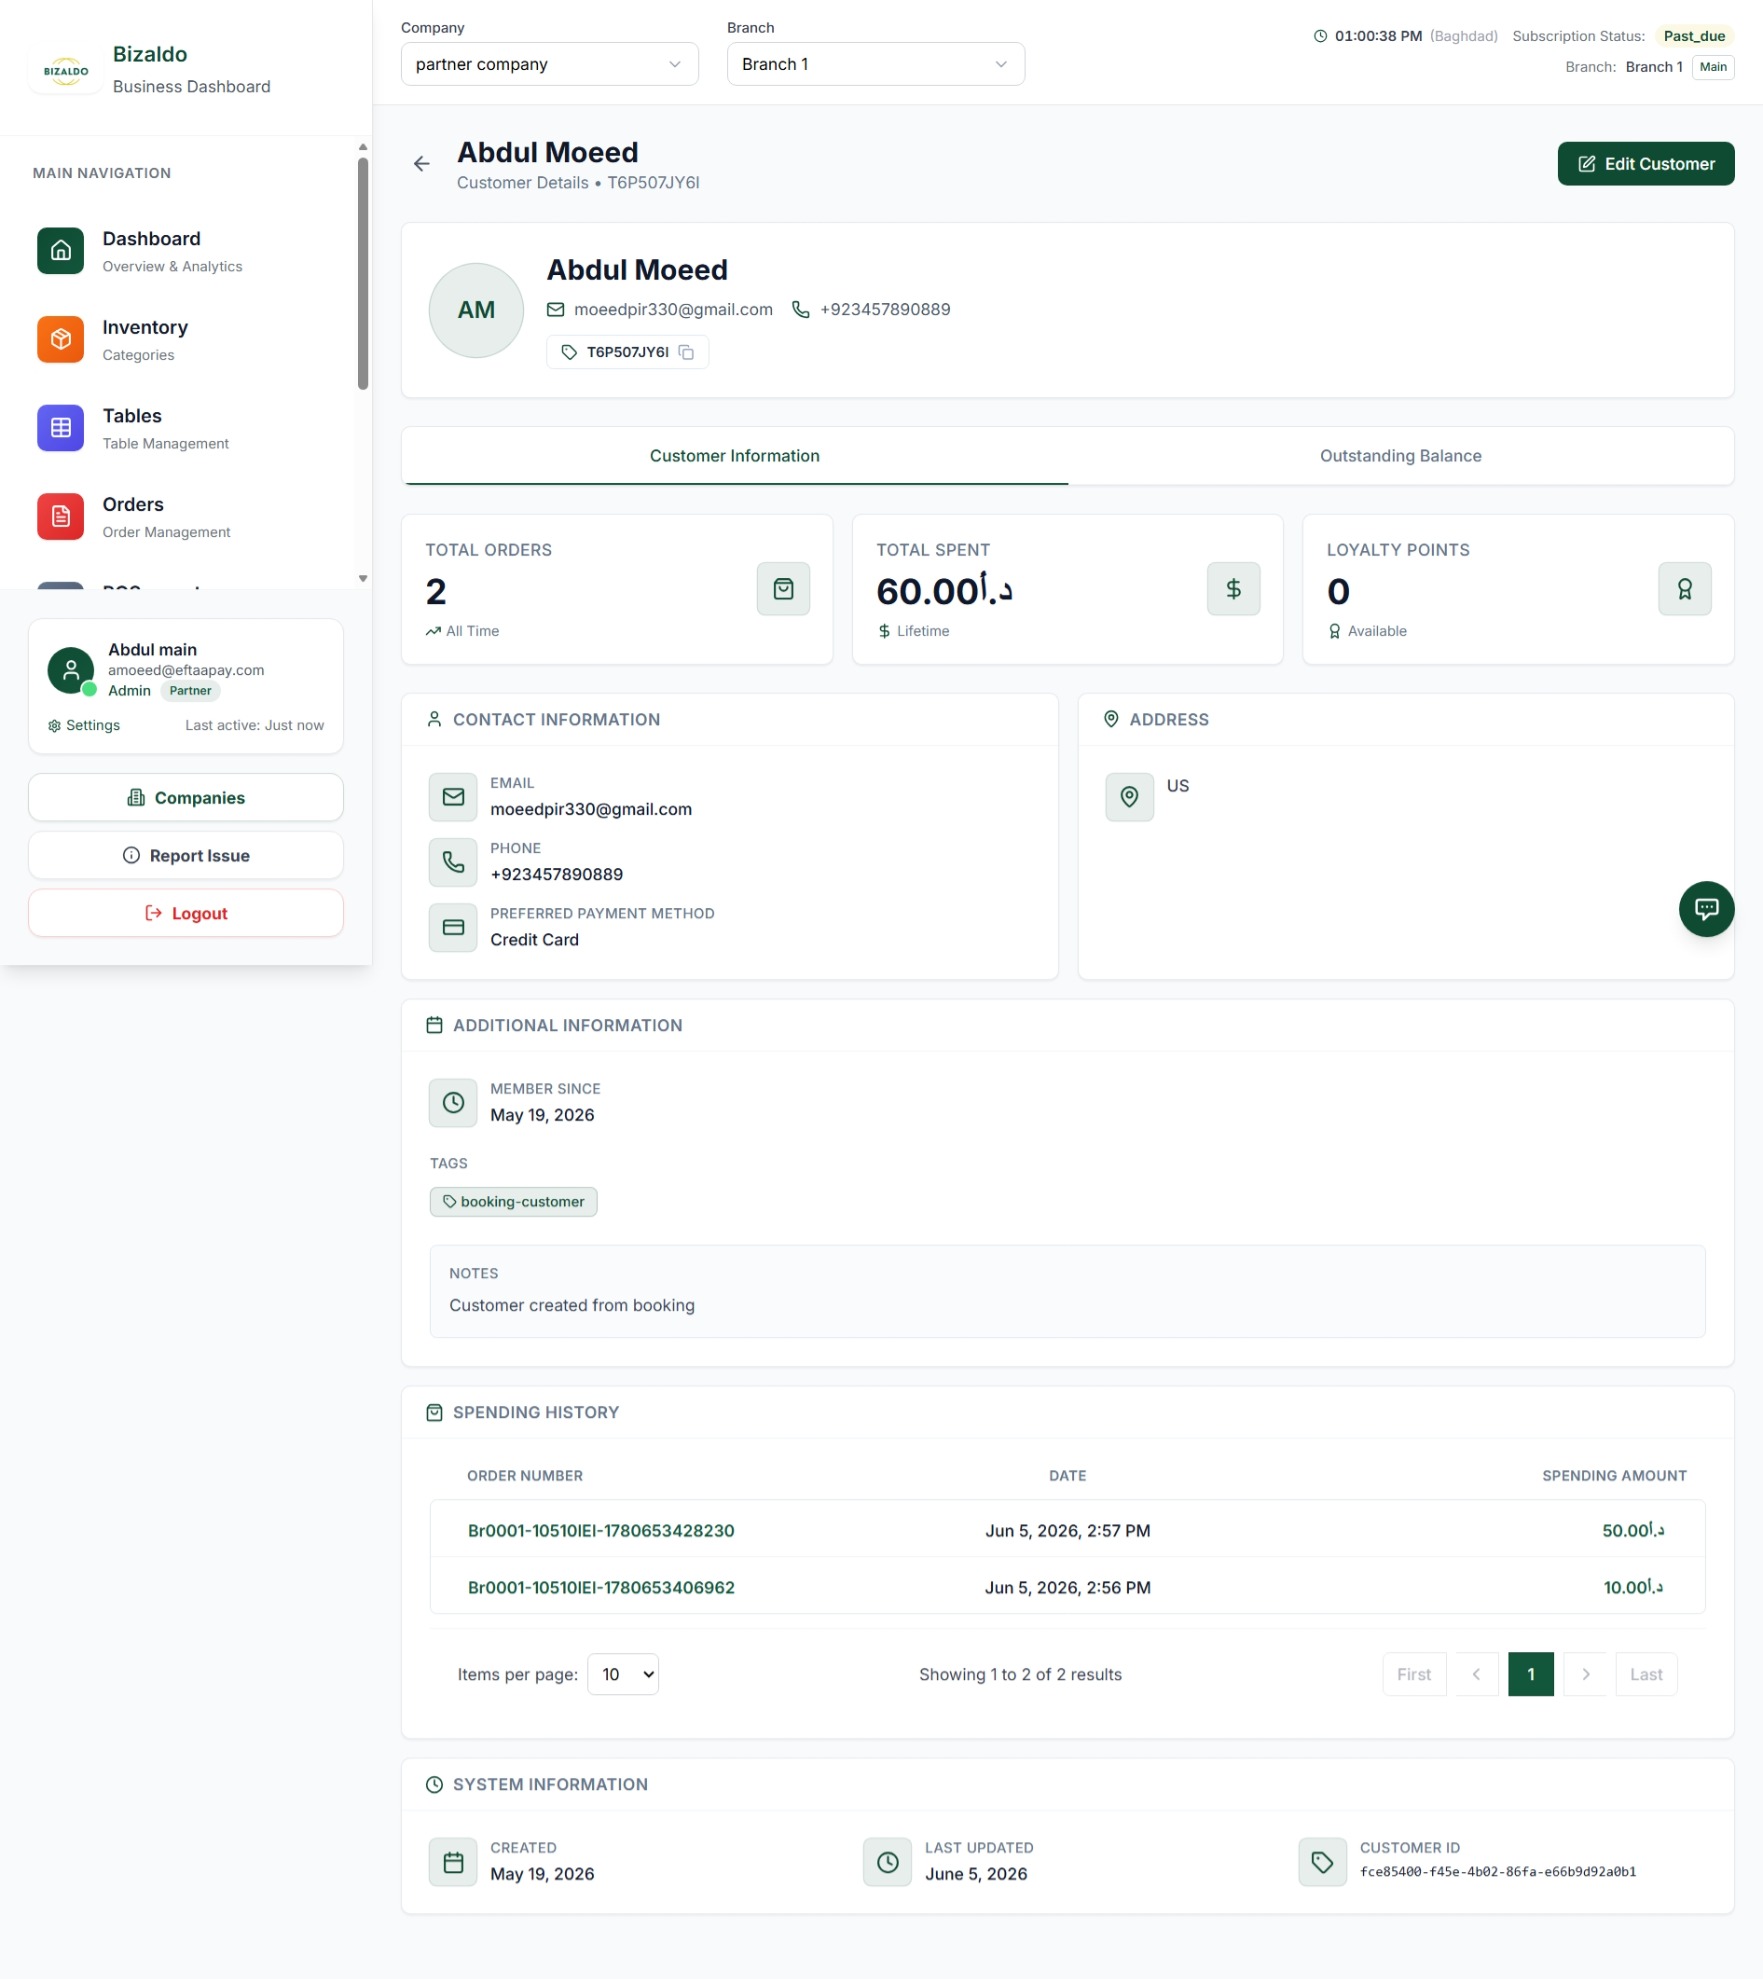 123456
Customer detail view with KPIs and tabs
Screen Elements
Display customer information, order history, and loyalty points.
Outstanding balance tab is visible only if company has BNPL enabled.
Display customer contact and general information.
Customer's address and location information.
Display additional customer information including membership date, tags, and notes.
Display the total spending of customer on each order.
Outstanding Balance
When clicking the Outstanding Balance tab on a customer's profile, a page will appear displaying all outstanding order balances along with payment records.KPI Definitions for Record Payment
| KPI | Definition |
|---|---|
| Total Outstanding | Total unpaid balance across all customer invoices. |
| Total Paid Amount | Cumulative amount the customer has paid. |
| Unpaid Orders | Count of orders with outstanding invoices. |
| Paid Orders | Count of orders fully settled. |
 12
12Record payment dialog for outstanding balance
Screen Elements
Click here to record bulk payment.
Click here to record payment.
Record Payment
For Single payments, use the Record Payment dialog.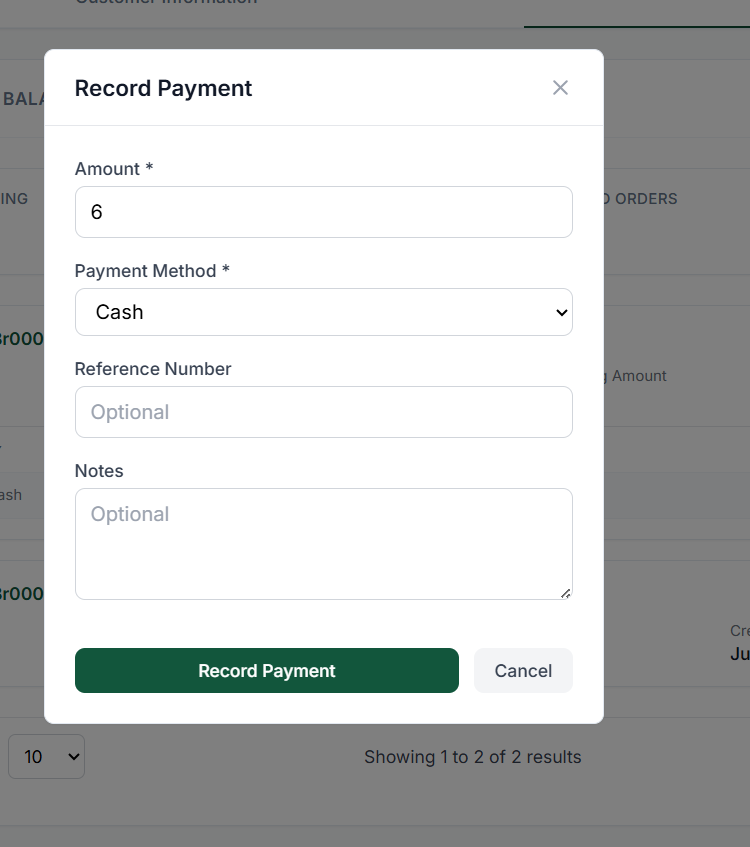 12345
12345Record payment dialog for a single order
Screen Elements
Enter amount for the selected invoice.
Select payment method.
Reference ID for transaction.
Optional notes for the payment.
Click to confirm payment.
Bulk Record Payment
For bulk payments, use the Record Payment bulk dialog.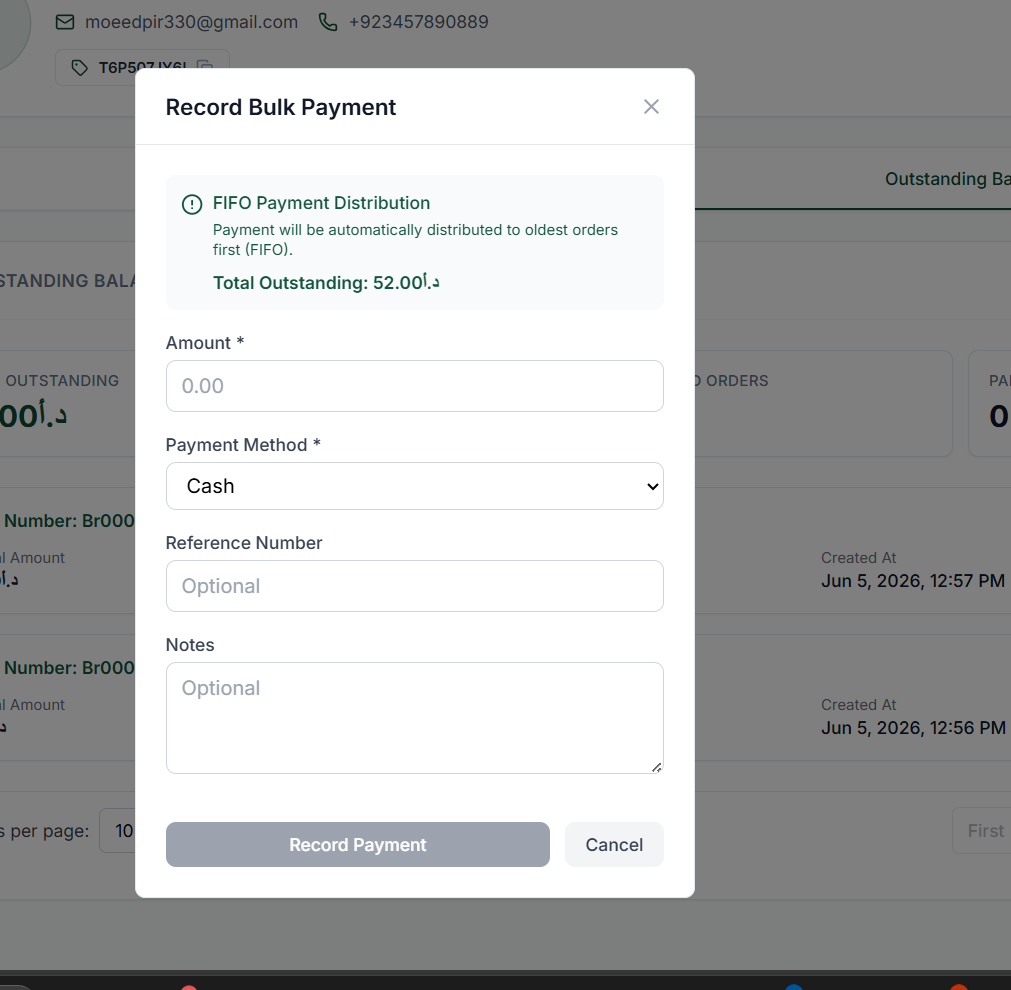 12345
12345Bulk record payment dialog
Screen Elements
Enter amount for each selected invoice.
Select payment method for bulk operation.
Reference ID for bulk transaction.
Optional notes for bulk payments.
Click here to confirm the payment.
Creating Customers
Customer Create By Admin Panel
To register a new customer manually:- Navigate to the Customers tab under Operations.
- Click the + Add Customer button in the top right.
- Fill out the customer details form (refer to fields below) and save.
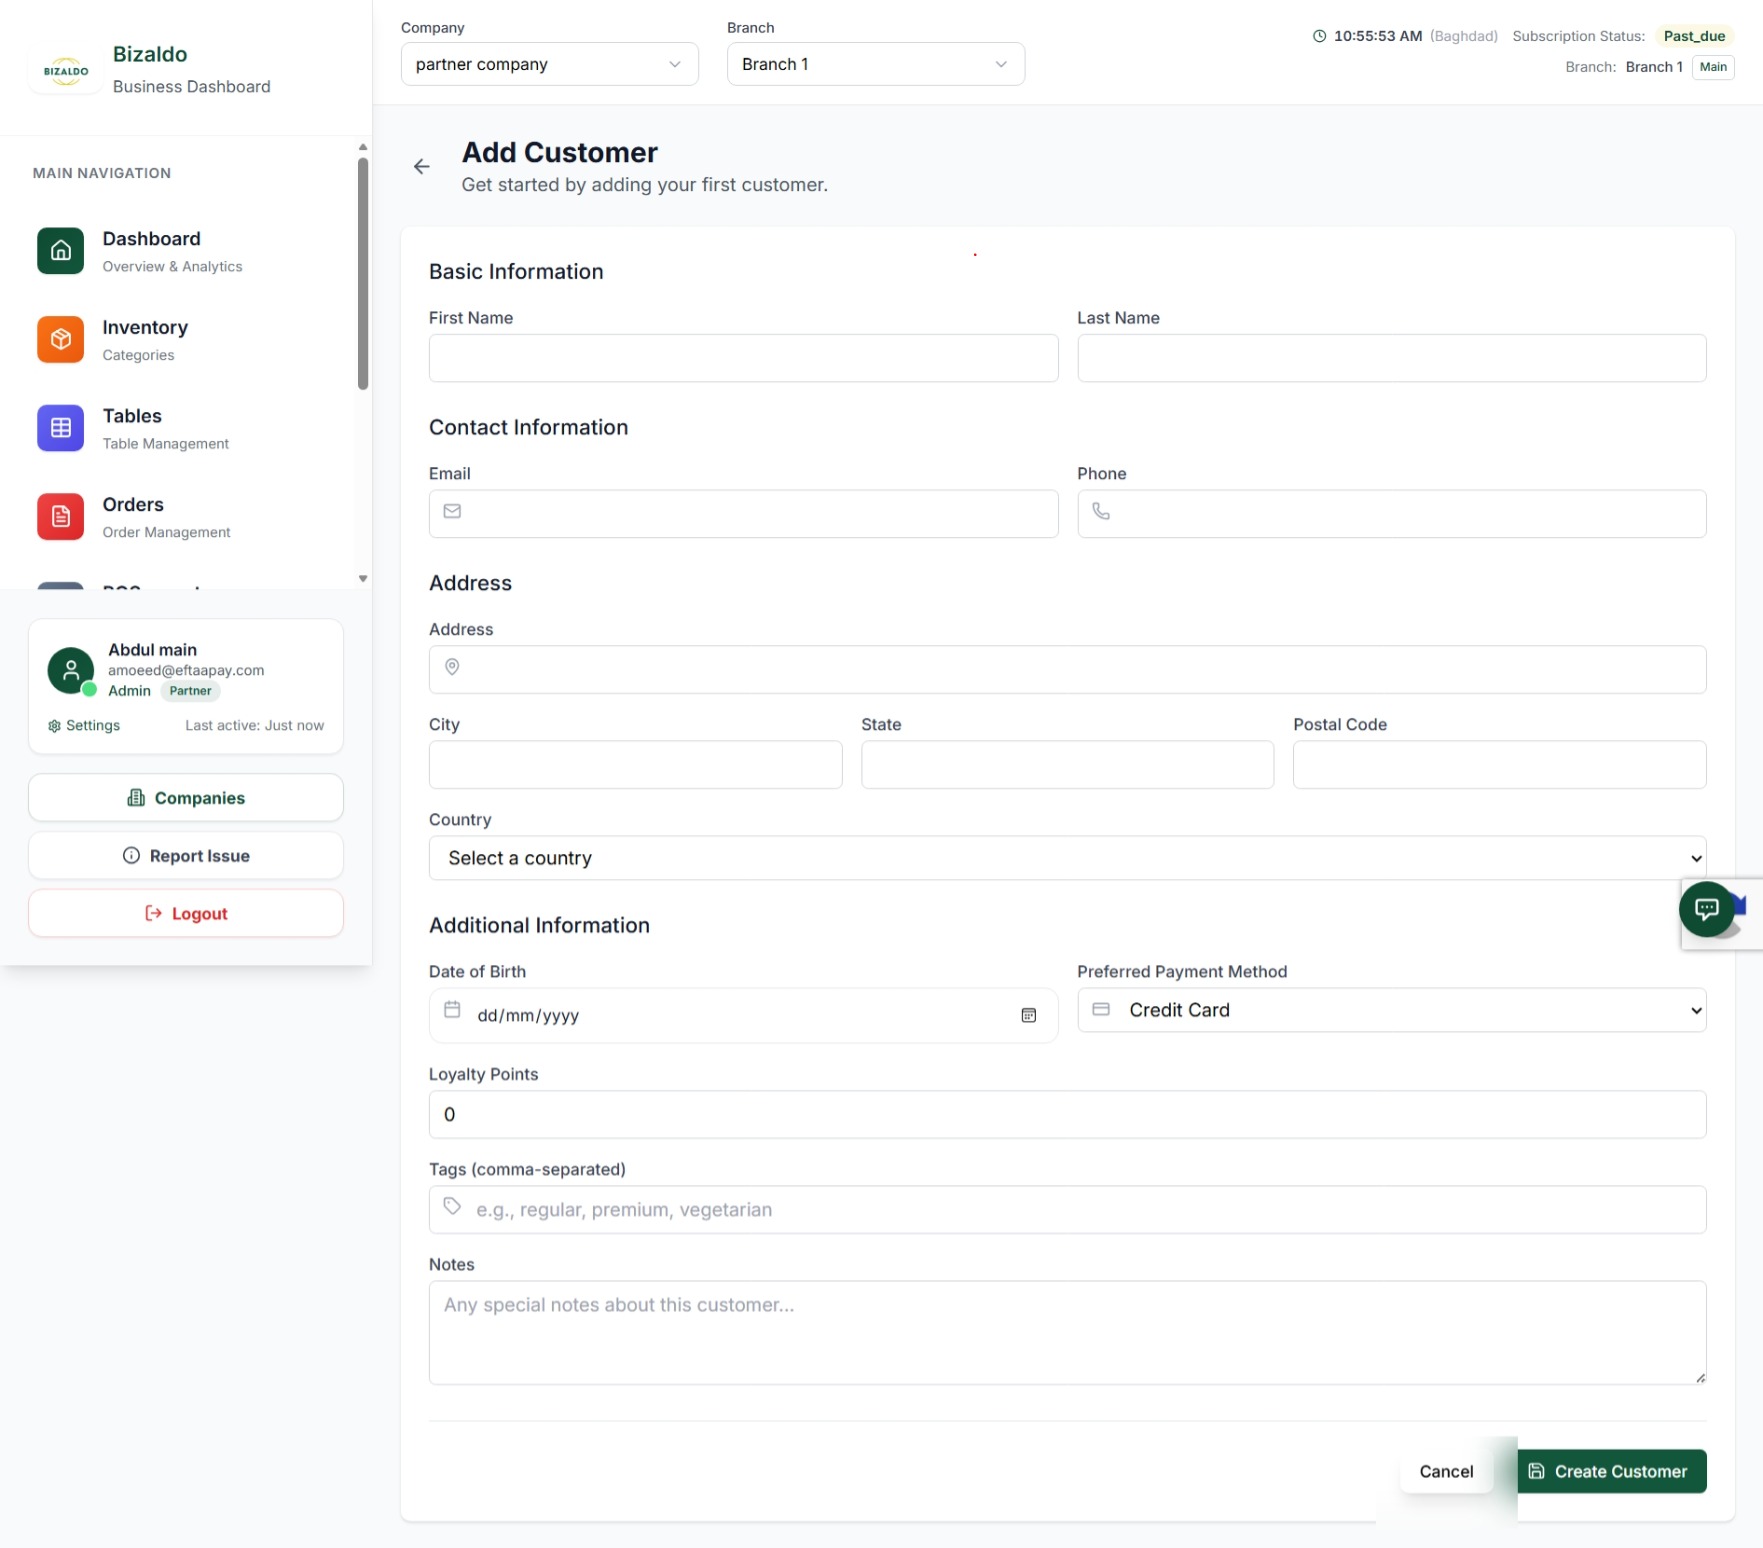 12345678910
Form layout for manually registering a single customer
Screen Elements
Required first name of the customer.
Required last name of the customer.
Optional contact email address. Must be valid and unique if provided.
Required phone number for contact and unique identification.
Optional physical address details including city, state, postal code, and country.
Optional birthday field to target customers with special birthday promotions.
Optional default preferred payment method for faster checkout.
Comma-separated search tags or category labels for segmentation.
Internal customer notes or specific directions visible to POS staff.
Click the final submit button to validate and save the new customer profile.
Fields Reference
| Field Name | Type | Requirement | Description |
|---|---|---|---|
| First Name | Text | Required | The customer's first name. |
| Last Name | Text | Required | The customer's last name. |
| Text | Required | Contact email address (must be unique). | |
| Phone Number | Text | Required | Primary contact phone number (must be unique). |
| Loyalty Points | Number | Optional | Starting points balance (can also be calculated automatically). |
| Tags / Tier | Dropdown | Optional | Customer level tag (e.g., *Bronze*, *Silver*, *Gold*). |
| Address Info | Text | Optional | Street address, city, state, postal code, and country. |
Customer Create By Tablet App
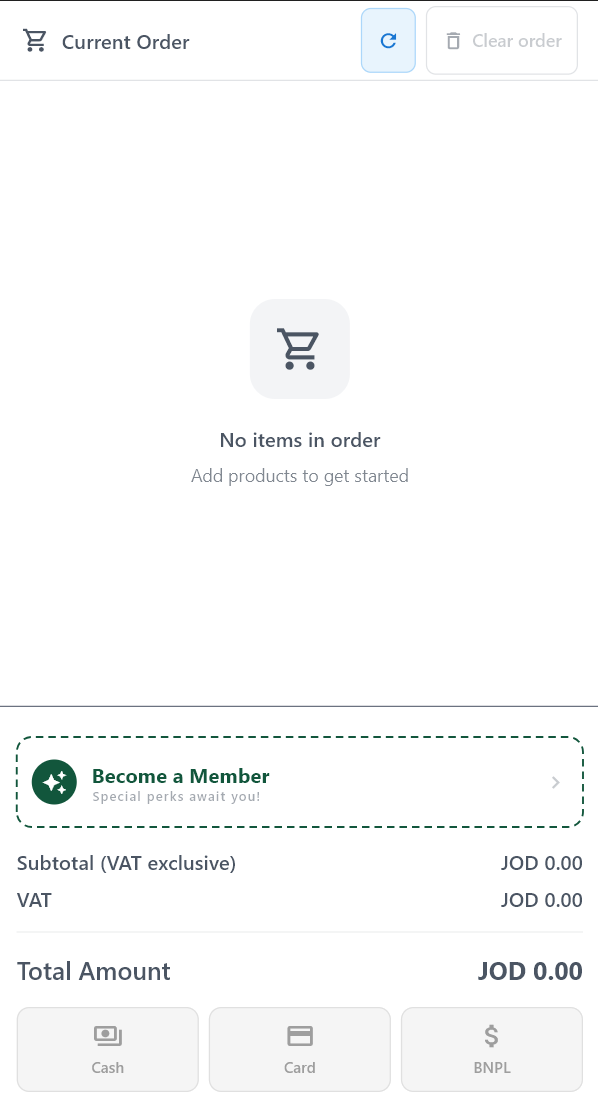
Customers can also be created directly from a POS terminal.QR Scan Registration (Hazel Pay Users)
- On the POS screen, tap Become a Member.
- A QR code appears; the customer scans it with the Hazel Pay app.
- The system automatically creates a loyalty profile and assigns a loyalty number.
 1
1QR code displayed on POS for Hazel Pay users
Screen Elements
Tap the button to start the registration process.
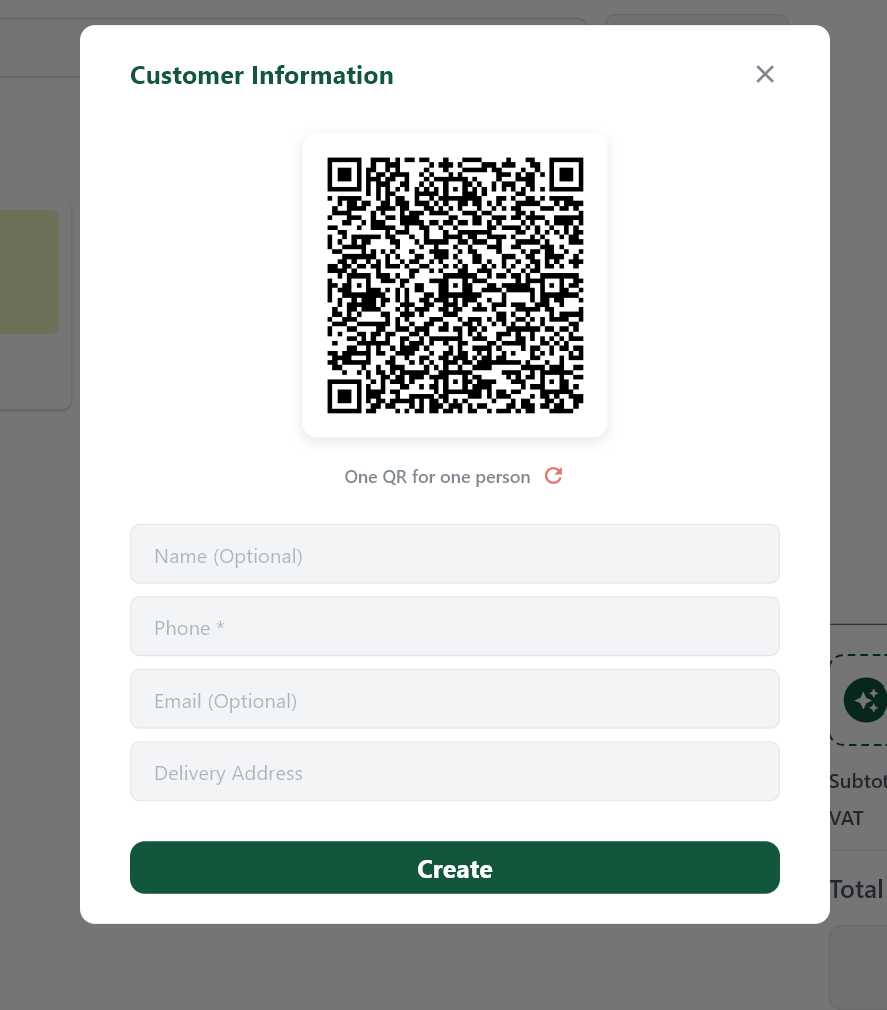 123
123Manual member registration dialog for non‑Hazel Pay users
Screen Elements
Hazel Pay user scans QR code.
Enter customer details manually.
Submit to create loyalty account.
Note: If the QR scan fails or the customer does not have Hazel Pay, the manual entry flow ensures every shopper can become a loyalty member.
BNPL Option
Customers can opt for Buy Now Pay Later (BNPL) directly from their profile.- Click the BNPL button.
- A dialog box appears showing payment details and installment options.
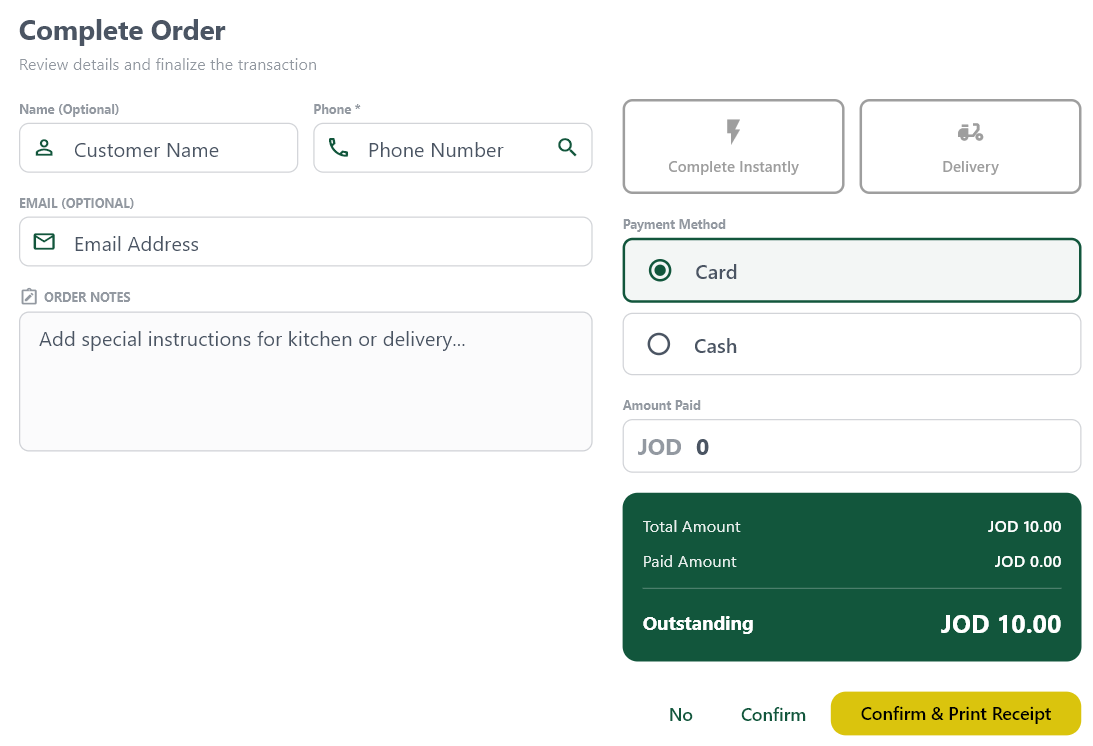 123456
BNPL option dialog with payment details
Screen Elements
Customer's full name.
Contact phone number.
Customer email address.
Number of amount to be paid.
Remaining amount left from total.
Creates the order with selected terms.
Bulk Customer Management
You can easily export your existing customer database or batch-import a list of customers using CSV files.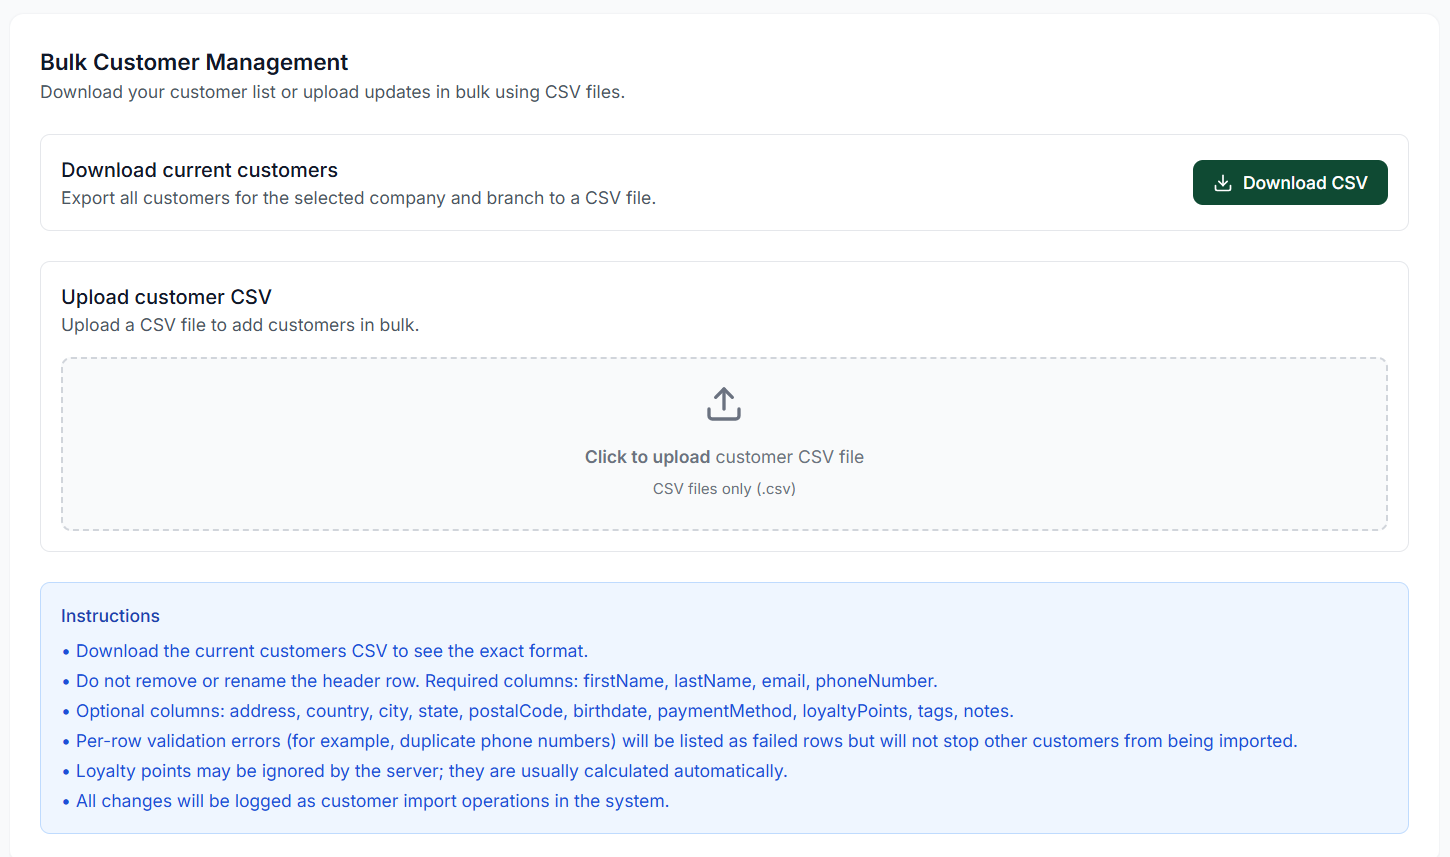 123
123Bulk CSV upload and download interface with requirements list
Screen Elements
Export the current customer database for the selected company and branch to reference correct formatting.
Upload a formatted CSV file to add or update customers in bulk.
List of required and optional columns, along with validation and error-logging rules.
How to Import Customers in Bulk
Follow these steps to import or update customers in batch using a CSV template:Download Current Customers
Begin by downloading the current customer list to review the correct layout and column headers.- Click Download CSV in the "Download current customers" card.
- Open the file in Excel, Google Sheets, or a text editor to view the active data.
Prepare Your CSV File
Add new records or update current rows while maintaining the following header layout:-
Required Columns:
- `firstName` — First name of the customer.
- `lastName` — Last name of the customer.
- `email` — Unique contact email.
- `phoneNumber` — Unique phone number.
-
Optional Columns:
- `address`, `country`, `city`, `state`, `postalCode` — Location details.
- `birthdate` — Date of birth for birthday promotions.
- `paymentMethod` — Default preferred payment.
- `loyaltyPoints` — Starting loyalty points balance.
- `tags`, `notes` — Customer group classification and internal staff notes.
Upload the Document
Upload the prepared file back to the server:- Drag and drop your `.csv` file directly into the dotted upload field, or click the zone to browse your local files.
- The system only accepts valid `.csv` formatted spreadsheets.
Review Validation & Logs
Once uploaded, the database executes a row-by-row validation check:- Per-row validation errors (e.g., duplicate phone numbers or invalid formats) will be isolated and logged.
- Partial Success: Invalid rows will fail individually but will not stop other valid customer rows from being imported.
- Loyalty Points: Note that loyalty points may be ignored by the server during import since they are calculated automatically from sales.
- Audit Trail: All successful and failed changes are recorded under customer import operations in the system logs.
Editing Customers
The edit page allows you to modify all details initially set during registration. Additionally, this view provides key performance indicators (KPIs) specific to the customer:Customer KPIs
- Total Orders: The lifetime number of individual orders successfully placed by this customer.
- Total Spent: The total lifetime revenue contributed by this customer.
- Joined Date: The exact date when the customer was added to the database.
- Customer Tier/Status: The current dynamically calculated segment (e.g., Prospect, VIP) based on their order count.
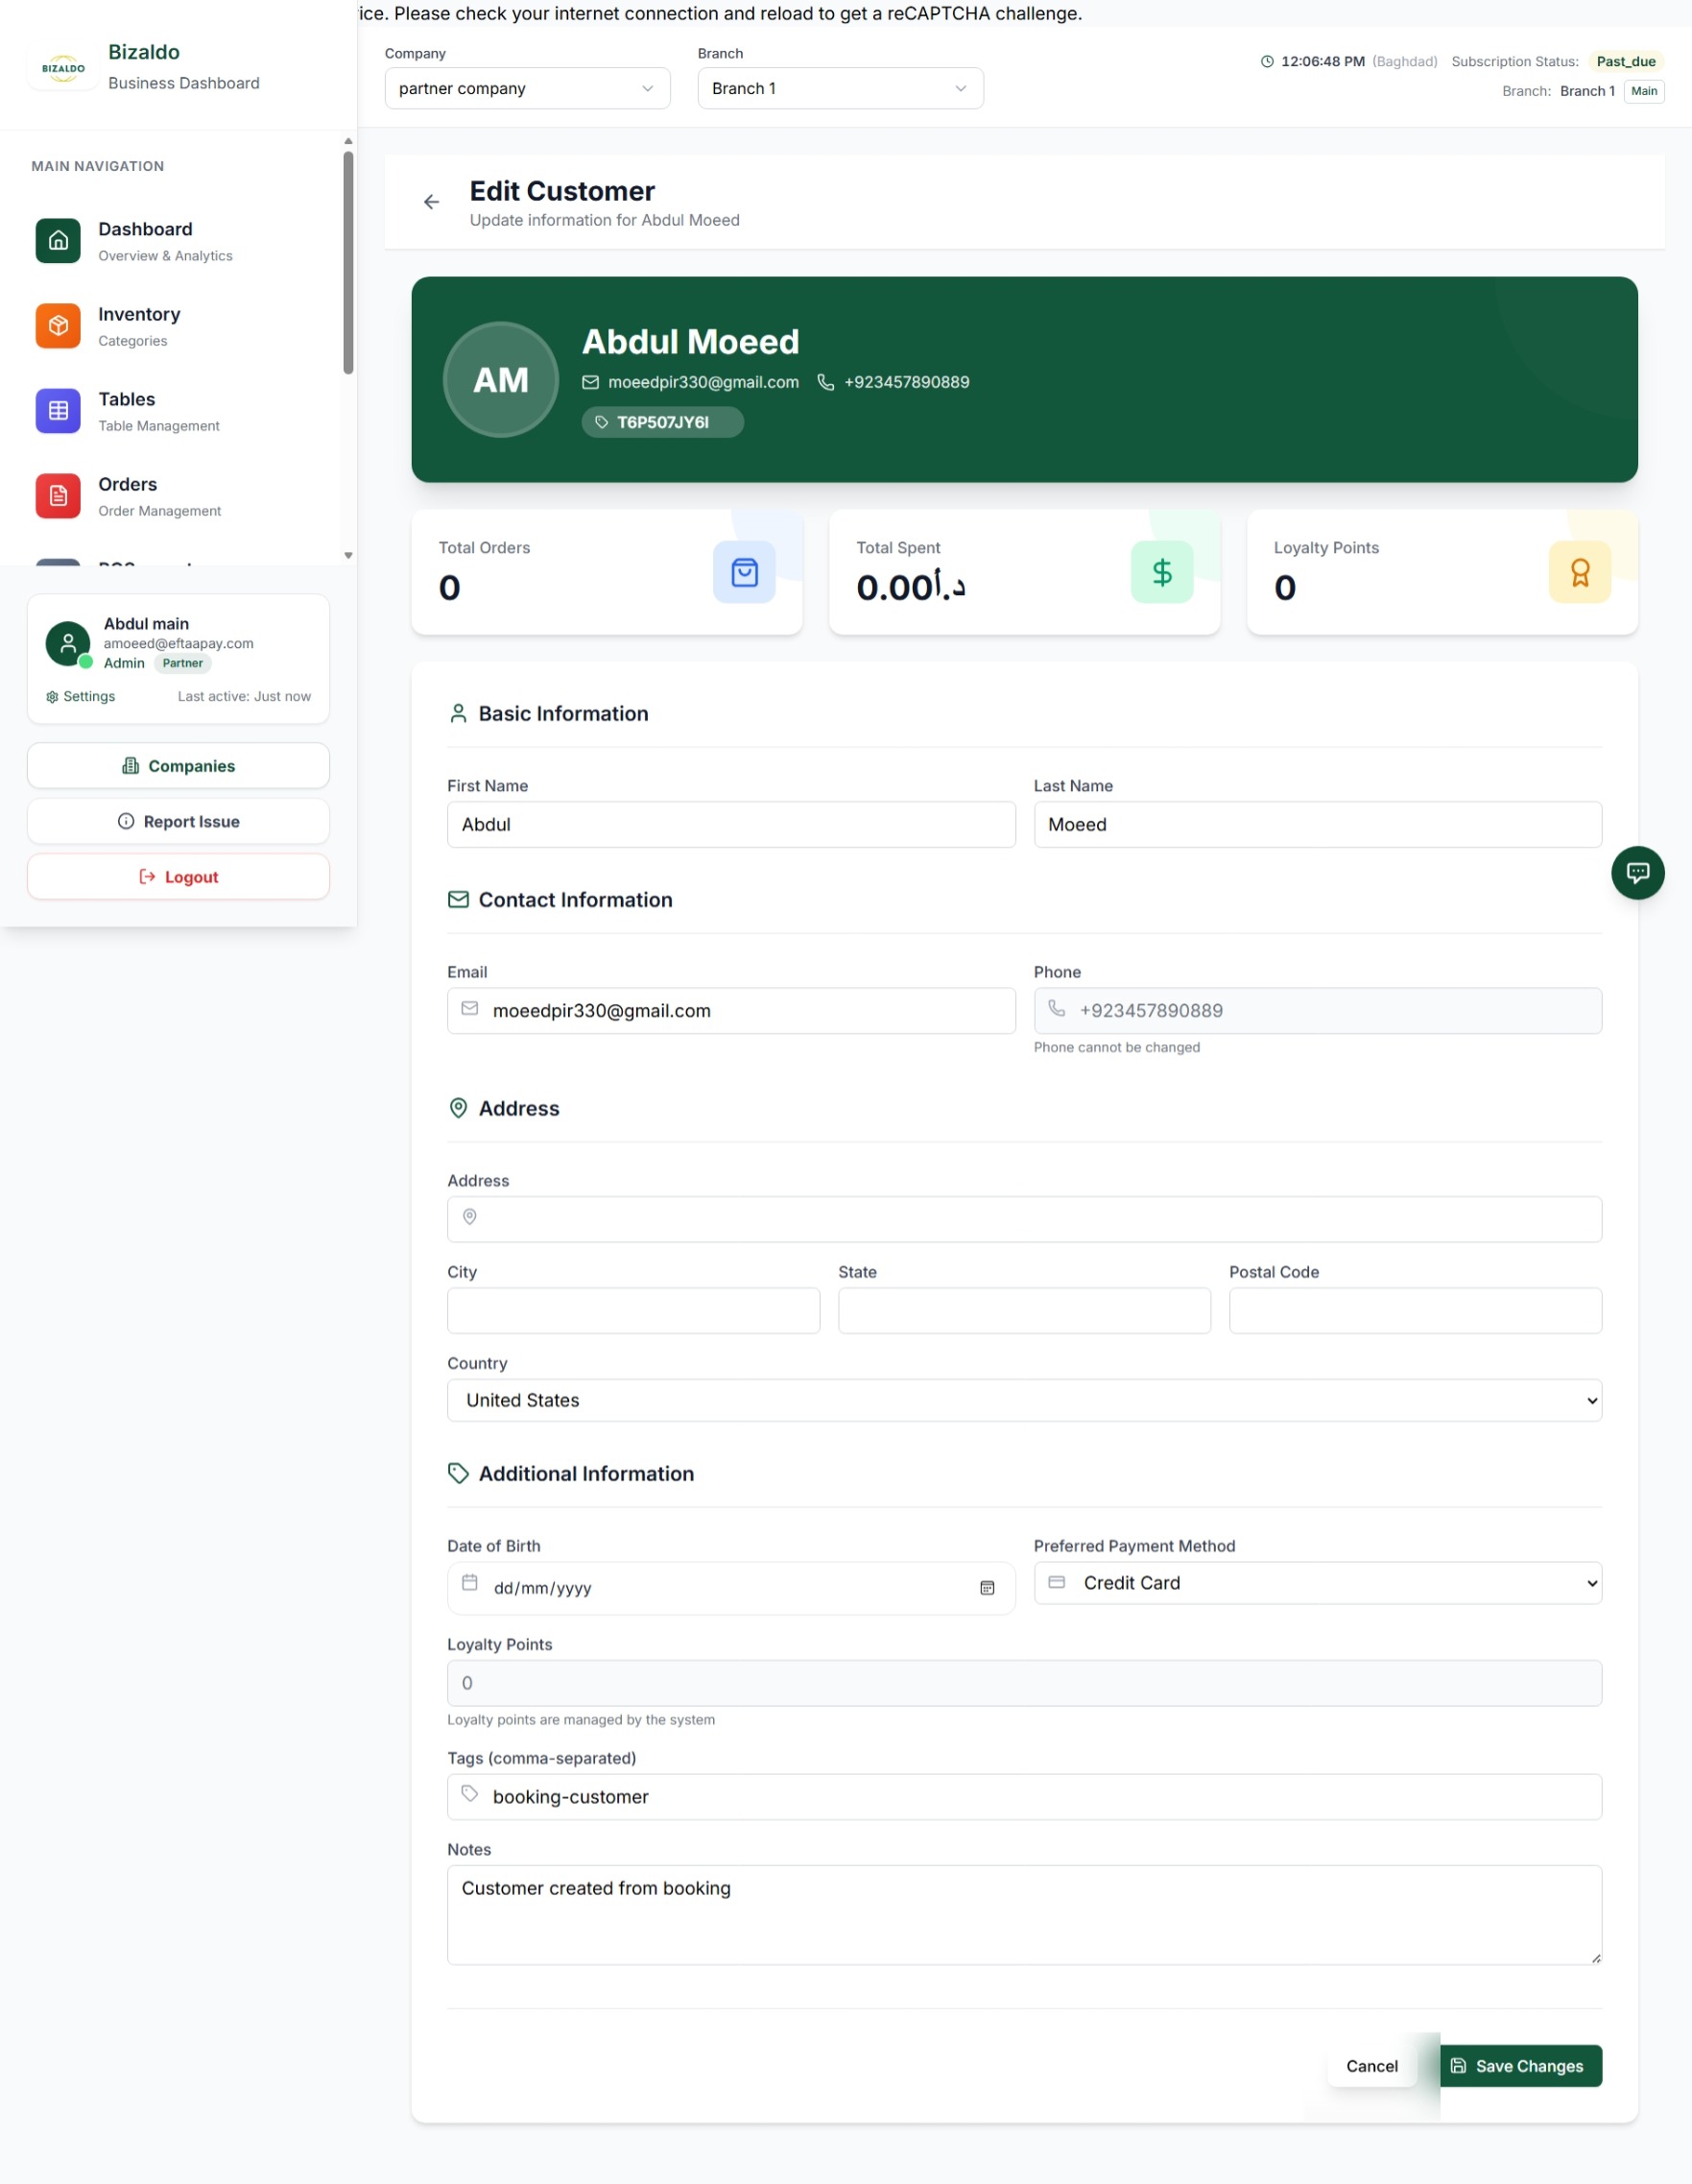 123
123Edit a customer's details and view their lifetime order KPIs
Screen Elements
View key metrics, such as the total number of orders placed by this customer.
Modify contact details, preferred payment methods, or add internal notes.
Click to save any updates made to the customer profile.
Key Operations
| Action | Navigation Route |
|---|---|
| Register Single Customer | Click + Add Customer on the Customers screen. |
| Edit Customer Info | Click the Edit button on any customer card. |
| Download Customer List | Click Download CSV under Bulk Customer Management. |
| Bulk Import Customers | Upload a valid file into the Upload customer CSV drag-and-drop zone. |
| Filter by Segmentation | Use the Status filter dropdown next to the search bar. |
| Customer Detail View | Click a customer card to view detailed profile. |
| Outstanding Balance | Click the Outstanding Balance tab on a customer profile. |
| Record Payment | Click Record Payment button in the payment dialog. |
| Bulk Record Payment | Click Bulk Record Payment in the bulk dialog. |
| Create Customer (Admin) | Use + Add Customer button in admin panel. |
| Create Customer (Tablet) | Use QR scan on POS to register a Hazel Pay user. |
Related Documentation
- Orders — Learn how orders affect customer segmentation counters.
- Customer Analytics — View lifetime value, purchase frequency, and cohort retention charts.
- Reports — Generate customer sales distribution and demographic reports.
- Settings — Configure tax/VAT parameters and loyalty rewards points metrics.