Company Management
The Company Management section is the primary administrative dashboard for system administrators (Super Admins, Admins, and authorized Managers) to list, modify, configure, and monitor all business entities registered on the Bizaldo platform. From this control center, you can create new companies, manage multi-location branches, allocate user accounts, generate device license keys, set up Stripe and Jira integrations, adjust risk management parameters (such as BNPL and Credit Blacklists), and audit configuration changes.Where to find it: In the admin sidebar navigation, click Companies (or your main administrative entry point).
The Company List
The Companies page displays a list of all registered business entities with sorting, status filtering, and search options.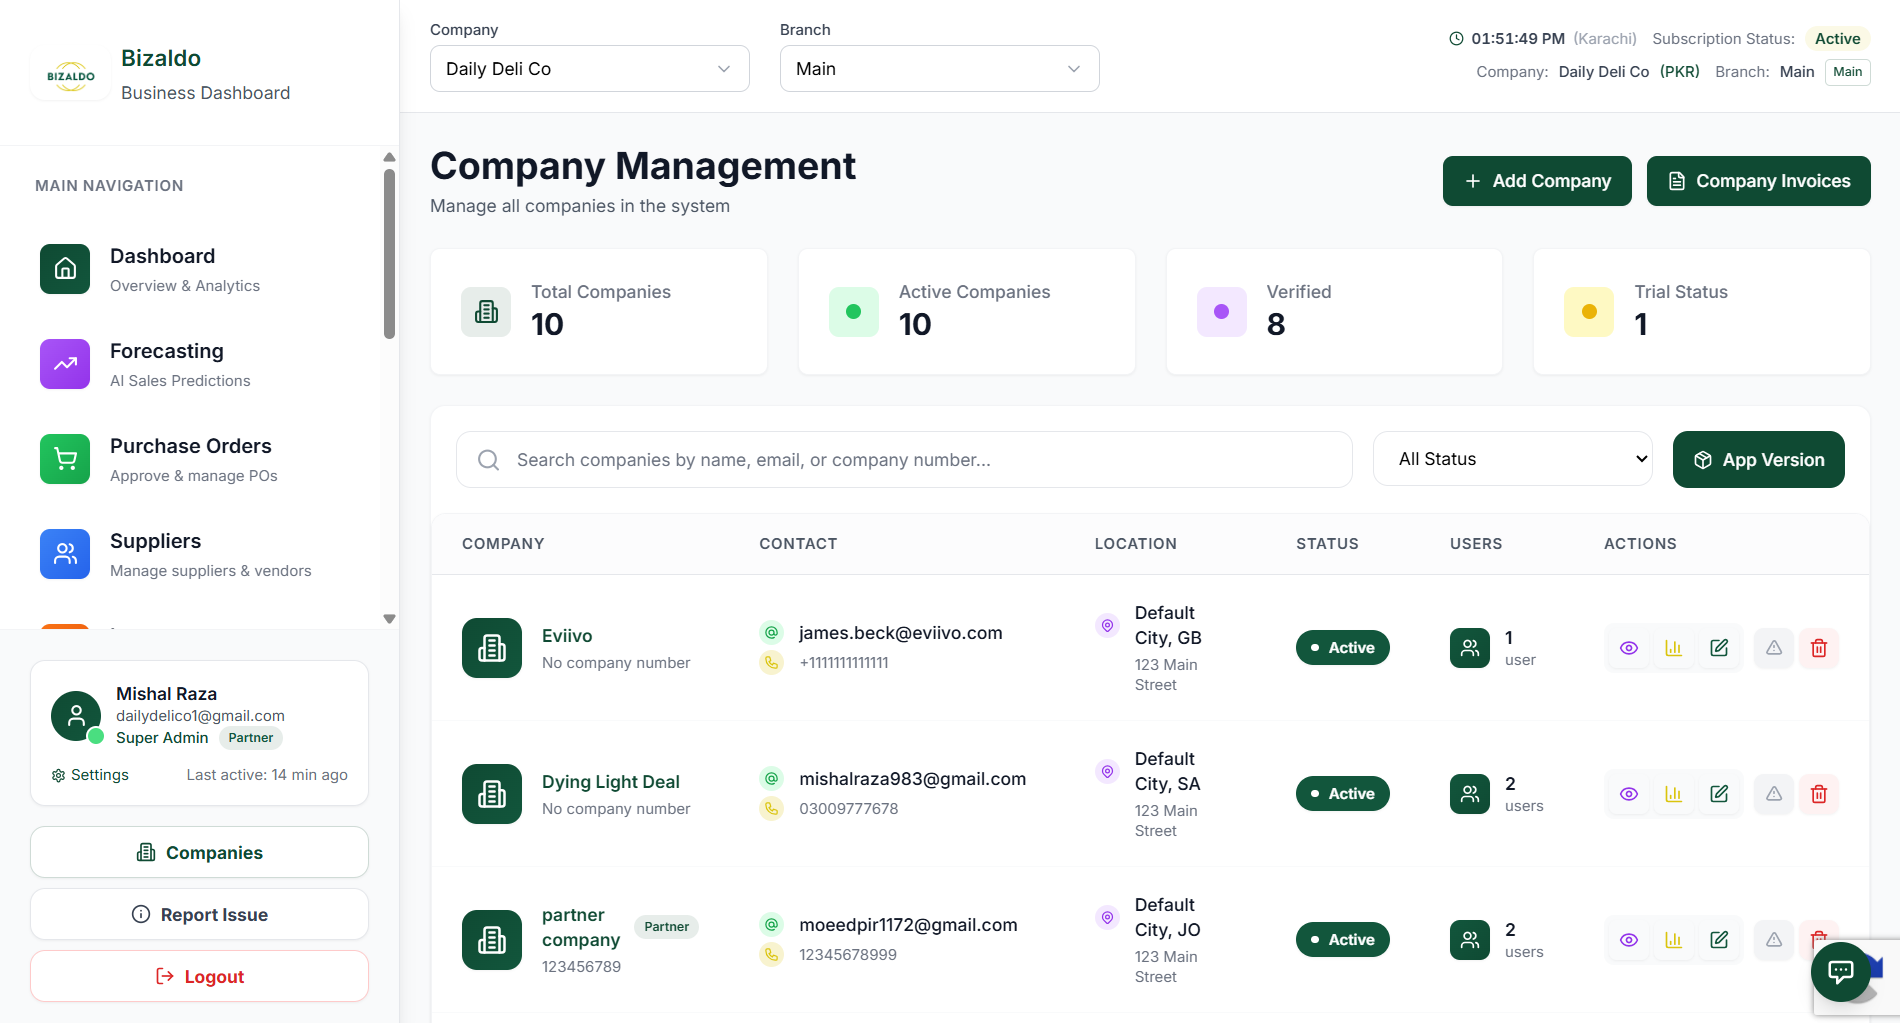 12345
12345Figure 1 — The main Company List view showing active, trial, and suspended companies.
Screen Elements
Search for a company by name, ID, email, or company number.
Filter companies by subscription state: All Status, Active, or Inactive.
Opens the new company wizard to register a new entity.
Navigate to the tabs-based Company Detail view for that company.
Click to open a popup showing aggregate metrics (Users, Branches, Products, Orders, Revenue) without leaving the list.
List Controls & Account Actions
- Fuzzy Search — Locate companies in real-time by searching for company name, company number, registration ID, email, or tax ID.
- Status Filter — Restrict list output to specific subscription states: *All Statuses*, *Trial*, *Active*, *Suspended*, or *Cancelled*.
- Add Company — Triggers the new company registration workflow.
- Suspend / Activate Account — Super admins can toggle the active status of any company. Suspending a company blocks POS terminal logins and administrative dashboard access for all associated users.
- Aggregate Stats Popup — Click the statistics icon to view total users, branches, products, orders, and total revenue calculations in a light modal.
Creating & Editing a Company
The Create Company and Edit Company panels segment information into four navigation tabs to ensure data accuracy:Tab 1: Basic Information
- Company Name *(Required)* — The official registered name of the business.
- Company Number — Unique registration ID.
- VAT Number — Tax registration identifier.
- Description — Optional brief summary or notes regarding the business.
- Referred By Partner — If a partner referred the company, select the partner from the list for commission/referral tracking.
-
Status Toggles:
- `Company Is Active` — Controls if the company is operational.
- `Company Is Verified` — Indicates if registration verification is complete.
- `Onboarding Completed` — Denotes if the onboarding checklist is finished.
- `Partner Status` — Designates if this company is a Bizaldo reseller/partner.
Tab 2: Contact & Address
- Support Email *(Email format validated)* — Core email address for billing and account communications.
- Website *(URL format validated)* — Corporate website address.
- Phone Numbers — Fields for primary and alternate contact lines.
- Location Fields — Address lines 1 and 2, City, State/Province, Postal Code, and Country (using `CountrySelector`).
Tab 3: Business Details
- Business Type & Industry — Industry categories selected via `IndustrySelector`.
- Currency — Default transactional currency code (e.g., USD, EUR, GBP). Auto-suggested when the country is selected.
- Timezone — Local timezone for scheduling, POS end-of-day reports, and audit trails. Auto-suggested when the country is selected.
- Preferred Language — System default locale (English, French, Arabic, Portuguese, etc.).
- Company Logo — Logo file upload (handles image scaling and previews).
- Two-Factor Authentication — Force 2FA enrollment for all company users.
Tab 4: Subscription & Billing
- Subscription Status — Trial, Active, Suspended, or Cancelled.
- Subscription Plan *(Required)* — Tier name (e.g., Lite, Pro, Enterprise).
- Start & End Dates *(Required, validated)* — Defines the subscription duration.
-
Credit Configuration:
- `Credit System Enabled` — Toggles invoicing and customer credit systems.
- `Credit Blacklist (Credit Guard) Enabled` — Restricts credit usage for blacklisted accounts.
- `Blacklist Duration` *(Required if Blacklist is enabled)* — Input or slider (range 1–999 days) setting the default duration for blacklist penalties.
Company Detail Layout
Once a company is selected, administrators can navigate through tabbed panels to manage sub-resources:docs.operations.company-management.detail_layout.permissions_callout_title
1. Overview Tab
Provides a dashboard overview of company operations: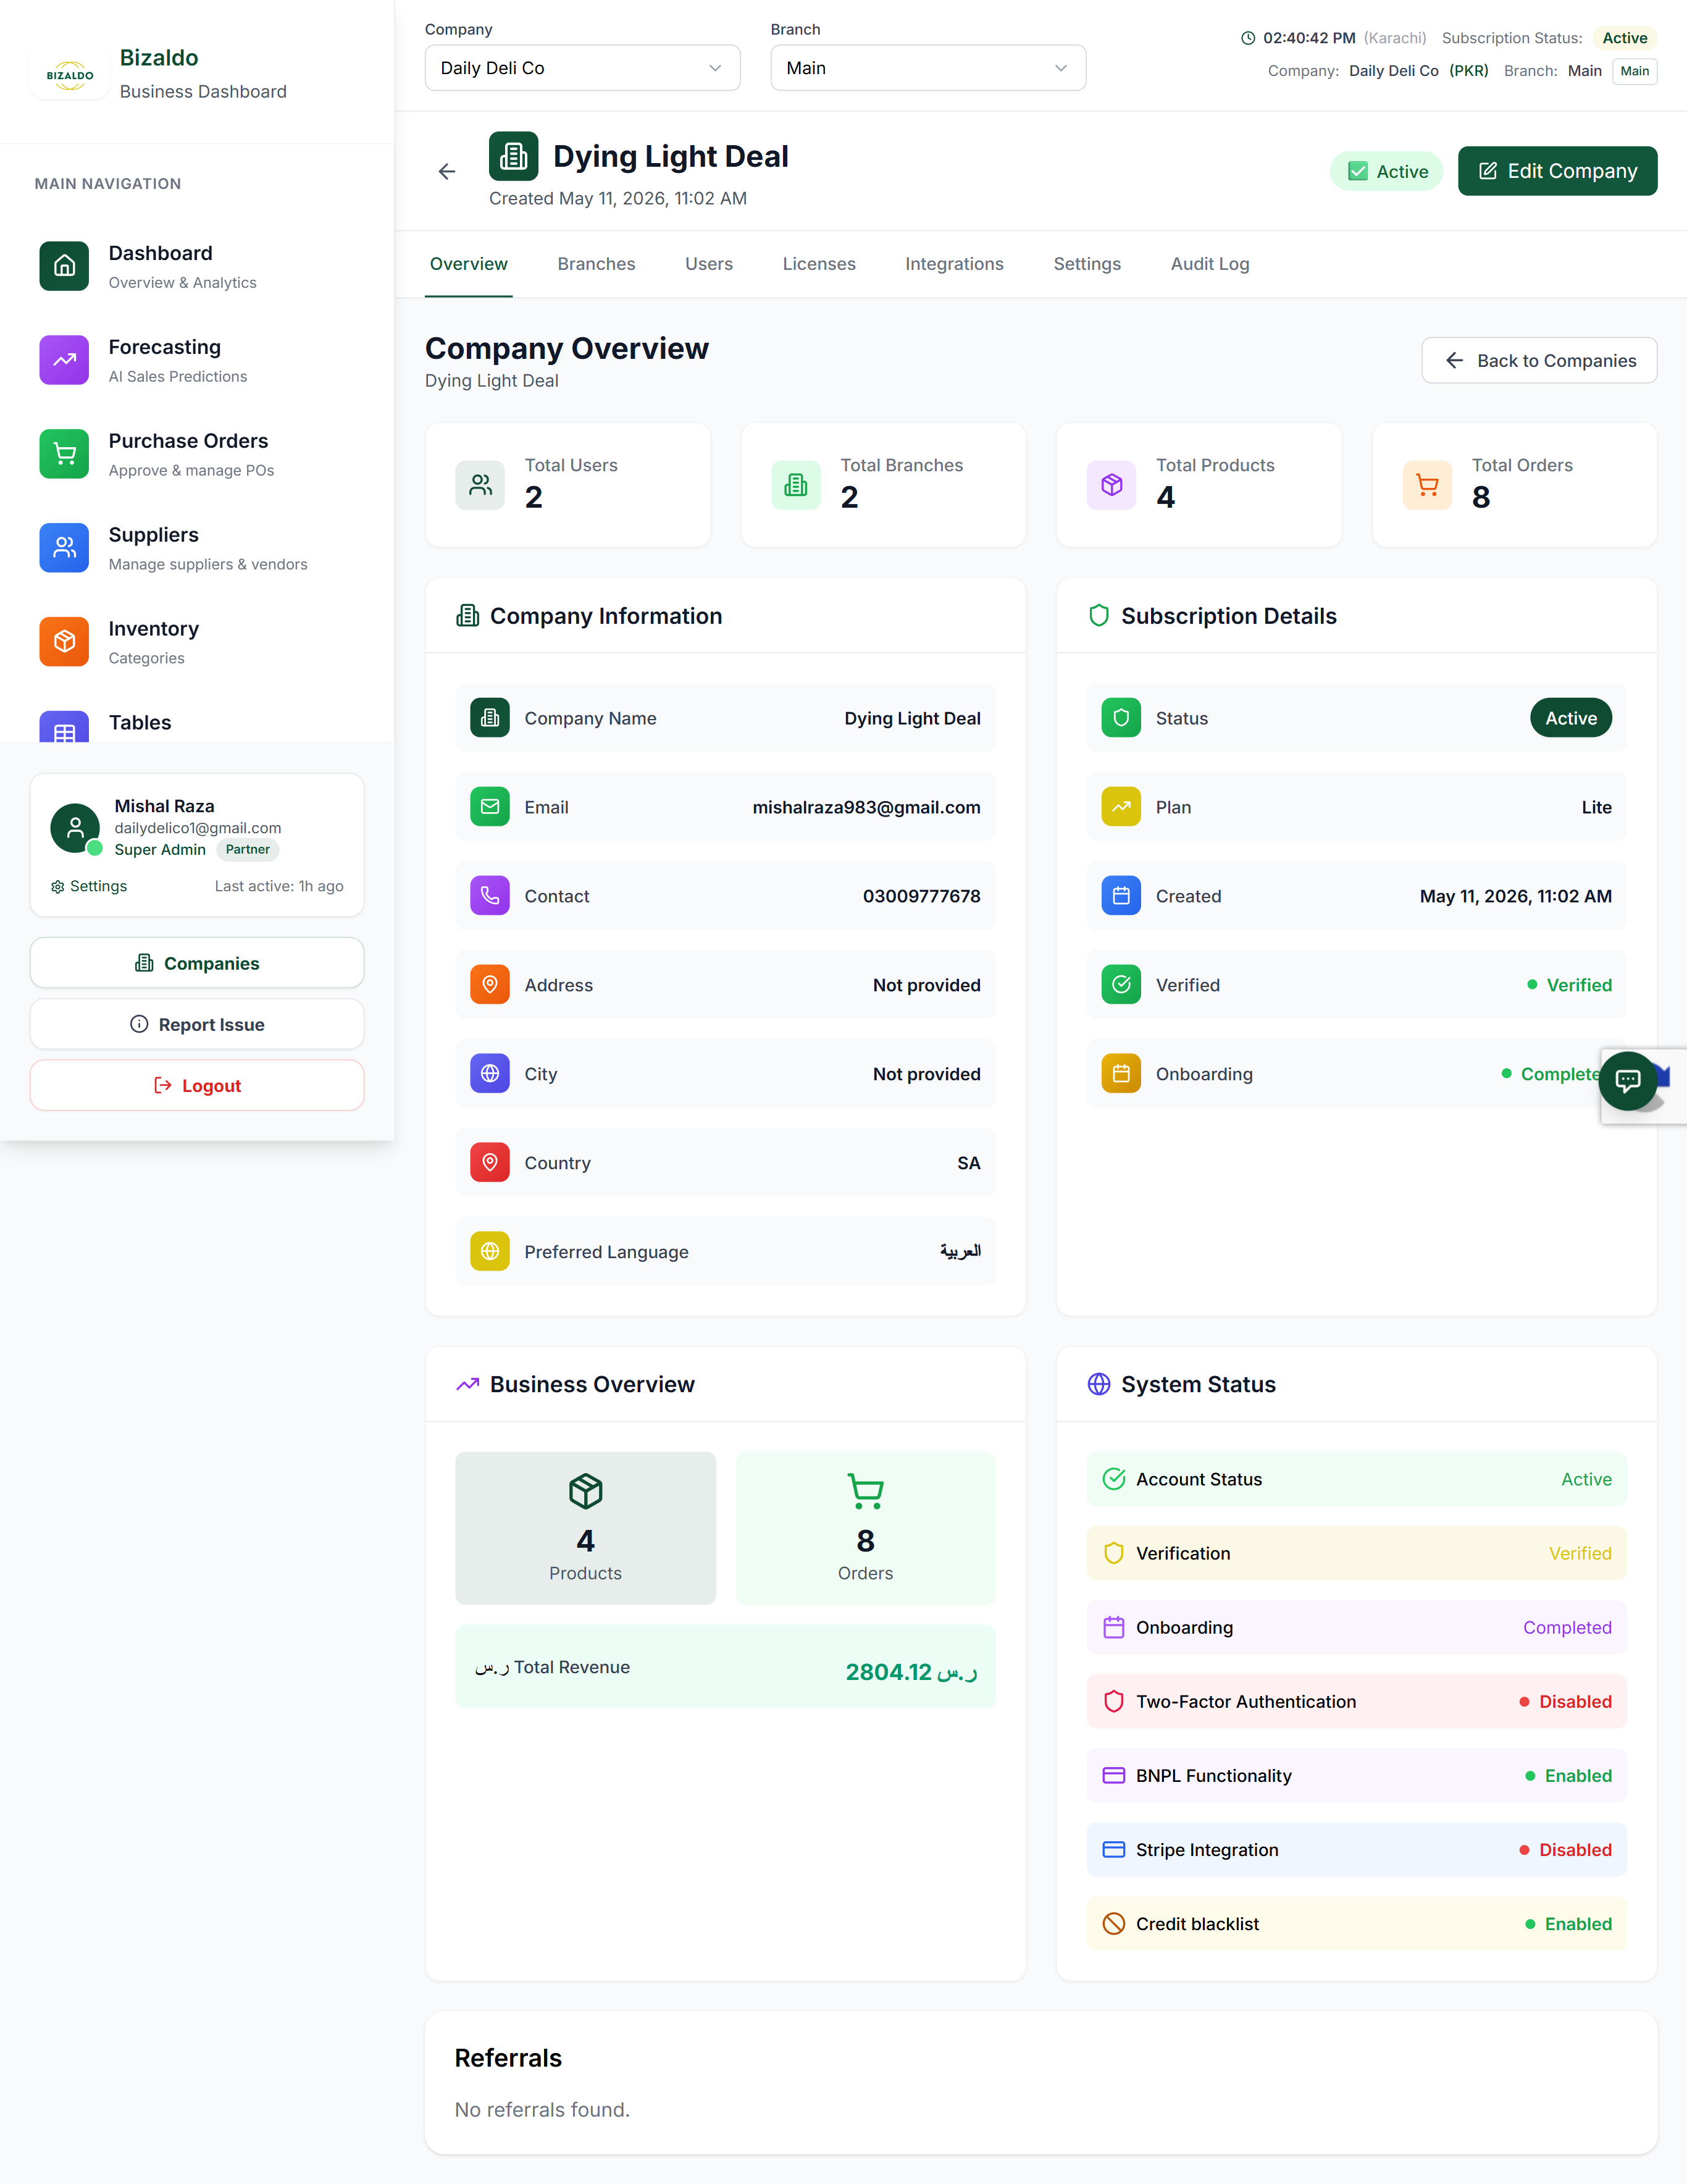 12345
12345Figure 2 — Company details dashboard showing metrics, contact profile, and subscription health.
Screen Elements
Aggregated counters for Total Users, Branches, Products, and Orders.
Displays profile fields like email, contact number, and timezone.
Visual indicators for Plan tier, verified status, and onboarding completeness.
Aggregated stats for Products, Orders, and Total Revenue.
List of system settings statuses like 2FA, BNPL, Stripe, and Credit blacklist.
2. Branches Tab
Allows managing multiple store, cafe, or restaurant locations under the parent company.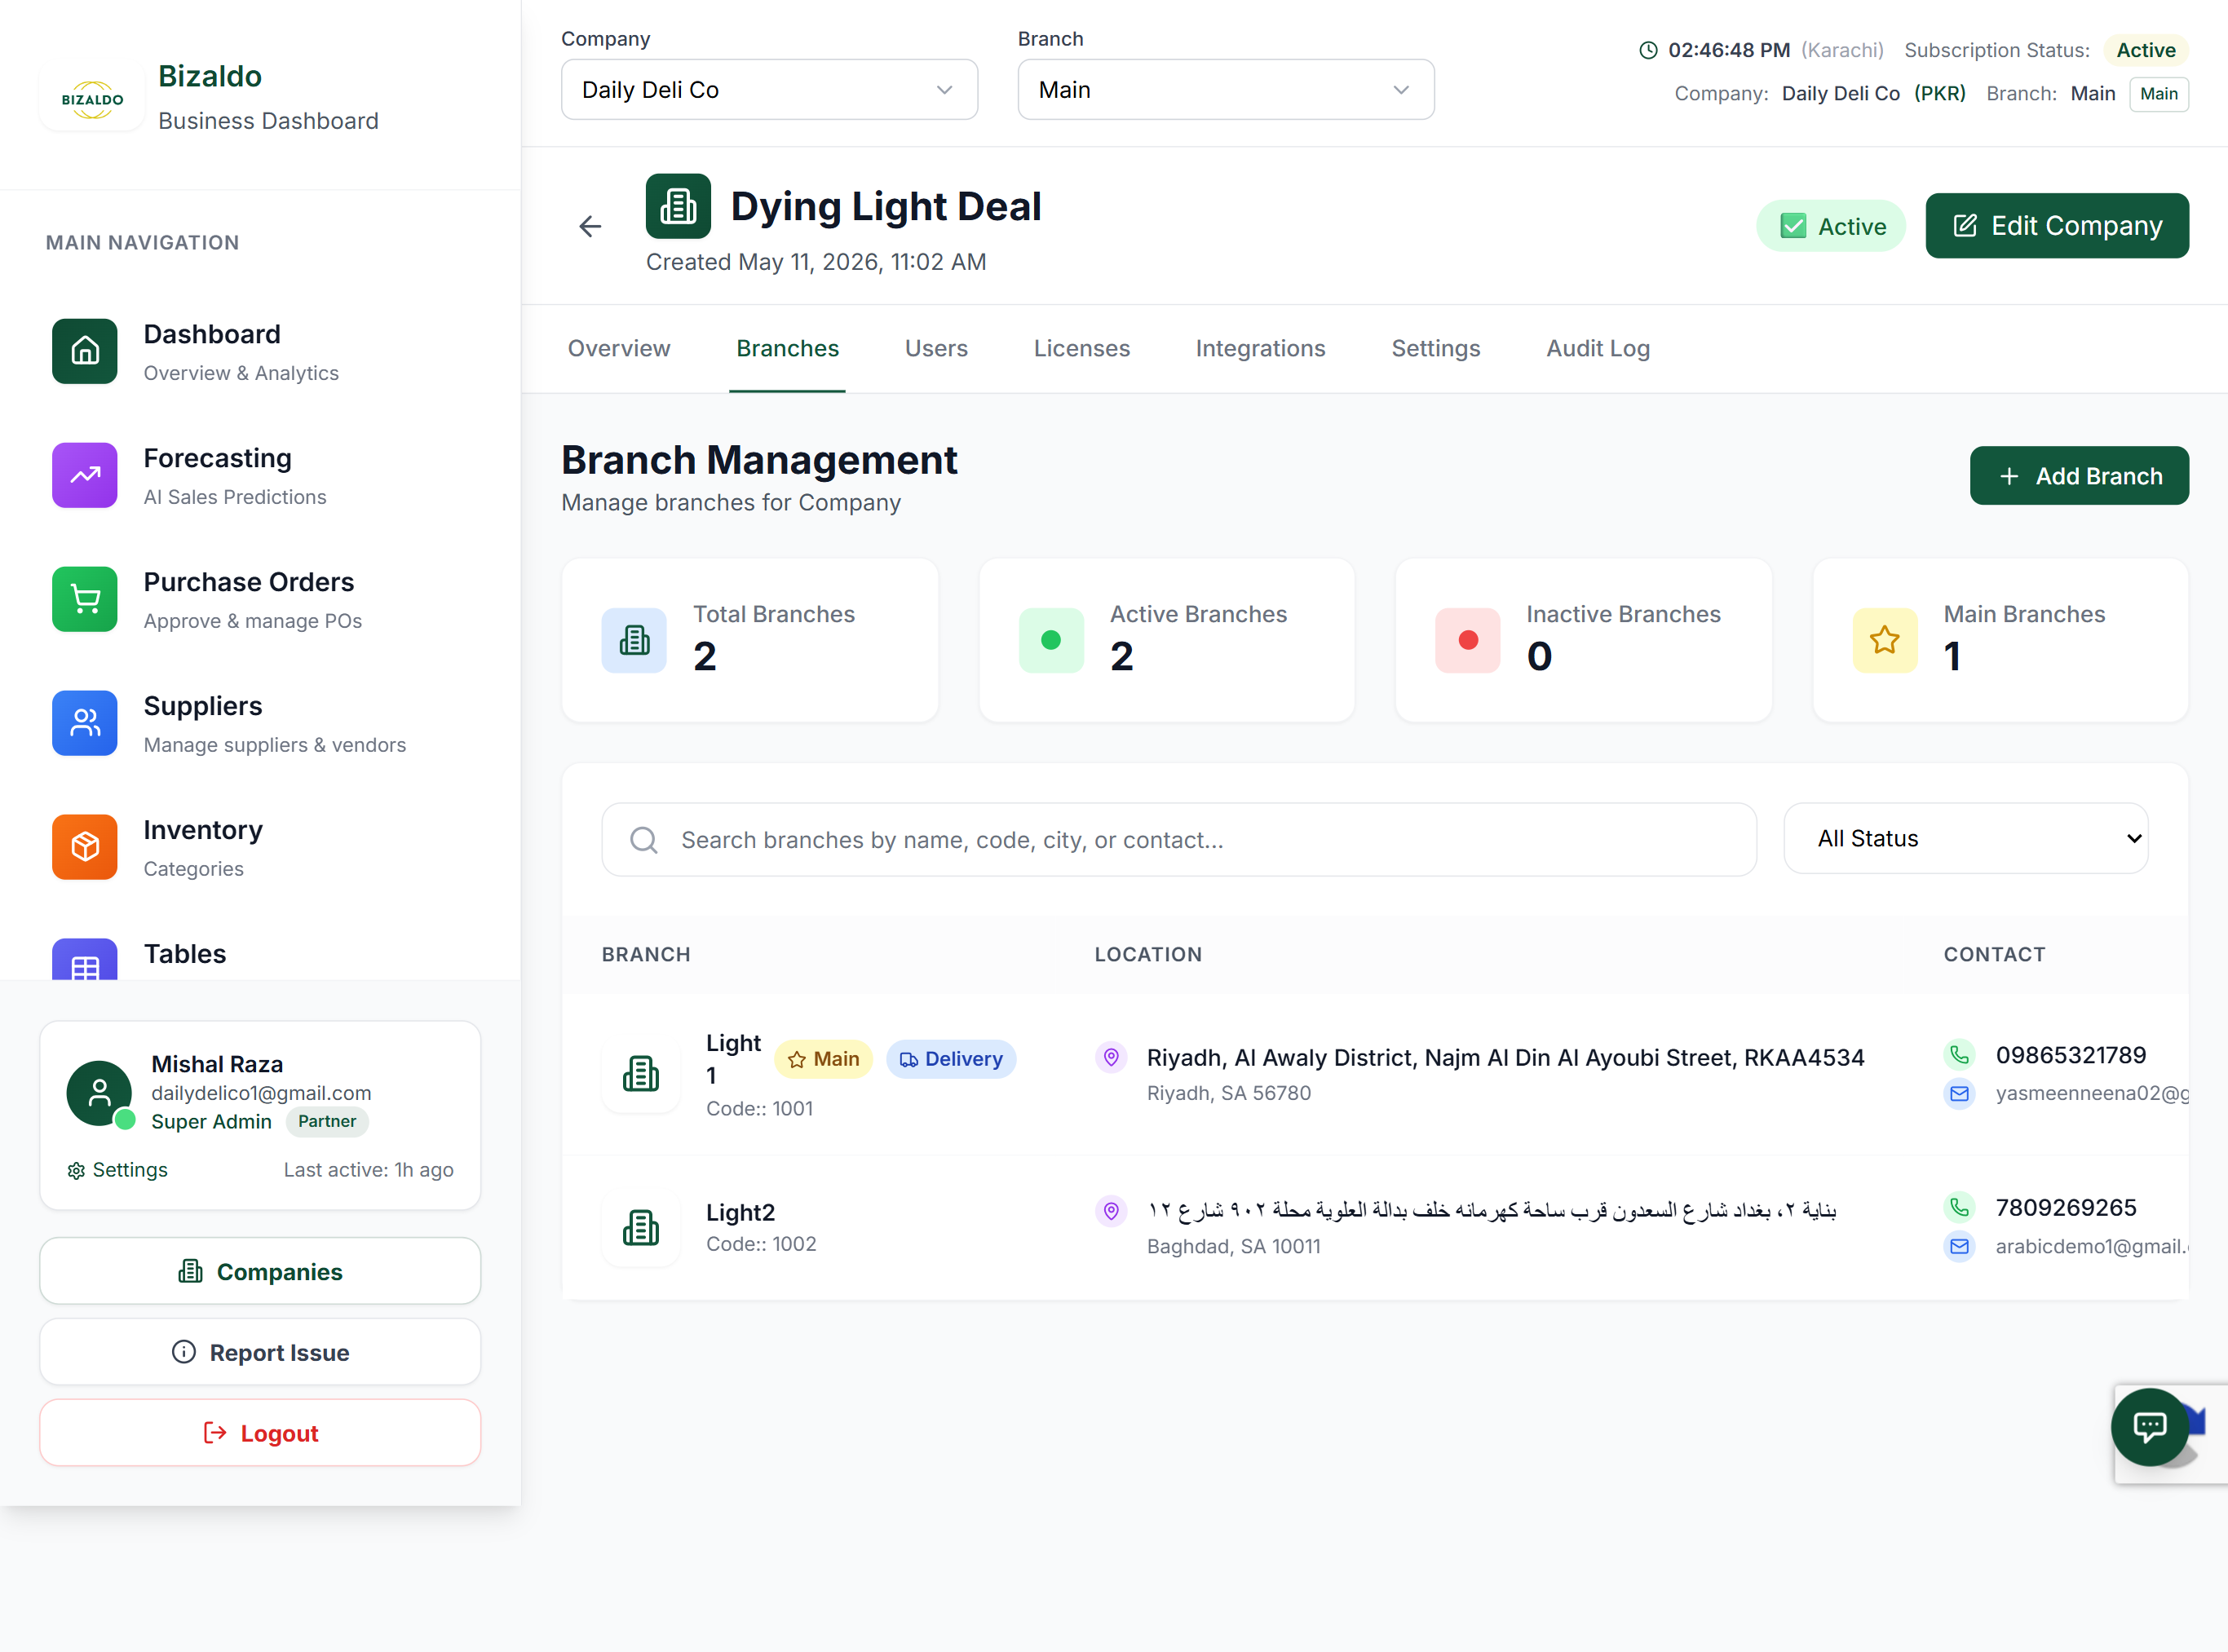 12
12Figure 3 — Multi-location branch listing and status view.
Screen Elements
Create a new physical location/branch for this company.
Lists name, code, contact information, and operating status.
Add / Edit Branch Form Fields
- Basic Details: `Branch Name` *(Required, min 2 chars)*, unique `Branch Code` (used for reporting tags), and `Description`.
- Location: `Street Address` *(Required, min 5 chars)*, `City` *(Required)*, `Postal Code` *(Required)*, and `Country` *(Required)*.
- Contact: `Primary Phone` *(Required, min 10 digits)*, alternate phone, email, and fax number.
- Manager Details: `Manager Name`, `Manager Email`, and `Manager Phone`.
- Operating Settings: Local `Timezone`, transaction `Currency`, `Active State` toggle, and `Set as Main Branch` toggle.
-
Delivery Config:
- `Is Delivery Supported` toggle.
- `Delivery Charges` *(Required if Delivery is toggled ON)* — Fixed fee added to home delivery transactions.
3. Users Tab
Manages administrative and POS terminal operator credentials: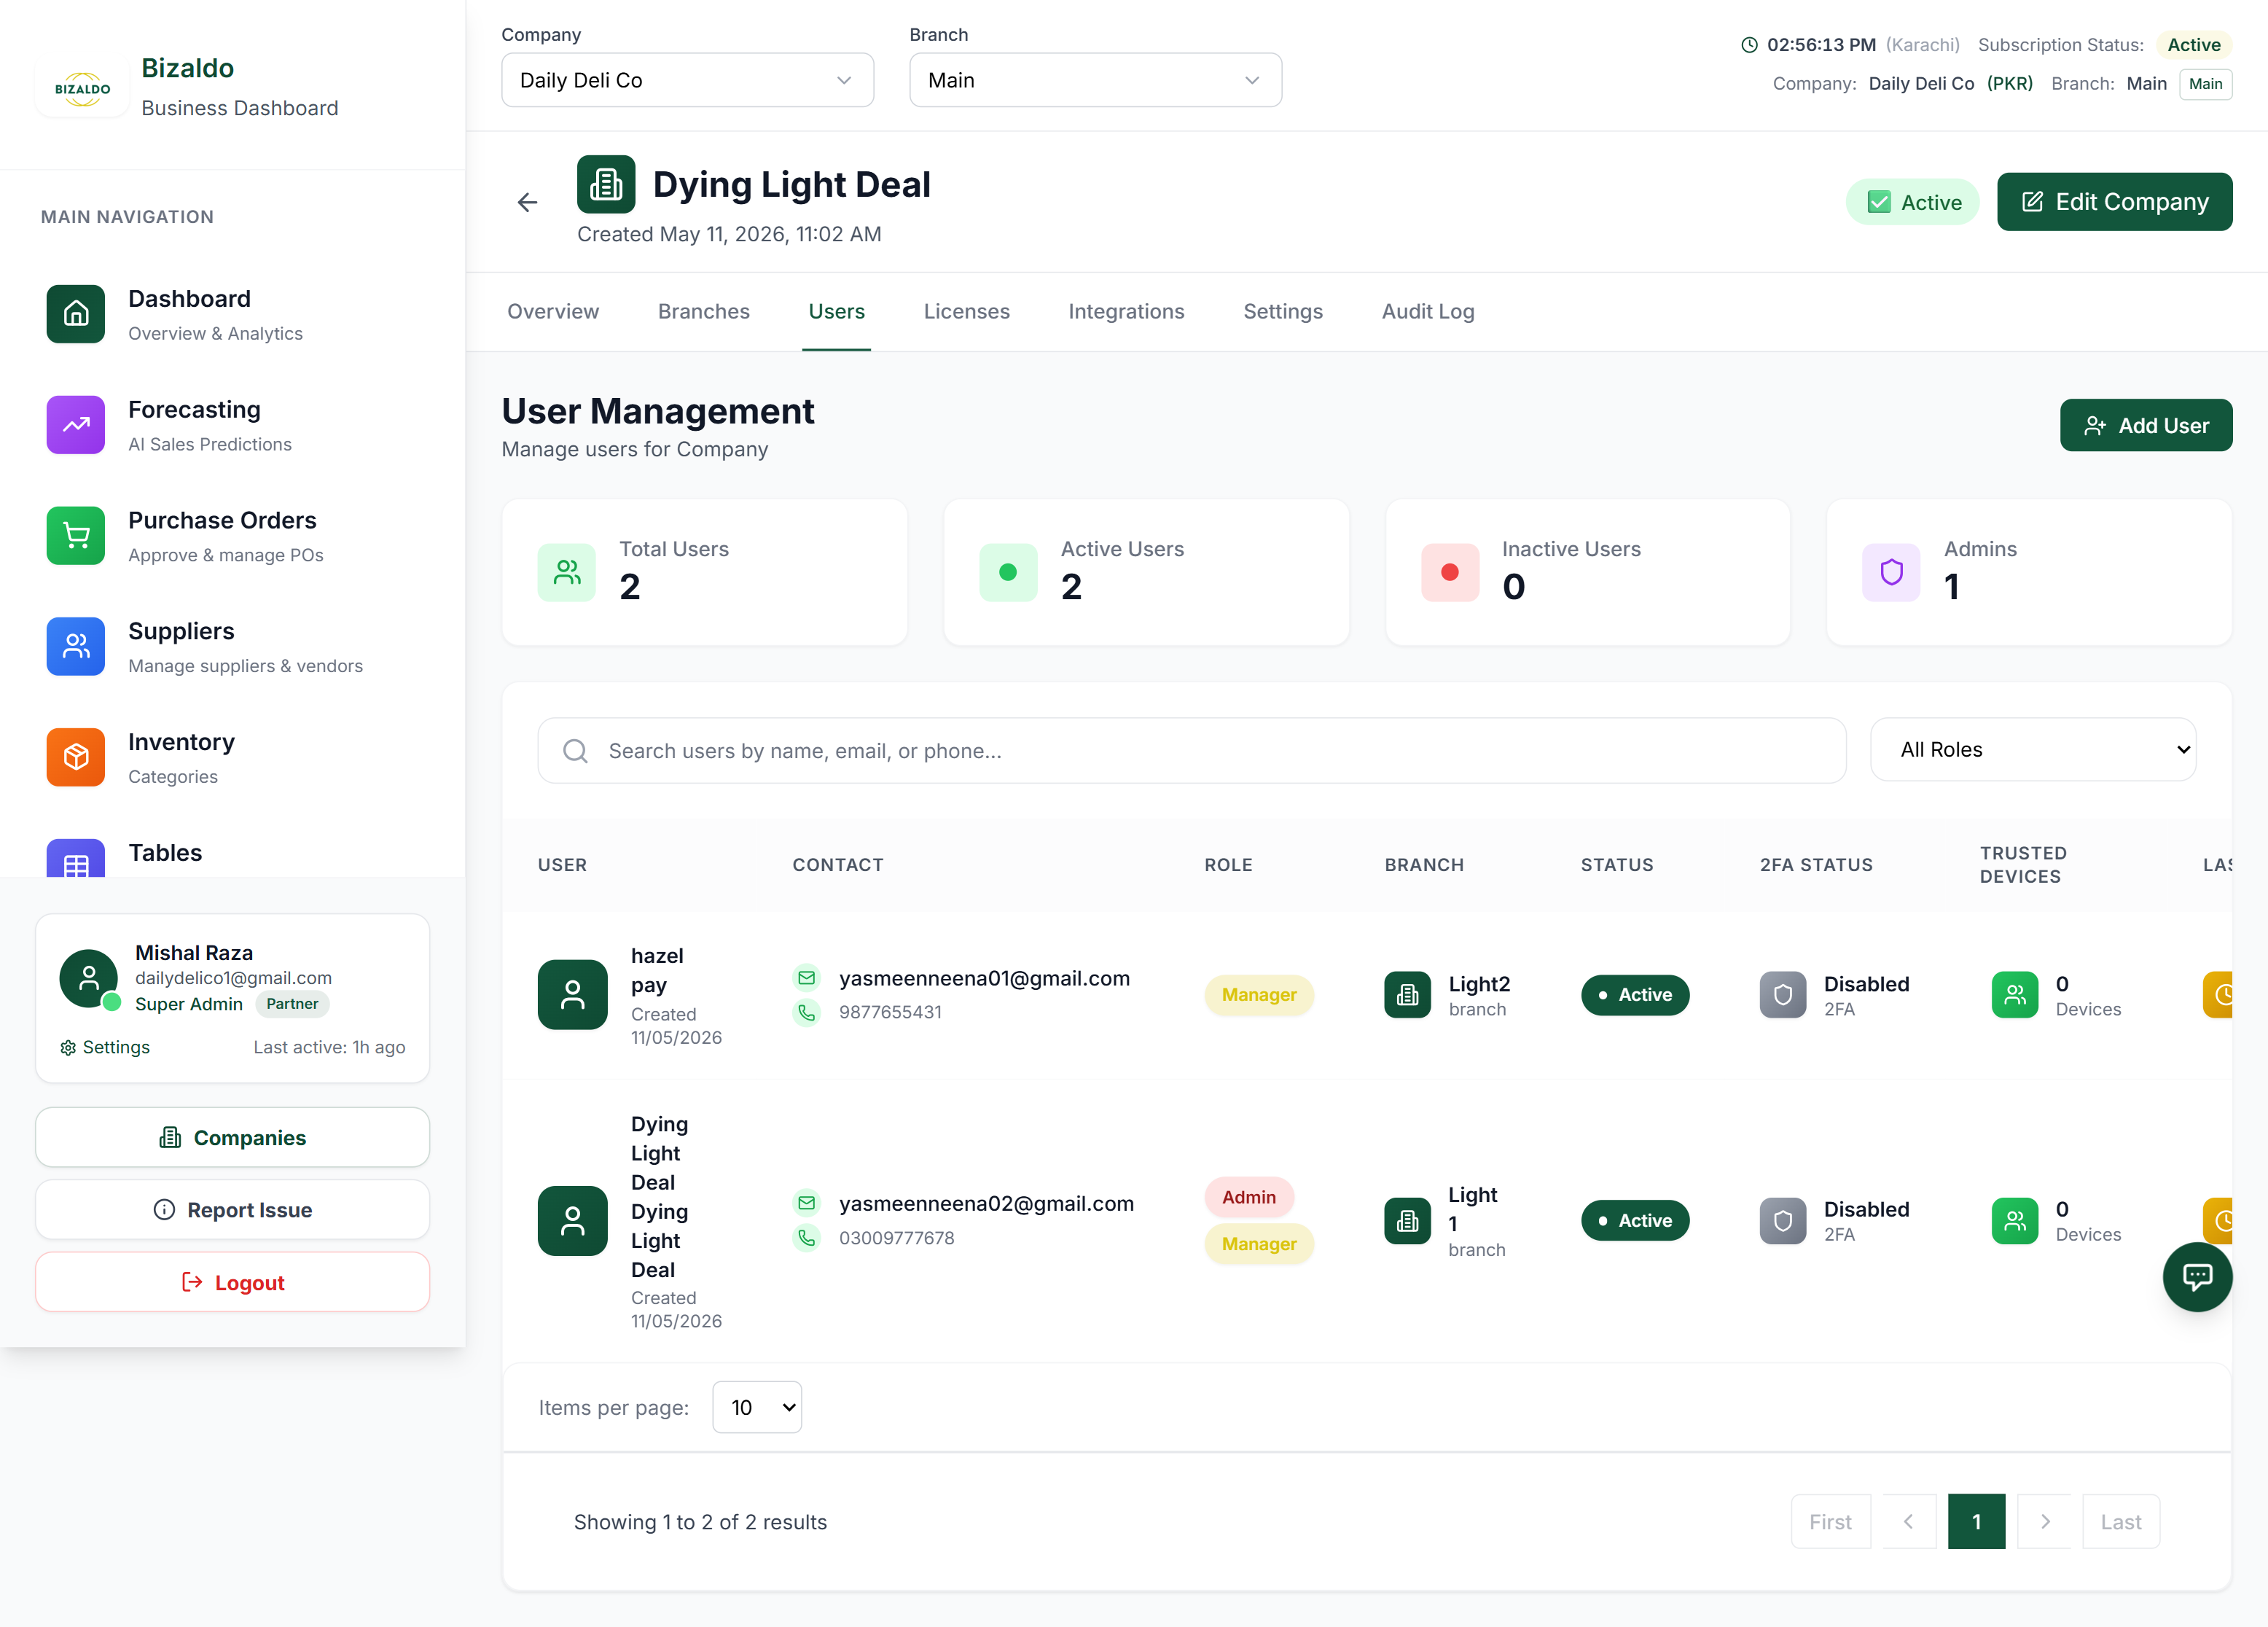 12
12Figure 4 — User accounts, role allocation, and branch assignments.
Screen Elements
Add a new staff member and assign their security credentials.
Shows roles allocated to each user (Admin, Manager, Cashier, Kitchen).
User Invitation Form Fields & Permissions
- Personal Details: `First Name` *(Required)*, `Last Name` *(Required)*, `Email Address` *(Required, unique login)*, `Phone`, and `Password` (with built-in `PasswordStrength` indicator and visibility toggle).
- Status Checkbox: `isActive` (enable or disable account access).
- Location Mapping: `Branch ID` assignment (cashiers and kitchen staff must be assigned to a specific branch).
-
Role Assignment Levels:
- Super Admin — System-wide control.
- Admin — full administrative control over the company's settings, branches, users, and billing.
- Manager — Branch-level control (orders, reporting, branch staff scheduling).
- Cashier — POS transaction entry (register drawer, order creation, refund entry).
- Staff / Kitchen — POS terminal and kitchen display viewing capabilities.
4. Licenses Tab
Manages POS terminal activation slots.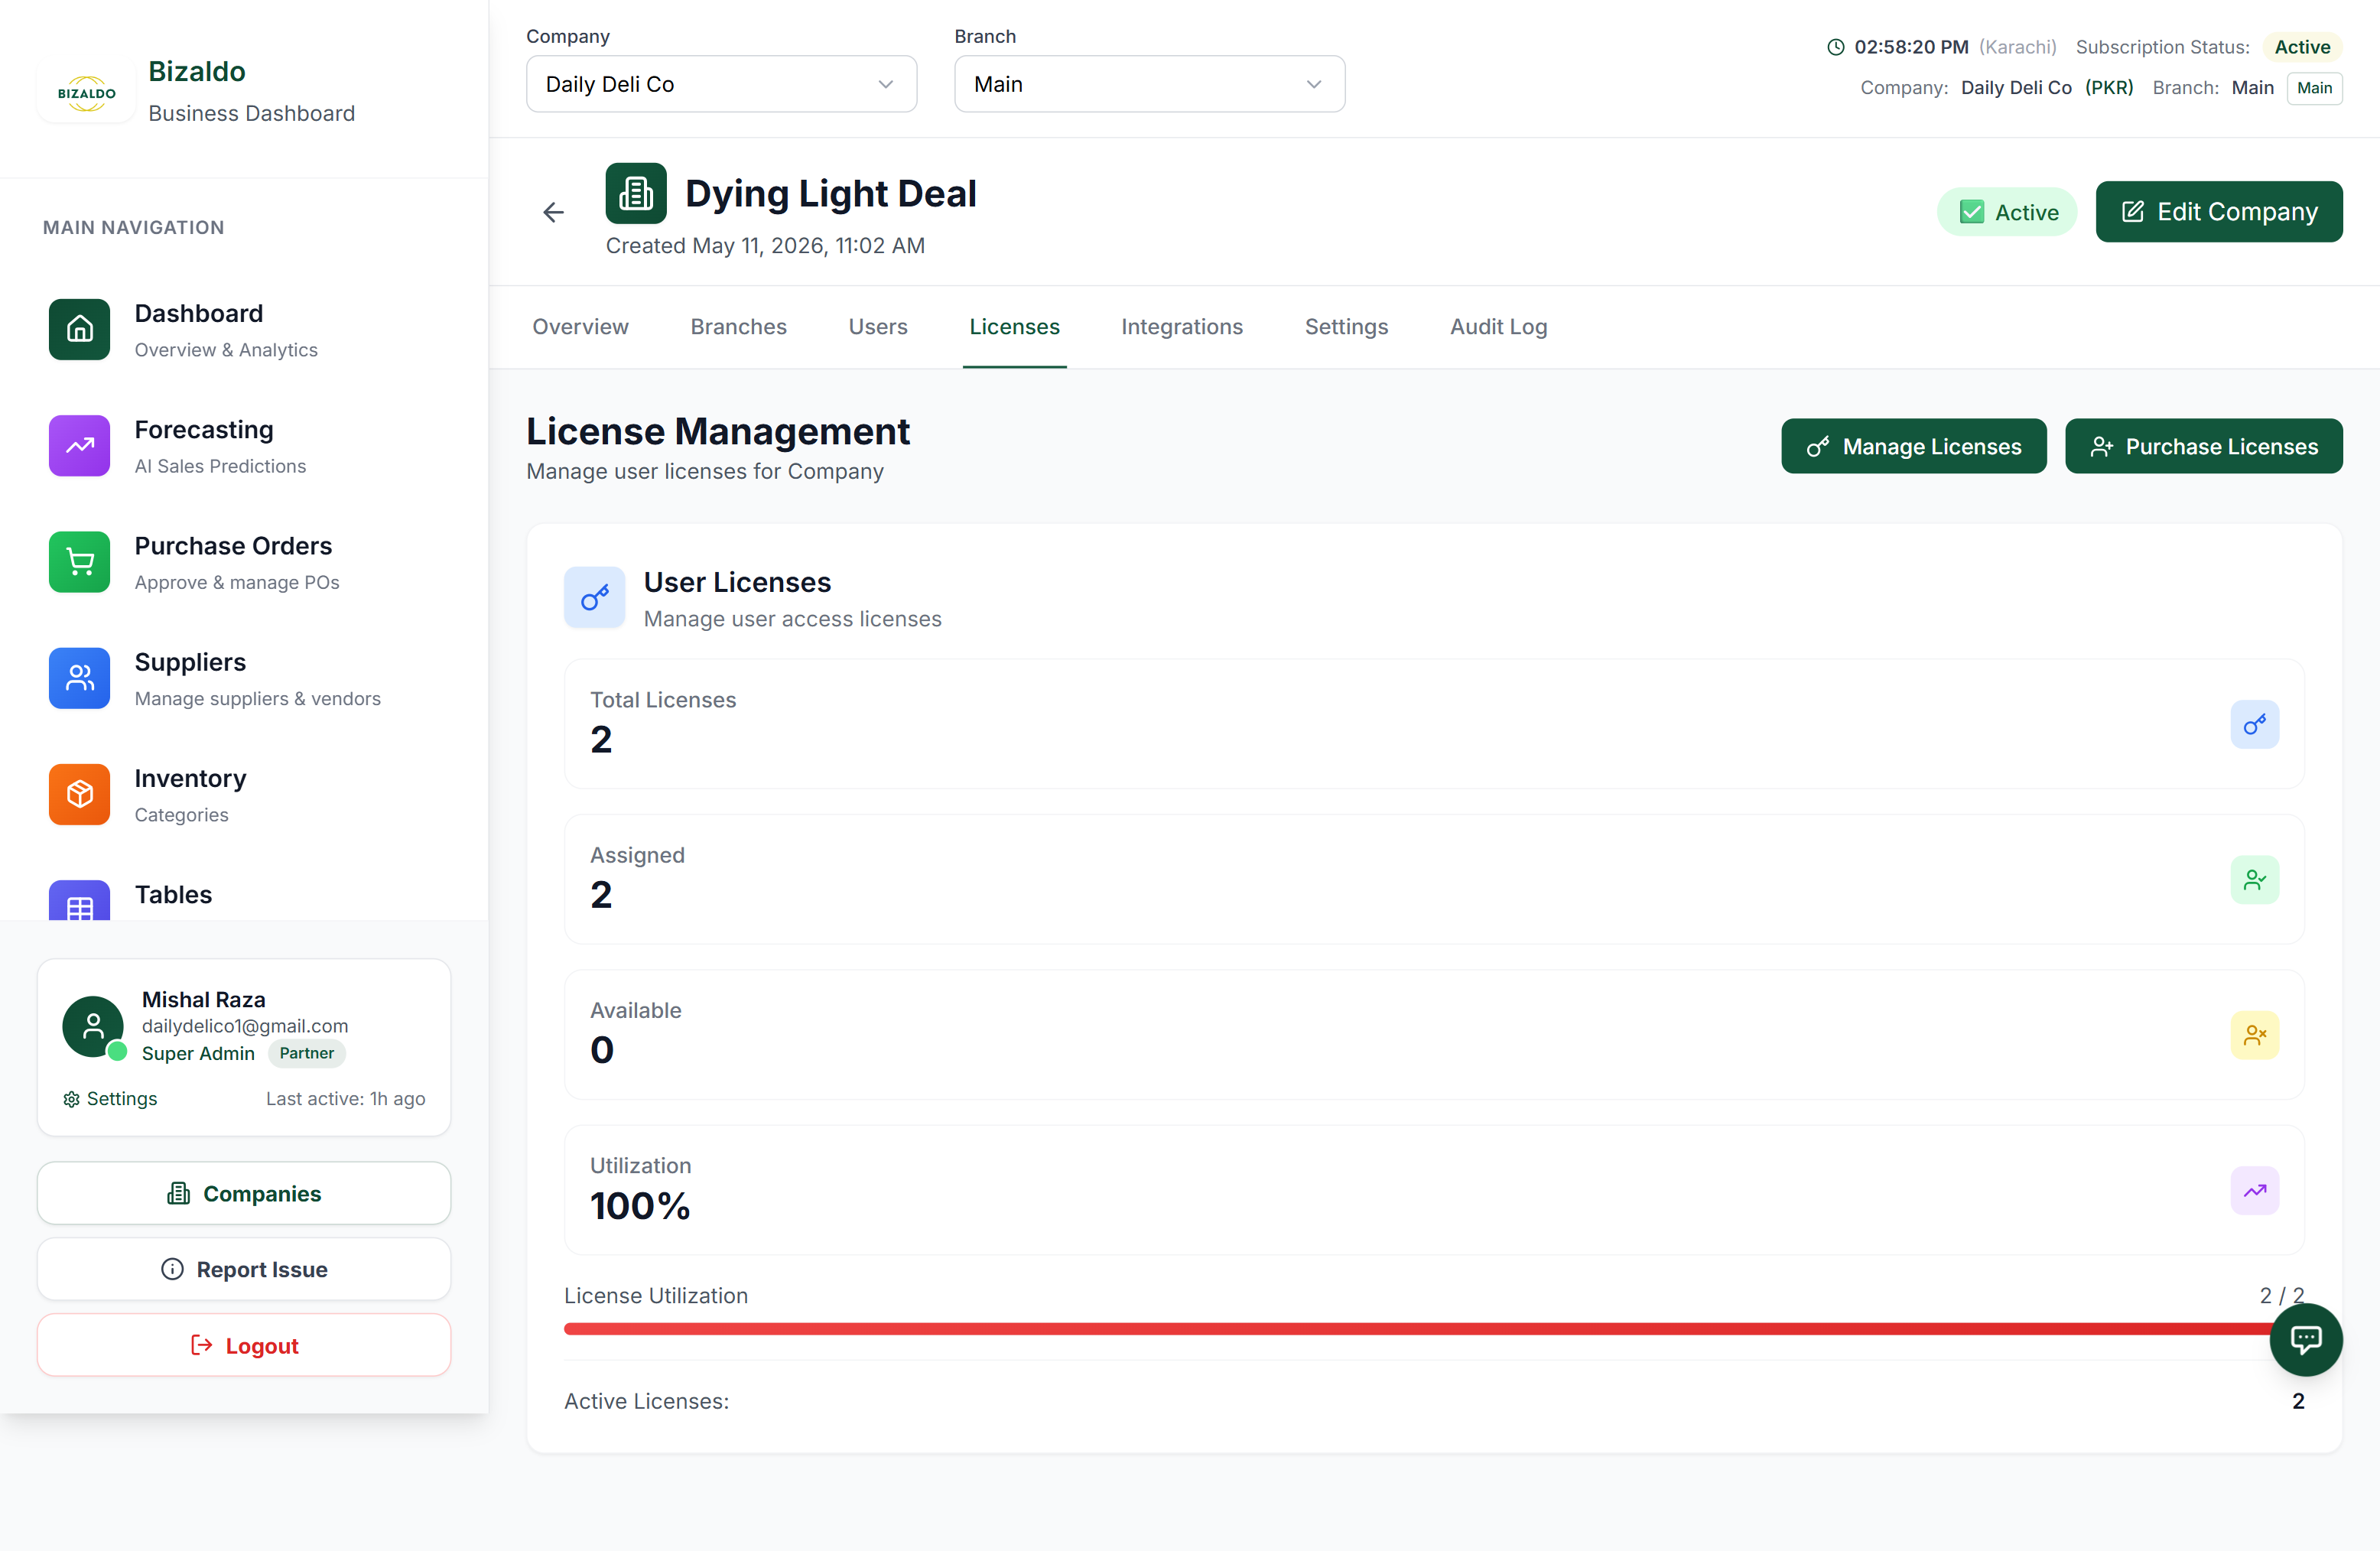 12
12Figure 5 — POS license key slots dashboard.
Screen Elements
Buy new license key slots for POS terminals.
Shows status (Active, Unassigned, Cancelled) and associated user email.
License Key Allocation & Procurement
- Stats Dashboard: Displays total active licenses, assigned terminals, unassigned slots, and cancelled slots.
- License Purchase Modal: Input license quantities (range 1–100) using custom number fields or quick buttons (+1, +5, +10, +25). Warns administrators if available unassigned licenses are low (< 2).
- Assignment Modal: Link a specific license key to an active, unassigned cashier or cashier terminal.
- Revocations: Deactivate and unlink device licenses for lost, broken, or retired terminal hardware.
5. Integrations Tab
Links the company with third-party software tools and APIs.Stripe Configuration
- Stripe Payments Toggle — Enables customer credit card processing on POS terminals.
- Publishable Key & Secret Key — Input fields for Stripe API credentials (includes mask/unmask eye toggle for the secret key).
Jira Integration
- Bug & Ticket Sync Toggle — Links the terminal feedback utility to a Jira backlog.
- Jira Credentials — Input fields for `Jira Base URL`, `Project Key`, `Auth Email`, `API Token` (secured/hidden), and `Issue Type Name` (e.g., Bug, Task).
6. Settings Tab
Allows configuring payment structures, risk blacklists, and subscription billing.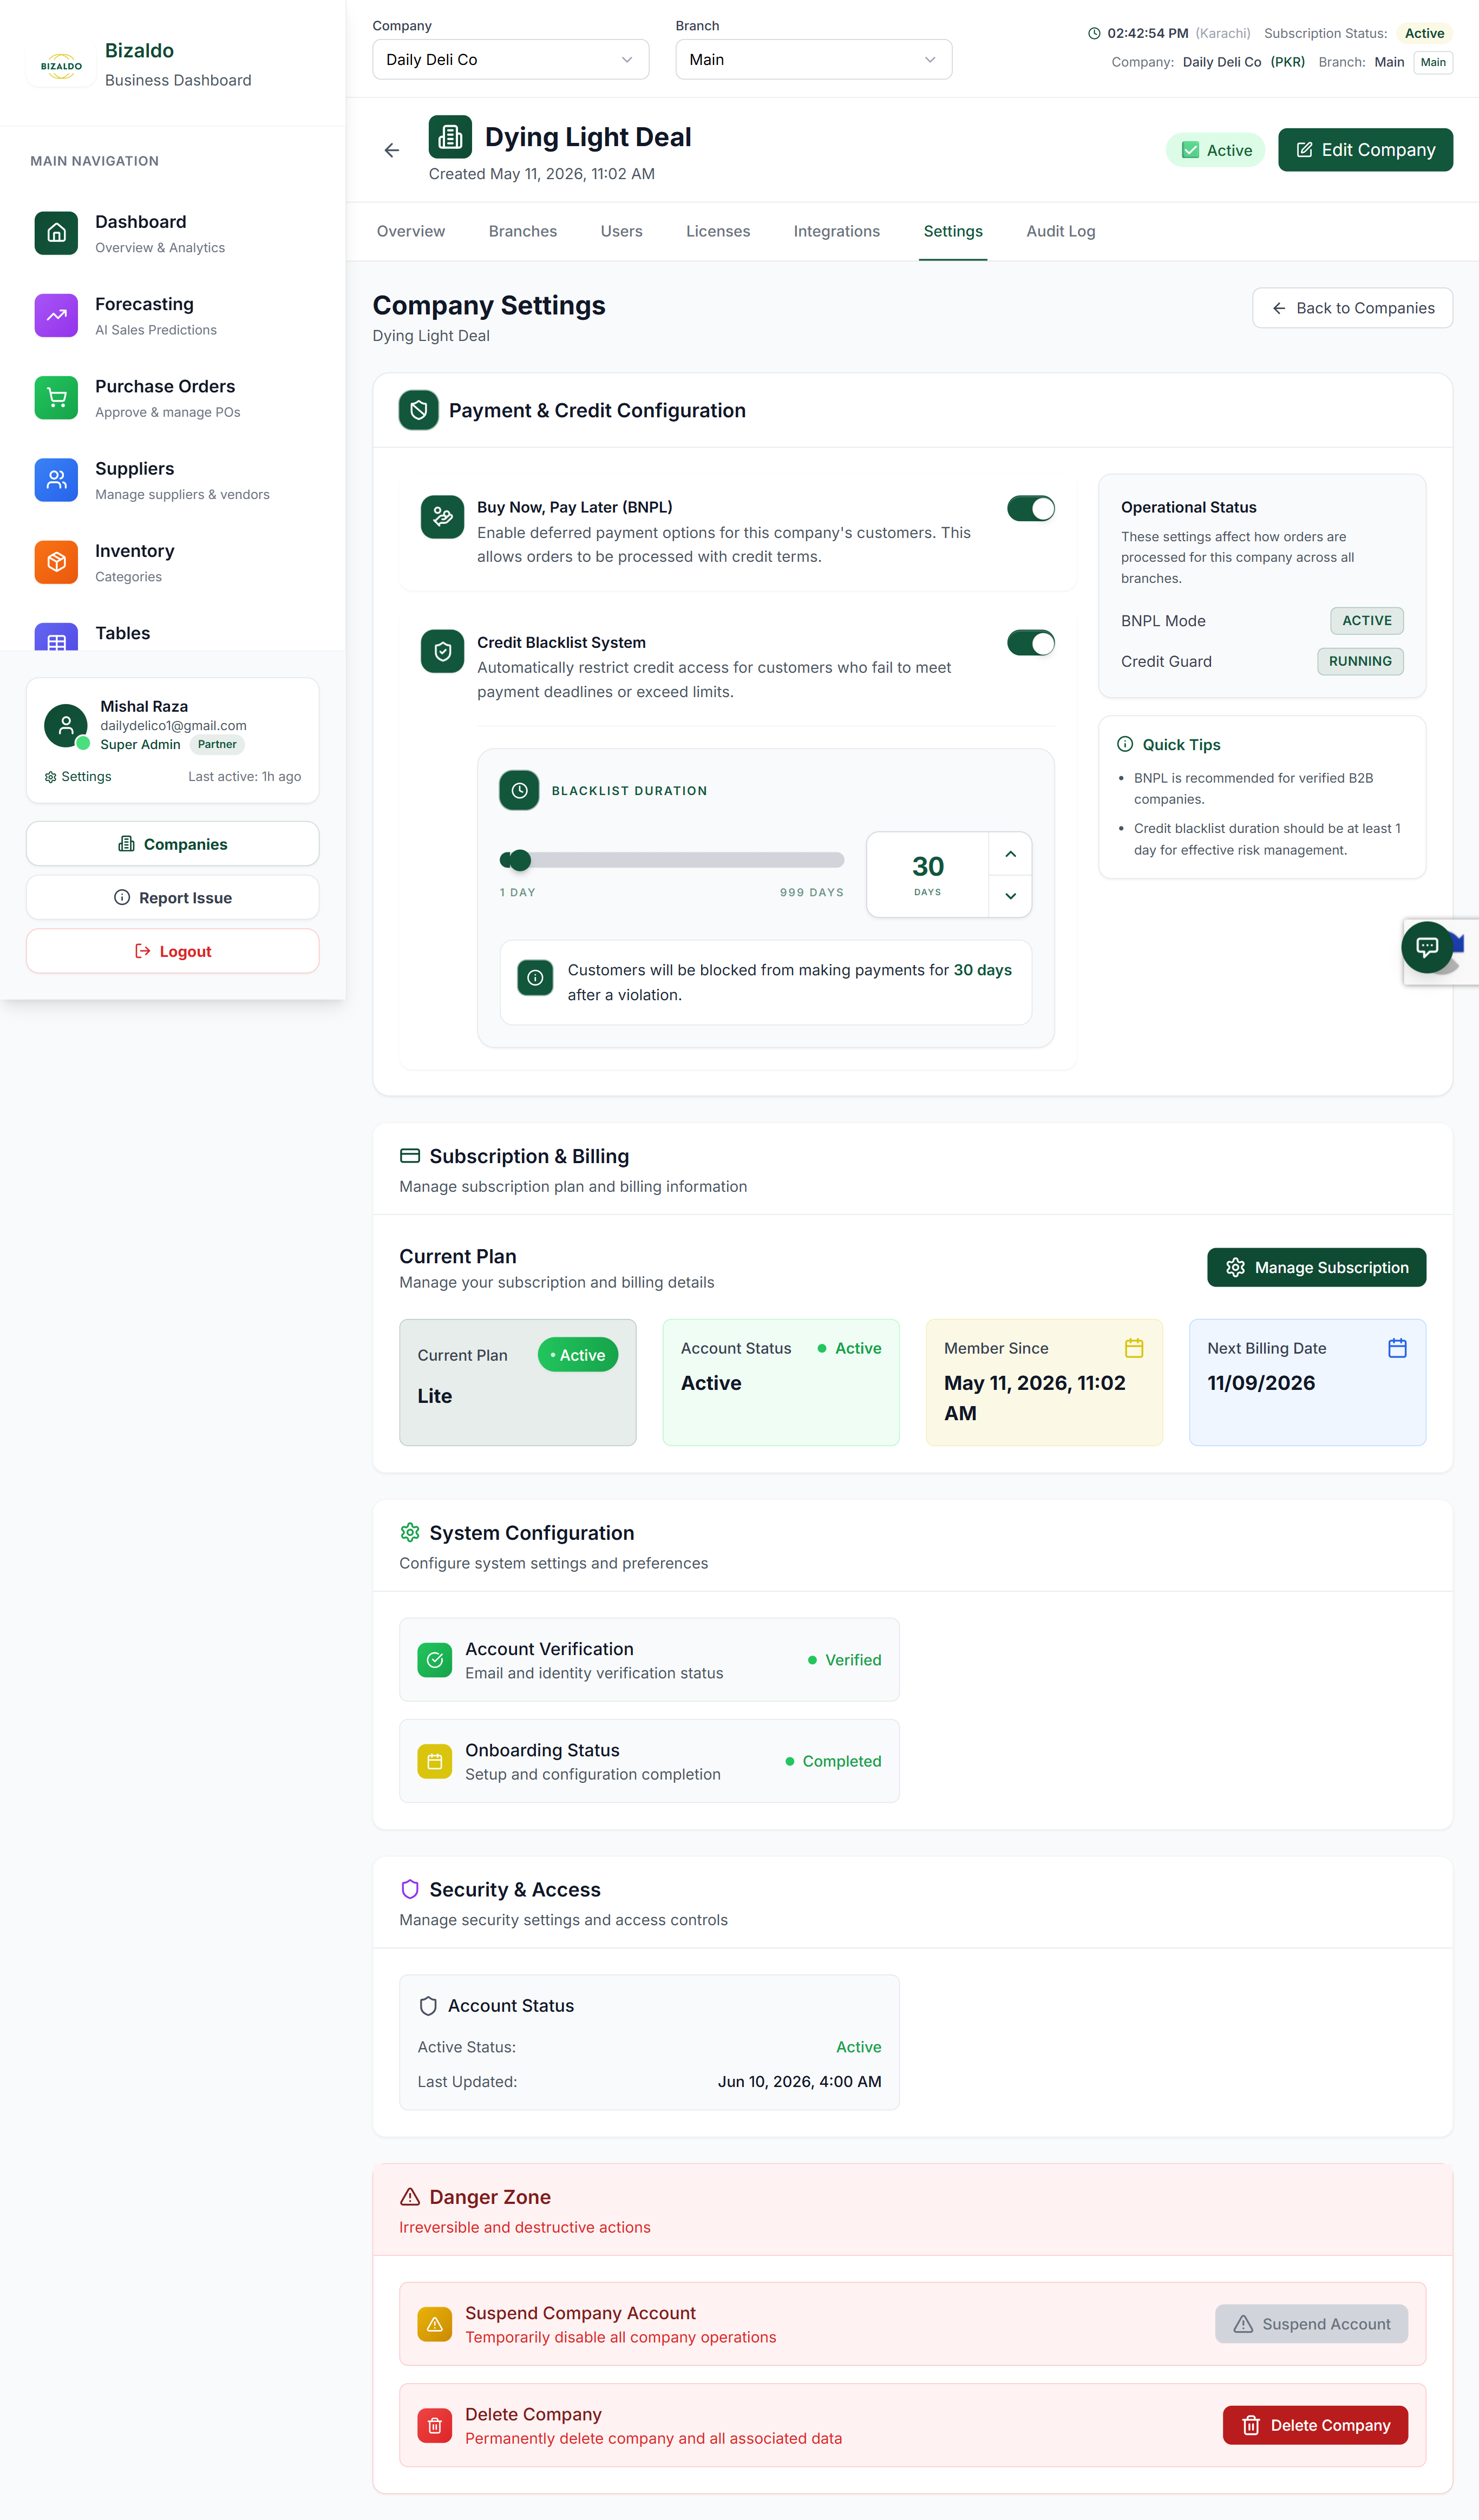
Figure 6 — Company Settings tab detailing payment & credit, operational status, and subscription parameters.
Screen Elements
Returns to the company picker so you can switch to another entity or branch.
Company Settings title and subtitle showing the active company name being edited.
Section heading for the card grouping BNPL and credit blacklist controls.
Toggle ON/OFF — when enabled, customers can use deferred payment. Affects the Loaned (BNPL) metric in POS Reports.
Toggle ON/OFF — Credit Guard automation to restrict credit for blocked customers. OFF means the guard is stopped.
Badges such as BNPL Mode: ACTIVE and Credit Guard: STOPPED — mirrors the toggles for at-a-glance confirmation.
In-context guidance on BNPL and blacklist behavior, e.g. duration and policy hints.
Current Plan (e.g. Lite Plus), Account Status, Member Since, Next Billing Date, and Manage Subscription button.
7. Audit History Tab
Displays a chronological record of configuration changes made within the company profile.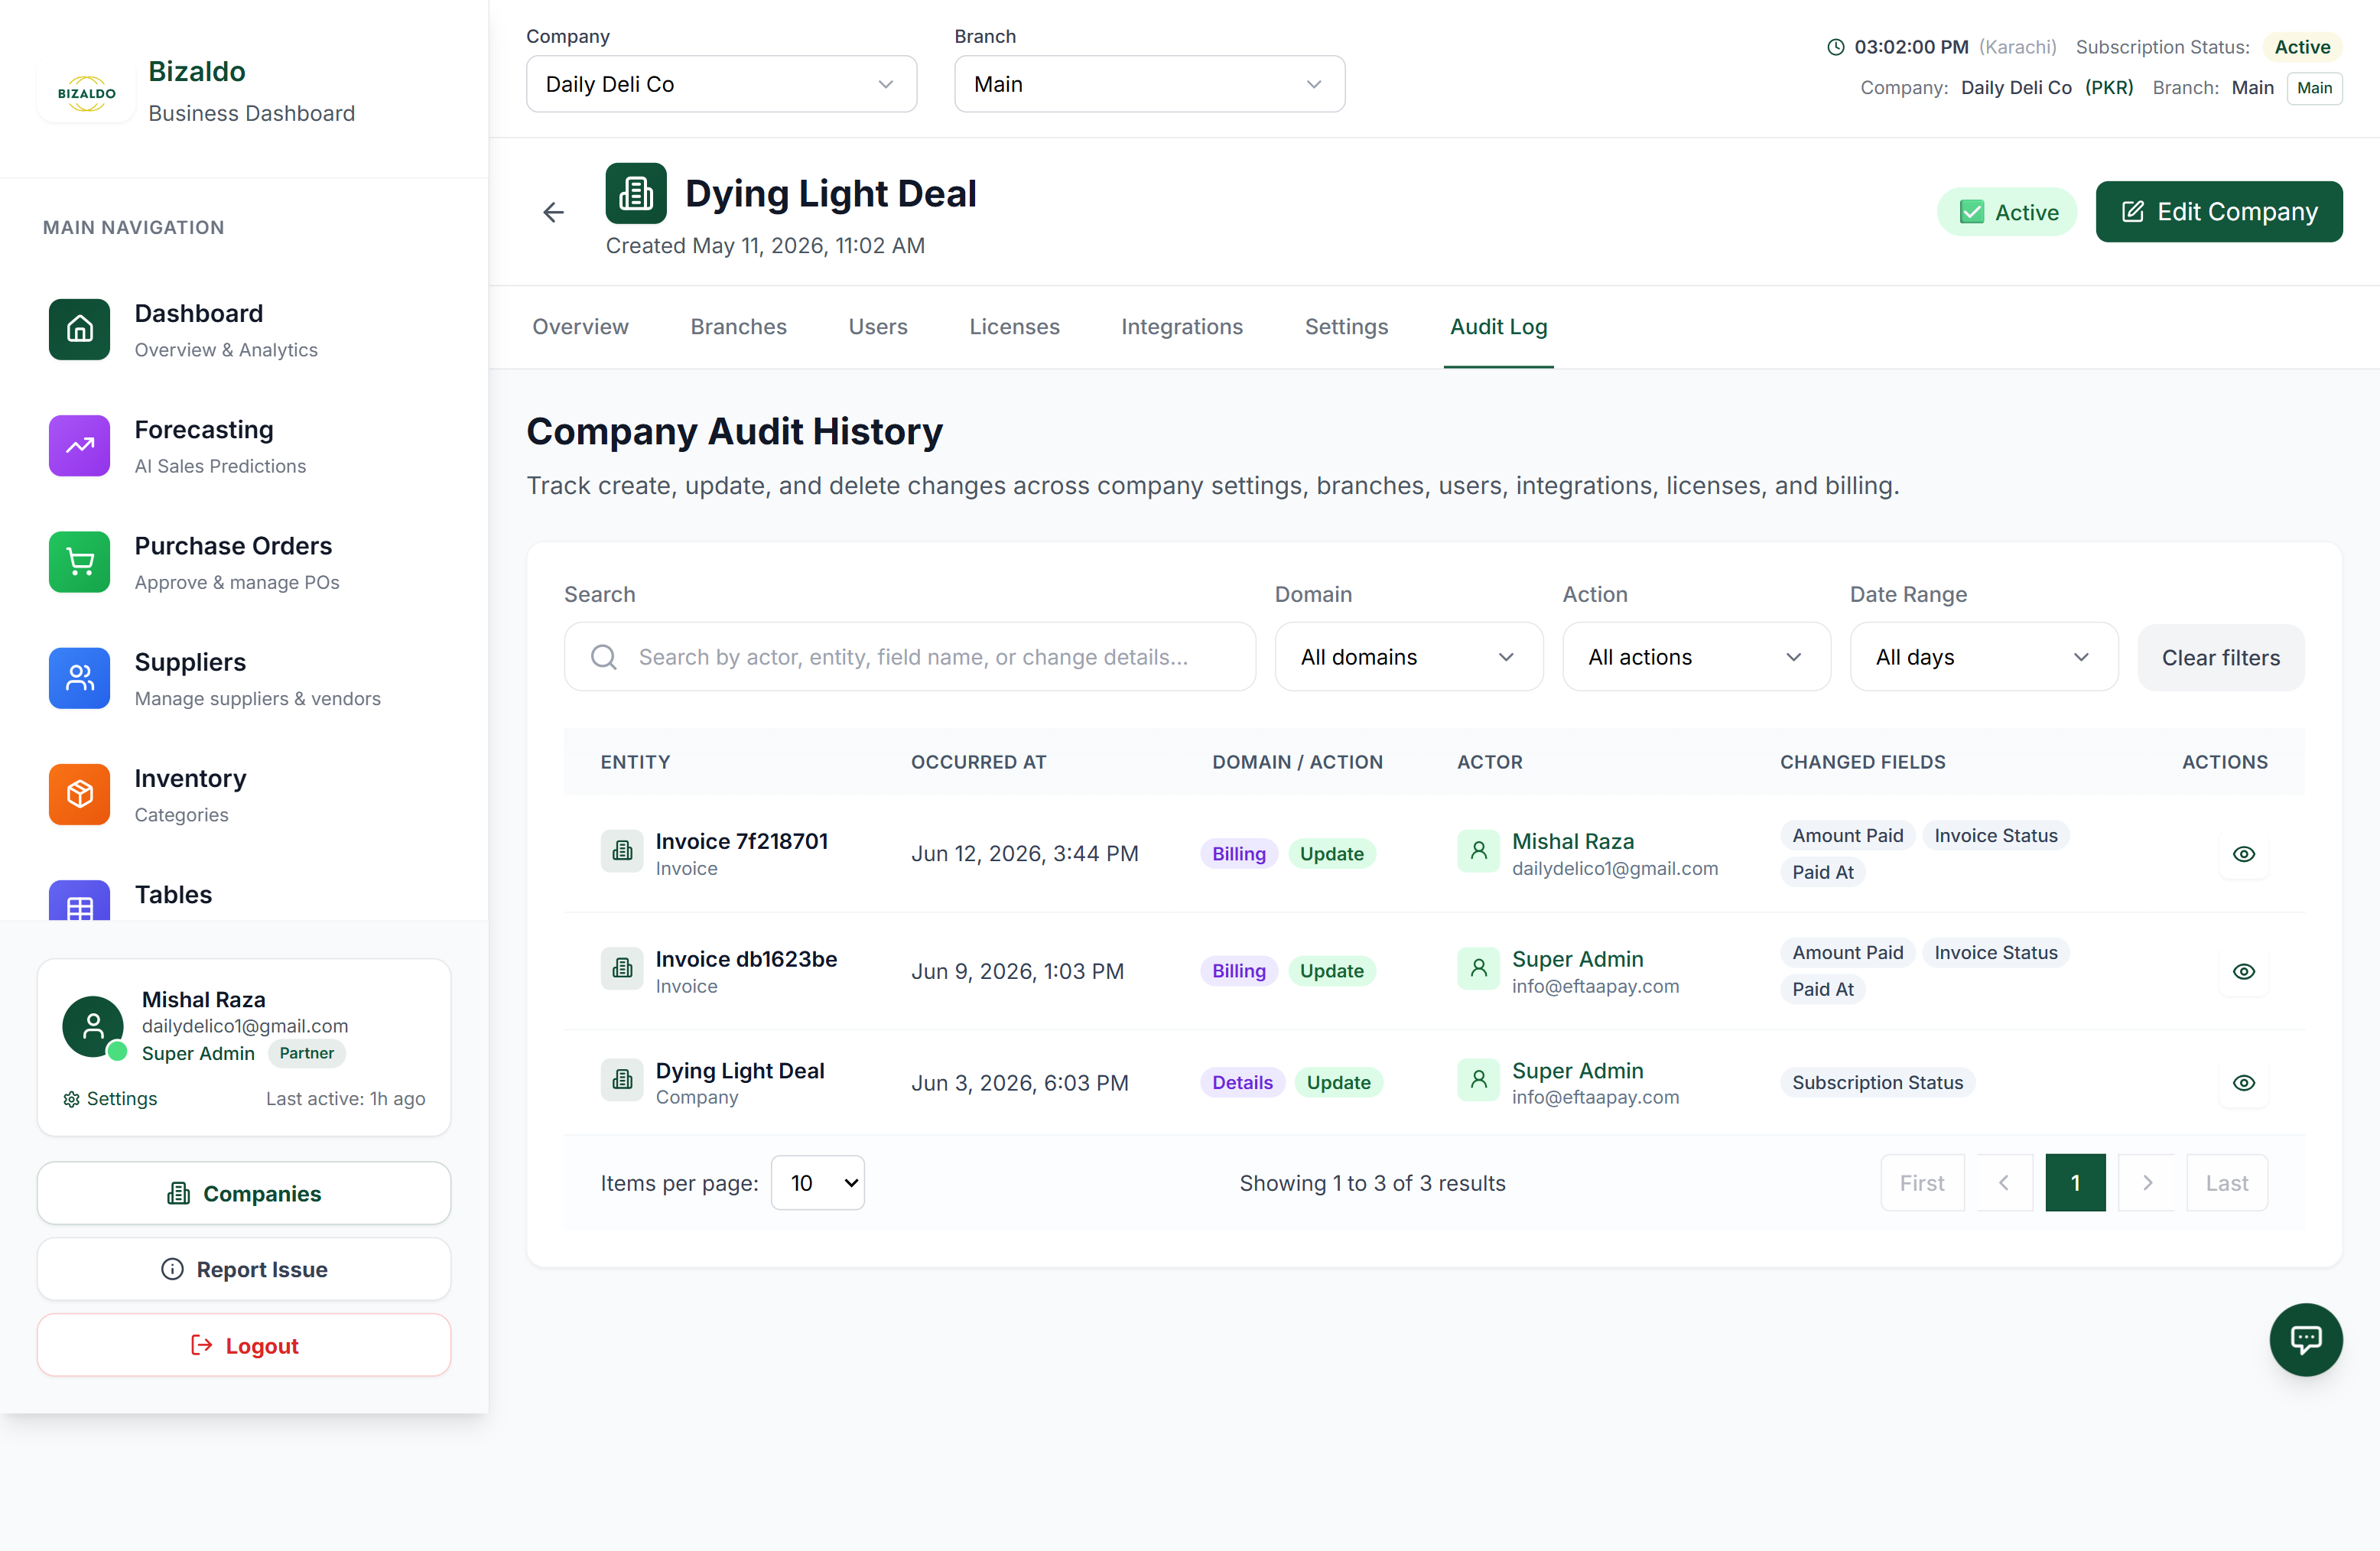 12345
12345Figure 7 — Chronological change logs with search, domain, action, and date filtering.
Screen Elements
Search logs by administrator name, entity ID, or specific fields modified.
Filter change logs by system domain (e.g., billing, products, users) or action types (update, create, delete).
Restrict logs to specific time periods, such as Today, Yesterday, This Week, or custom ranges.
Chronological table displaying entity details, timestamp, category, actor, and list of changed fields.
Click the eye icon to open the comparison modal, showing side-by-side previous and new property values.
- Filter Logs: Use date ranges (All Days, Today, Yesterday, This Week, This Month, Last Month) and domain filters (e.g., product, category, stock).
- Search Logs: Search by administrator name or specific action keywords.
- Analyze Logs: Expand any log row to open the comparison modal, detailing exactly which properties were modified along with their previous and new values.
Related Documentation
- Company Settings — Billing details and system setup toggles.
- Customer Management — Detailed guides on customer directories and credit blacklists.
- Getting Started — Account setup and branch setup guidelines.