API Keys & Webhooks
API Keys and Webhooks let you connect Bizaldo to external systems for ERP sync, custom dashboards, inventory automation, or internal tooling without sharing staff login credentials.Where to find it: In the Bizaldo dashboard sidebar, open Settings. Use the API Keys tab to create keys and the Webhooks tab to register endpoints. The General section at the top of Settings shows your current Company ID and Branch ID, which many integrations need alongside the key.
Who can manage integrations
Only users with the Admin or Super Admin role see the API Keys and Webhooks tabs. Other roles (Manager, Cashier, Staff) can use Settings for profile and order-page options but cannot create or revoke keys.Company and branch
API keys and webhooks are created for the company and branch selected in the dashboard header at the time you create them. Select the correct company and branch before creating credentials. Copy Company ID and Branch ID from Settings → General when configuring your integration.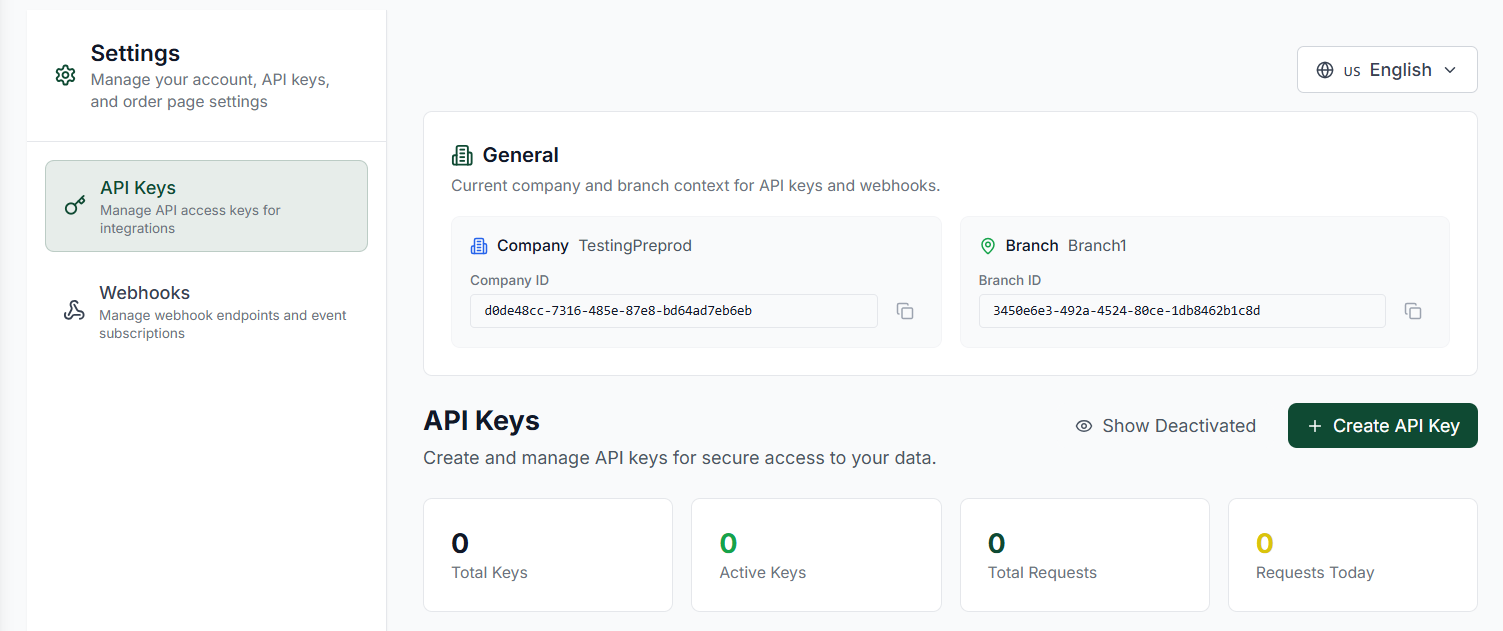 12345
12345Figure 1 — Settings API Keys tab with company and branch IDs
Screen Elements
Open Settings and select API Keys to manage integration credentials.
Copy the company ID for your integration. Matches the company selected in the dashboard header.
Copy the branch ID for your integration. Matches the branch selected in the dashboard header.
Start the key creation flow.
Total keys, active keys, total requests, and requests today.
API keys
What an API key contains
Each API key has:| Field | Description |
|---|---|
| Name | Human-readable label (minimum 3 characters), e.g. `Production ERP` |
| Description | Optional note about what the integration does |
| Public key | Identifier you can reference in logs; always visible in the dashboard |
| Secret key | Credential used to authenticate API requests; masked by default, reveal with the eye icon |
| Permissions | Fine-grained scopes (see below) |
| Usage stats | Total requests and last-used timestamp |
Creating an API key
- Sign in with an Admin or Super Admin account.
- Select the correct company and branch in the dashboard header.
- Go to Settings → API Keys.
- Click Create API Key.
- Enter a name (at least 3 characters) and optional description.
- Select permissions. Grant only what the integration needs (least privilege).
- Click Create Key.
- Copy the public key and secret key immediately. Store the secret in a password manager or environment variable (e.g. `BIZALDO_API_SECRET`). Never commit secrets to source control or embed them in client-side code.
 1234
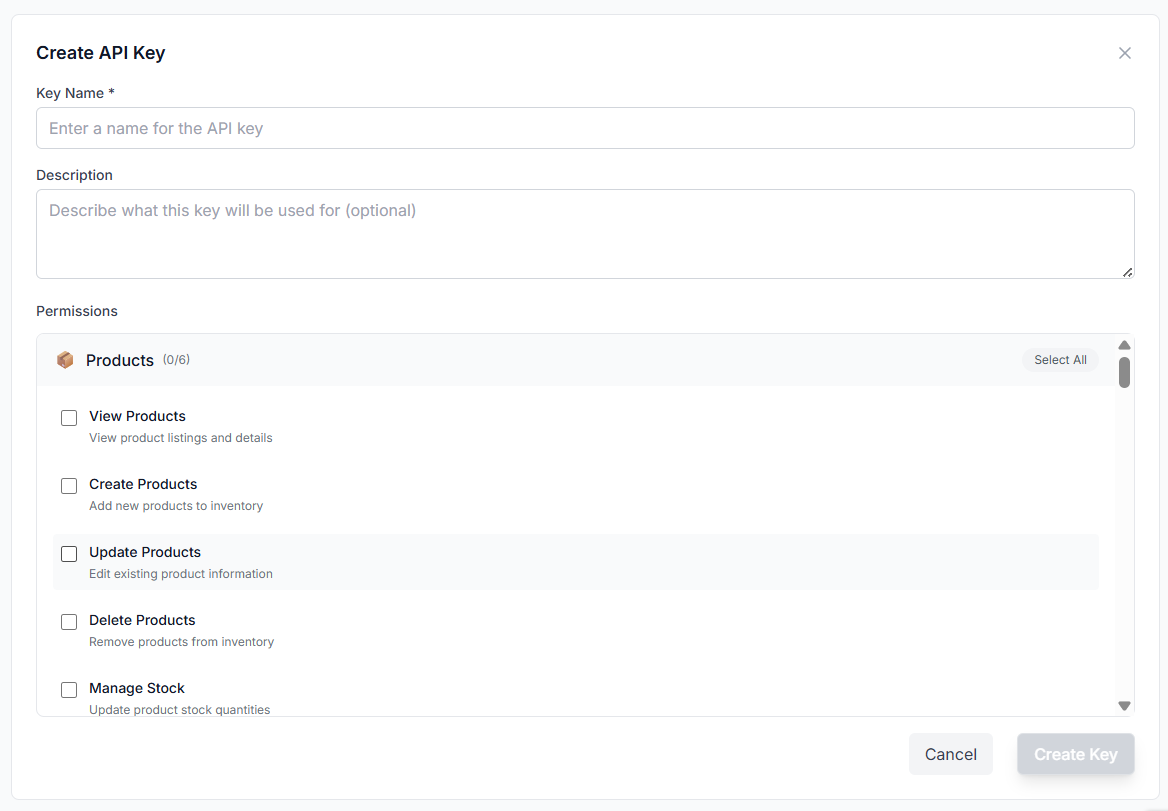
1234Figure 2 — Create API Key: name, description, and permission scopes
Screen Elements
Required label for the key (minimum 3 characters).
Optional note describing what this integration does.
Select scopes by entity group. Grant only what the integration needs.
Generate the public and secret key pair.
Available permissions
Permissions are grouped by entity. Toggle an entire group or individual scopes:| Entity | Permissions |
|---|---|
| Products | View, Create, Update, Delete, Manage Stock, Manage Pricing |
| Categories | View, Create, Update, Delete, Manage Hierarchy |
| Orders | View, Create, Update, Delete, Manage Status, Process Payments, Manage Refunds |
| Tables *(restaurant only)* | View, Create, Update, Delete, Manage Reservations, Manage Status |
| Bookings *(restaurant only)* | View, Create, Update, Delete |
| Customer | View, Create |
| Rewards | View, Create, Update, Delete, Manage Points, Manage Redemptions |
| Users | View, Create, Update, Delete, Manage Roles, Manage Access |
| Inventory | View |
| Reports & Analytics | View, Export, Create Custom Reports, Manage Scheduled Reports |
| System Settings | View, Update, Manage Integrations, Manage API Keys |
Restaurant companies also see Tables and Bookings permission groups. Retail and other industries do not.
Using an API key
Send server-to-server requests to the Bizaldo Open API server using your secret key:Include the company and branch from your dashboard selection:GET /api/v1/products HTTP/1.1 Host: openapi.bizaldo.com Authorization: Bearer YOUR_SECRET_KEY Content-Type: application/json
Typical use cases:x-company-id: YOUR_COMPANY_ID x-branch-id: YOUR_BRANCH_ID
- Catalog sync: Pull or push products and categories
- Inventory automation: React to stock level changes
- Custom reporting: Build reports from your branch data
- Nightly exports: Pull completed orders into accounting tools
Managing existing keys
| Action | Effect |
|---|---|
| Copy public / secret | Use the copy icon next to each key field |
| Show / hide secret | Eye icon toggles visibility |
| Regenerate secret | Creates a new secret; the old one stops working immediately. Update your integration before revoking the old secret. |
| Deactivate | Key becomes inactive; API calls with that secret fail |
| Activate | Re-enables a previously deactivated key |
| Show deactivated | Toggle to list inactive keys for audit |
Rotate keys safely
Webhooks
Webhooks push HTTP notifications to your server when Bizaldo events occur, so you do not need to poll the API.Supported events
The dashboard lets you subscribe to these event types (same set for restaurant, retail, and default industries):| Event | When it fires |
|---|---|
product.created | A new product is added |
product.updated | Product details are changed |
product.deleted | A product is removed |
product.stock_updated | Stock levels change |
category.created | A new category is added |
category.updated | Category details are changed |
category.deleted | A category is removed |
Select one or more events when registering or editing a webhook. At least one event is required.
Registering a webhook
- Select the correct company and branch in the dashboard header.
- Go to Settings → Webhooks.
- Click Register Webhook.
- Fill in the form:
| Field | Required | Notes |
|---|---|---|
| Endpoint URL | Yes | Public HTTPS URL, e.g. `https://your-server.com/webhooks/bizaldo` |
| Description | No | Helps identify the endpoint later |
| API Key | Your chosen secret string used to verify incoming payloads. On edit, leave blank to keep the existing key. | |
| Events | Yes | One or more from the table above |
- Click Register Webhook.
 12345
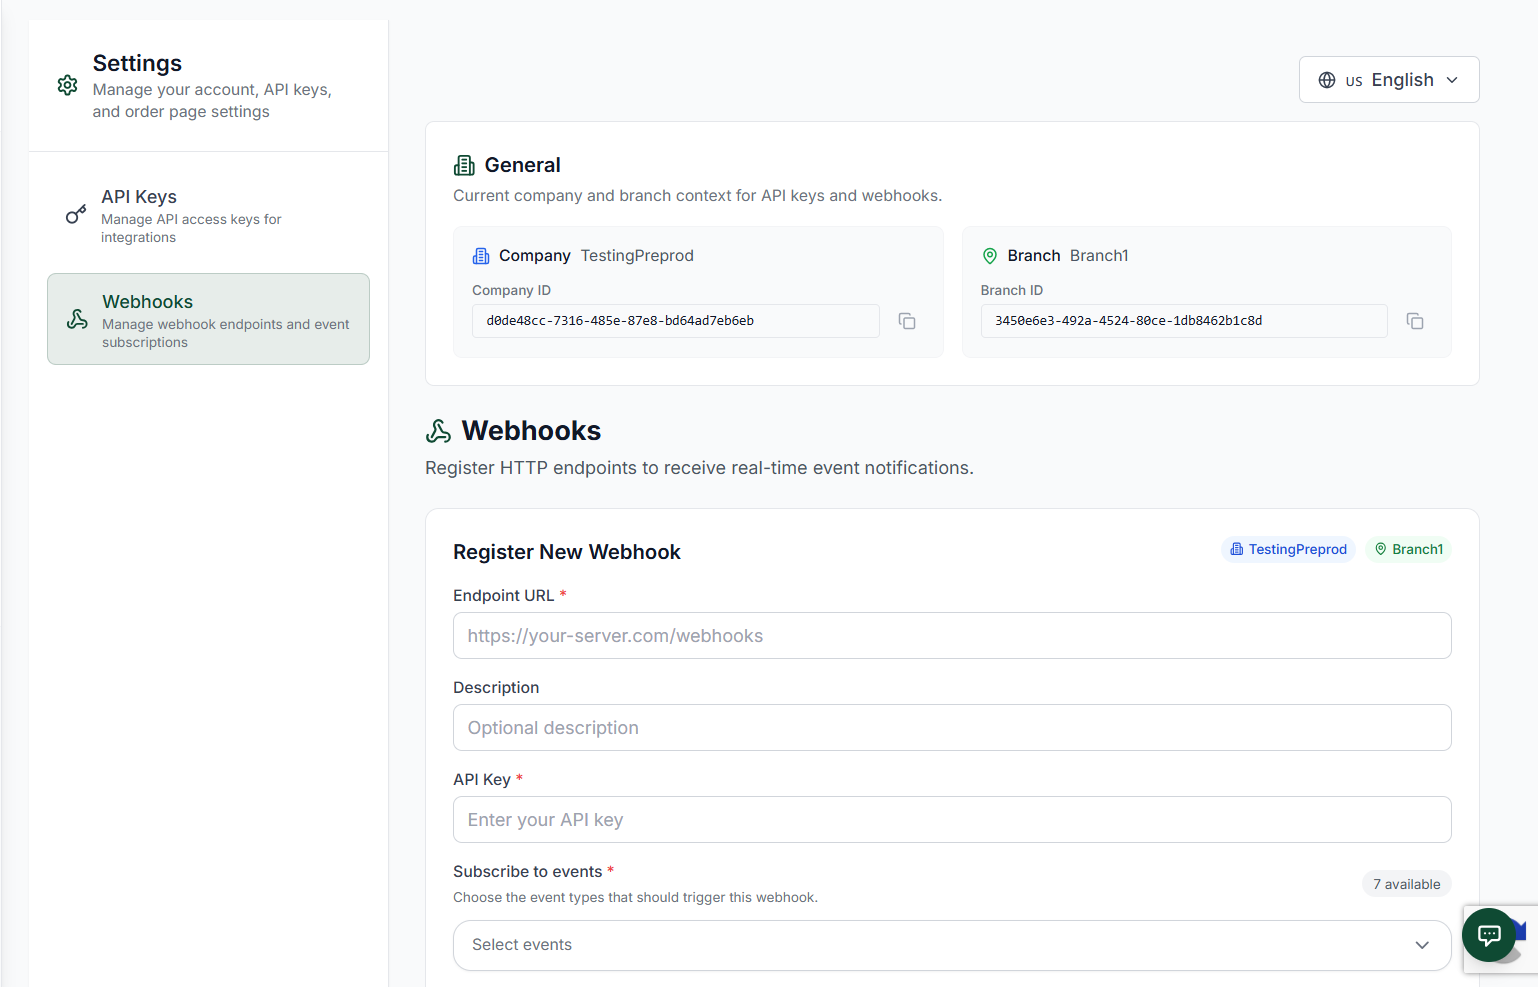
12345Figure 3 — Register a webhook endpoint and subscribe to events
Screen Elements
Switch from API Keys to Webhooks in Settings.
Current company and branch context for the webhook being registered.
Public HTTPS URL that receives event POST requests.
Secret string used to verify incoming webhook payloads.
Choose one or more event types to receive.
After registration, Bizaldo displays a signing secret in a yellow banner: "API Key - Save this now!" This value is shown only once. Copy it before closing the banner.Use this secret to verify the `X-Bizaldo-Signature` header on every incoming webhook request.
Verifying webhook signatures
Each delivery includes an `X-Bizaldo-Signature` header. Compute an HMAC of the raw request body using your signing secret and compare it to the header value. Reject requests that do not match. Your endpoint should:- Respond with 2xx within a few seconds
- Be idempotent. The same event may be delivered more than once; deduplicate using event ID if provided in the payload
- Use HTTPS in production
Managing webhooks
The Registered Webhooks list shows each endpoint with:- URL and description
- Subscribed events
- Active / Inactive status
- Created date
| Action | Description |
|---|---|
| Edit | Change URL, description, events, or API key |
| Delivery history | View the last 100 delivery attempts (event name, HTTP status, attempt number, timestamp) |
| Delete | Removes the webhook and its delivery history; events stop being sent |
Local development
For local testing, expose your machine with a tunnel (ngrok, Cloudflare Tunnel, etc.) and register the tunnel HTTPS URL as the webhook endpoint. Use delivery history in the dashboard to debug failed attempts.Security best practices
- Issue separate keys per environment (staging vs production) and per integration.
- Apply least-privilege permissions. A read-only catalog sync does not need `orders:delete`.
- Restrict webhook URLs to HTTPS and validate `X-Bizaldo-Signature` on every request.
- Do not expose API secrets in browser JavaScript, mobile apps, or public repositories.
- Enable two-factor authentication on admin accounts that can manage keys.
- If a secret is compromised, regenerate or deactivate the key immediately and review recent usage stats.
Related documentation
- Company Settings — Company profile, branches, and billing
- Order Management — Order lifecycle (separate from current webhook event catalog)
- Platform Overview — Bizaldo architecture and apps
- FAQ — Common integration questions